DHCP, abbreviation of Dynamic Host Control Protocol, is a network protocol that assigns IP addresses automatically to client systems in the network. This reduces the tedious task of manually assigning IP addresses in a large network that has hundreds of systems. We can define the IP range (Scopes) in the DHCP server, and distribute them across the network. The client systems in the network will automatically get the IP address.
In this tutorial, we will see how to install DHCP server in Ubuntu 16.04 LTS server, and configure the DHCP clients.
Table of Contents
Install DHCP Server in Ubuntu 16.04 LTS server
For the purpose of this tutorial, I will be using the following system as DHCP server.
My DHCP Server:
- OS - Ubuntu 16.04 LTS 64 bit
- IP Address - 192.168.1.105/24
- Hostname - ubuntuserver.ostechnix.lan
Open Terminal and run the following command to install DHCP server:
sudo apt-get install isc-dhcp-server
DHCP server has been installed. Now, let us go further and configure it to suit our needs.
Configure DHCP server
The default configuration file of DHCP server is /etc/default/isc-dhcp-server. We need to edit and modify it as per our requirements.
If you have more than one Network interface card in your DHCP server, you need to mention on which interface should the DHCP server serve DHCP requests.
As I have only one NIC in my server, I assigned 'enp0s3' as the listening interface. Here, enp0s3 is network card's name.
To do so, edit /etc/default/isc-dhcp-server configuration file:
sudo vi /etc/default/isc-dhcp-server
Assign the network interface:
[...]
INTERFACES="enp0s3"
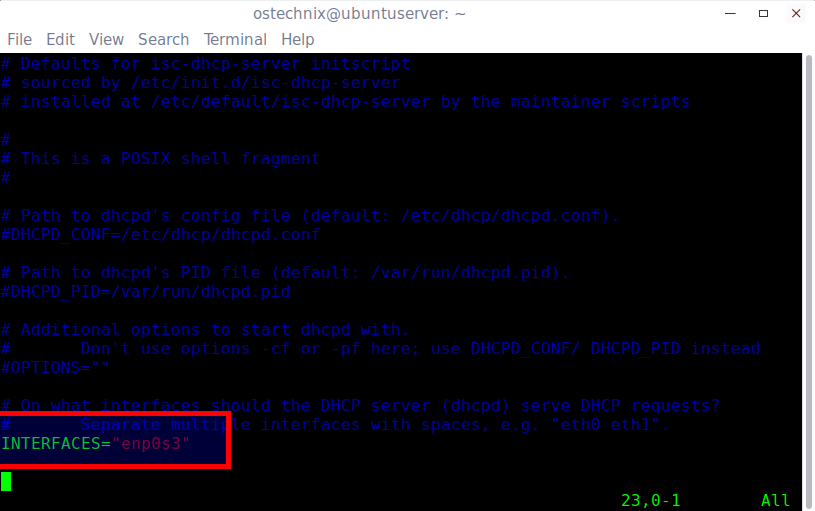
If you have more than one interfaces, mention them with spaces, for example "eth0 eth1".
Save and close the file.
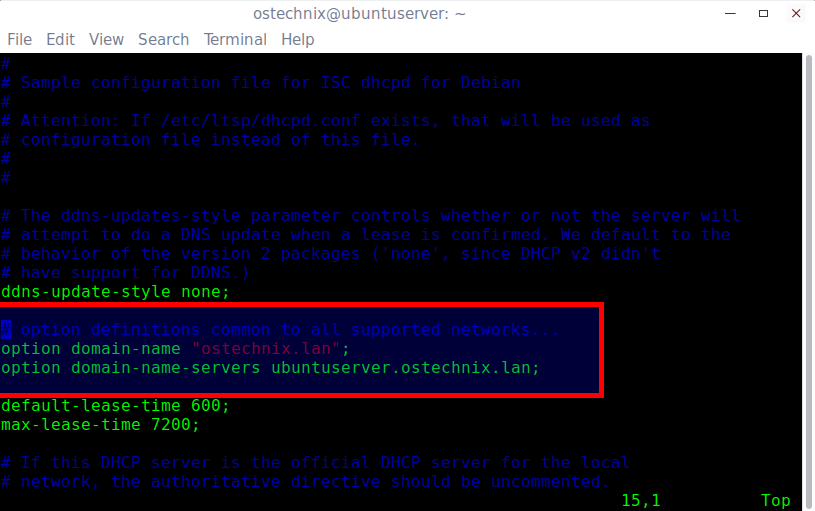
Then, edit dhcpd.conf file,
sudo vi /etc/dhcp/dhcpd.conf
Modify it as shown below. Replace the domain name with your own values.
Enter the domain name and domain-name-servers:
[...]

# option definitions common to all supported networks...
 option domain-name "ostechnix.lan";
 option domain-name-servers ubuntuserver.ostechnix.lan;

[...]
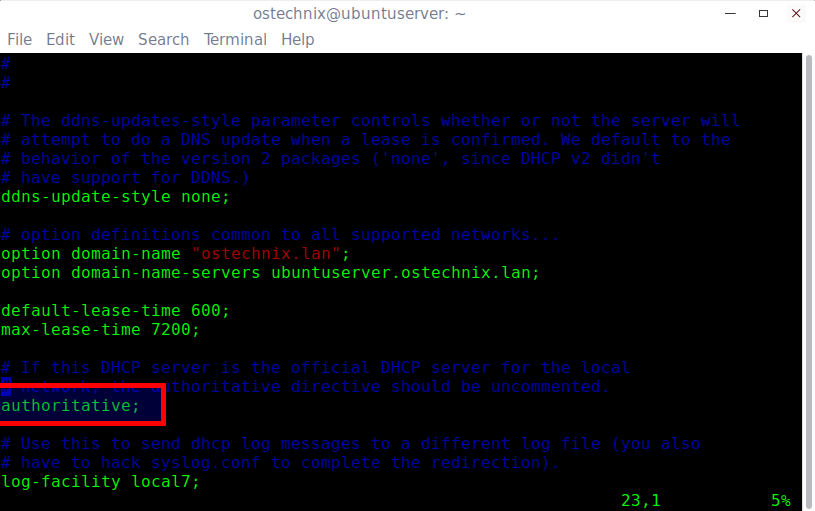
To make this server as official DHCP for your clients, find and uncomment the following line:
[...]
authoritative;
[...]
Scroll down little bit, and define the subnet, IP range, domain and domain name servers like below.
[...]
# A slightly different configuration for an internal subnet.
 subnet 192.168.1.0 netmask 255.255.255.0 {
 range 192.168.1.20 192.168.1.30;
 option domain-name-servers ubuntuserver.ostechnix.lan;
 option domain-name "ostechnix.lan";
 option routers 192.168.1.1;
 option broadcast-address 192.168.1.255;
 default-lease-time 600;
 max-lease-time 7200;
 }
[...]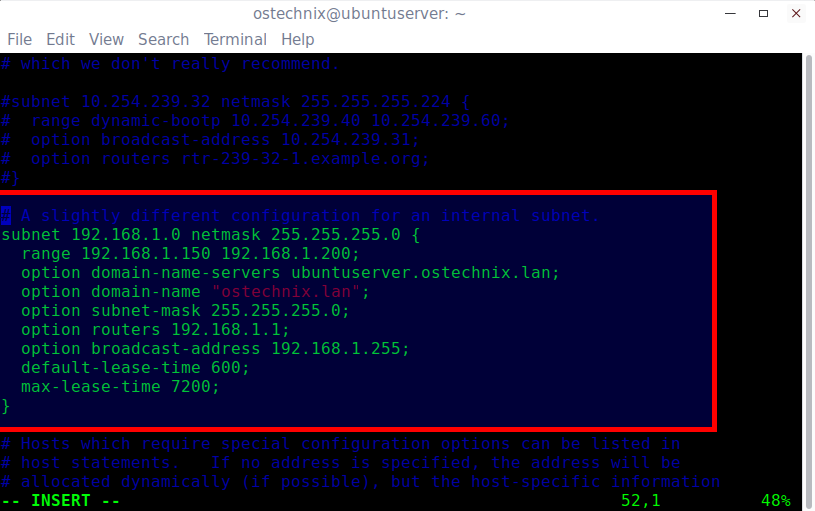
As you see in the above configuration, I have assigned IP range from 192.168.1.150 to 192.168.1.200. So, the DHCP clients will get the IP address from this range. But, what if you want assign a specific IP (fixed IP address) to a particular client? It's easy too. You can easily assign a specific IP to a client of your network by adding the MAC id of that client with fixed IP address as shown below.
For example, let us say we want to assign IP 192.168.1.160 to client that has MAC id 00:22:64:4f:e9:3a. To find out the IP ann MAC addresses, use 'ifconfig' command.
ifconfig
Sample output:
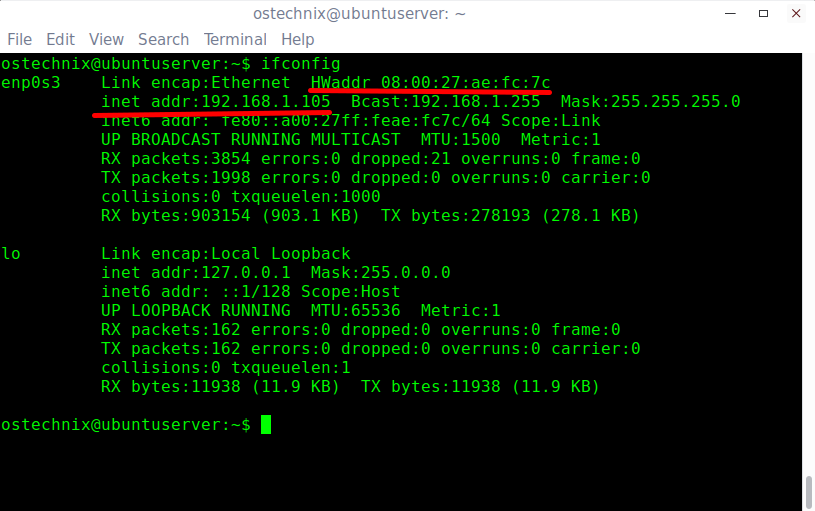
See the underlined words. Those are the IP and MAC addresses.
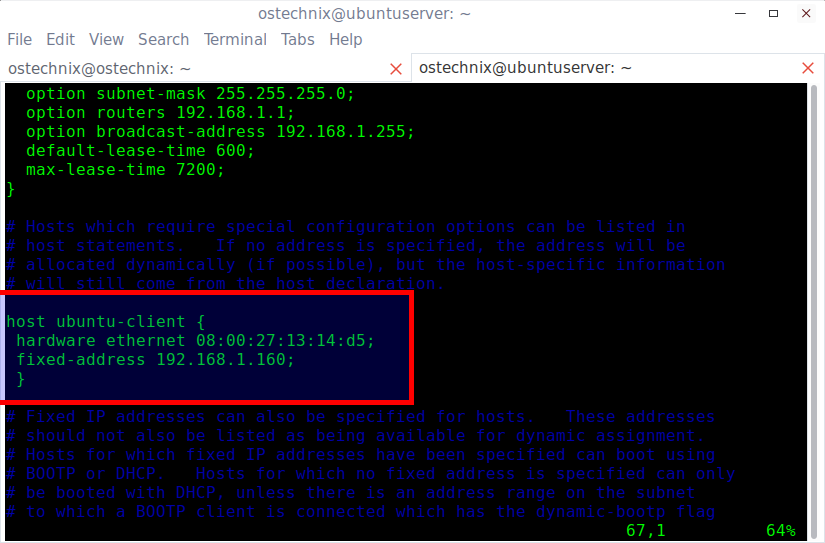
Assign the fixed IP and MAC id of the client as shown below.
[...]
host ubuntu-client {
 hardware ethernet 08:00:27:13:14:d5;
 fixed-address 192.168.1.160;
 }
[...]
Once you modified all settings as per your requirements, save and close the file.
Now, restart dhcp service:
sudo systemctl restart isc-dhcp-server
Make sure you haven't left any unused entries in the dhcpd.conf file. If there is any unused or unnecessary lines, just comment them out. Otherwise, DHCP service will not start.
Let us check if our DHCP service has been started or not using command:
sudo systemctl status isc-dhcp-server
Sample output:
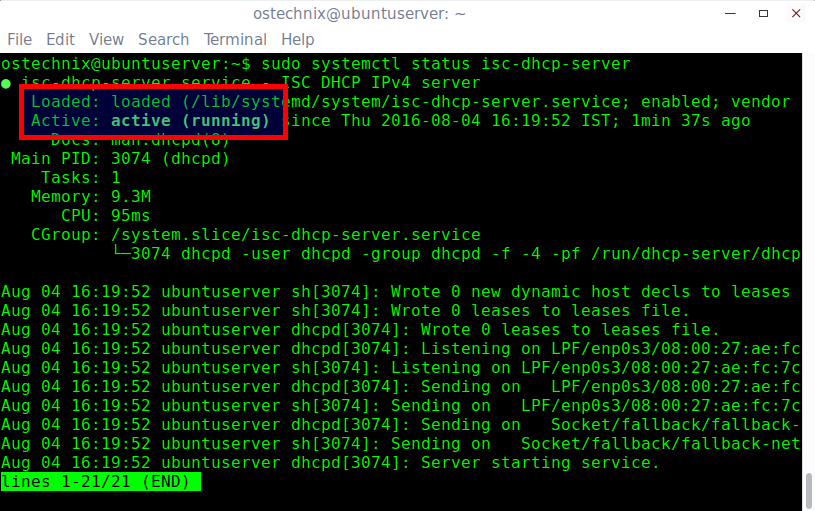
As you see in the above screenshot, DHCP server is running!
To start or stop DHCP service, use the following commands:
sudo systemctl start isc-dhcp-server
sudo systemctl stop isc-dhcp-server
At this stage, you will have a working DHCP server. The server side configuration part is over. Let's go ahead and configure the DHCP clients.
Configure DHCP Clients
For the purpose of this tutorial, I will be using Ubuntu 16.04 LTS desktop as my DHCP client.
My DHCP client:
- OS - Ubuntu 16.04 LTS desktop
- IP Address - DHCP enabled
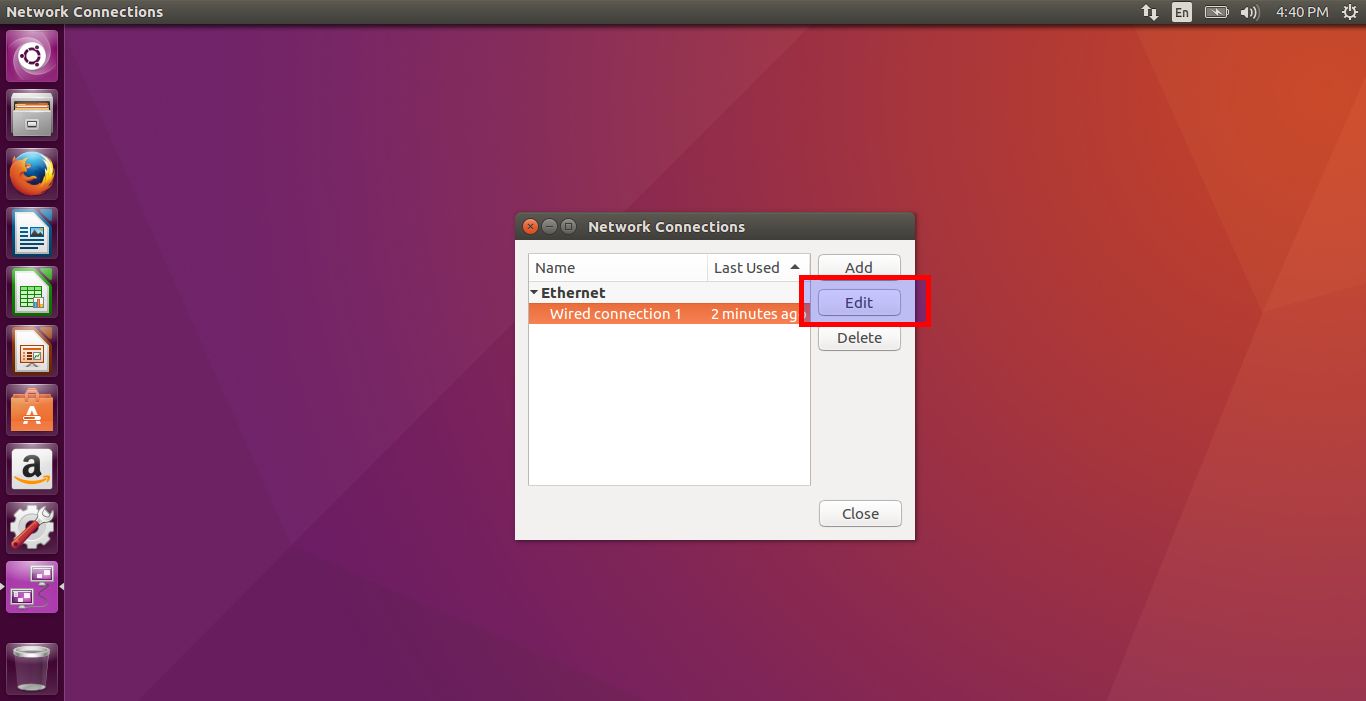
Open Network Connections either from Unity dash or Menu.
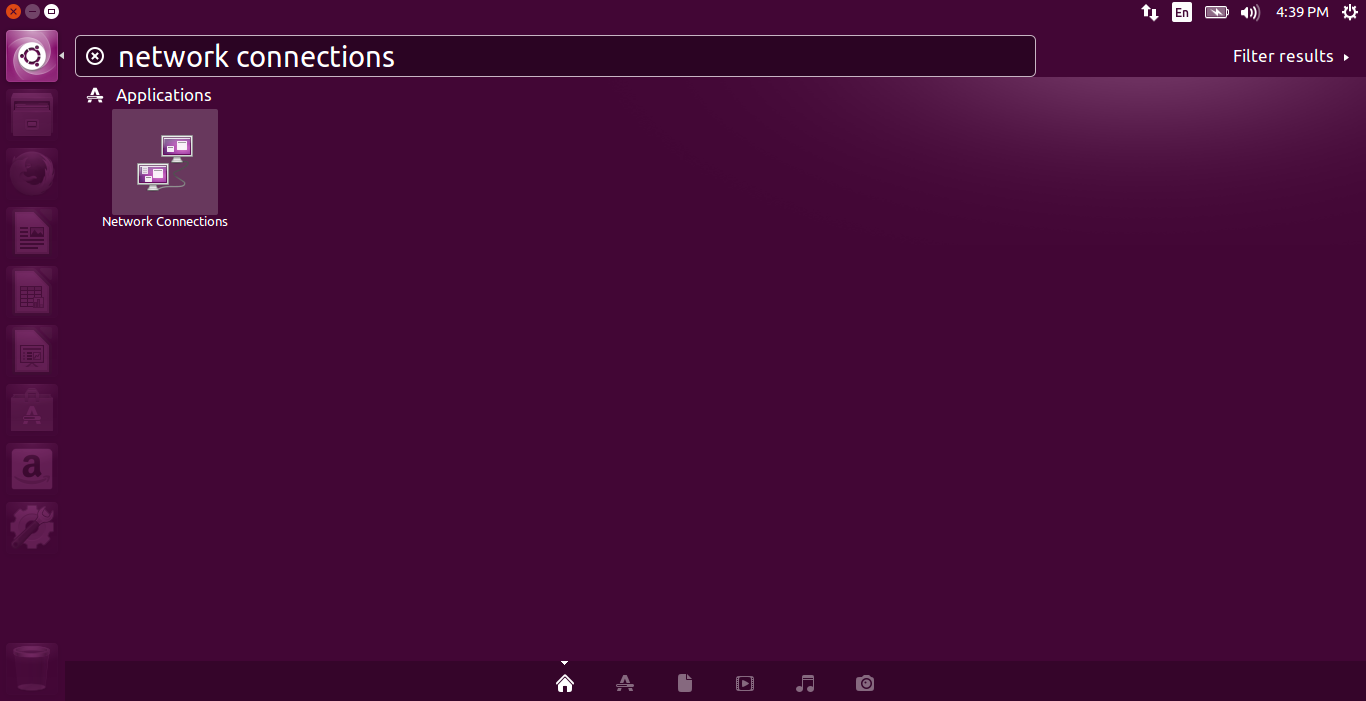
In the Network connections window, Select your Ethernet card and click Edit.
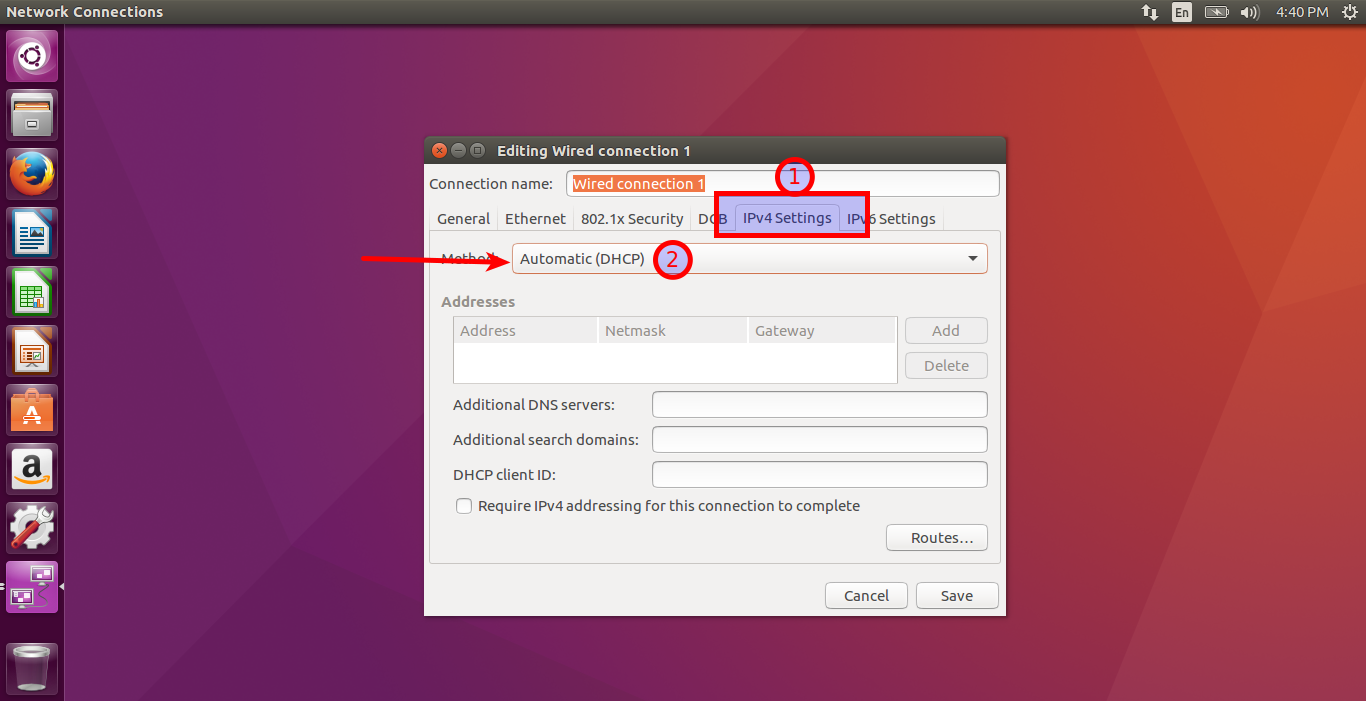
Click IPv4 Settings, and select "Automatic (DHCP)" option. Finally click Save.
Now, restart your client system, and check the IP address of your client system.
ifconfig
Sample output:
You will see a new IP address from IP range, which we defined in the DHCP server, is assigned to your client system.
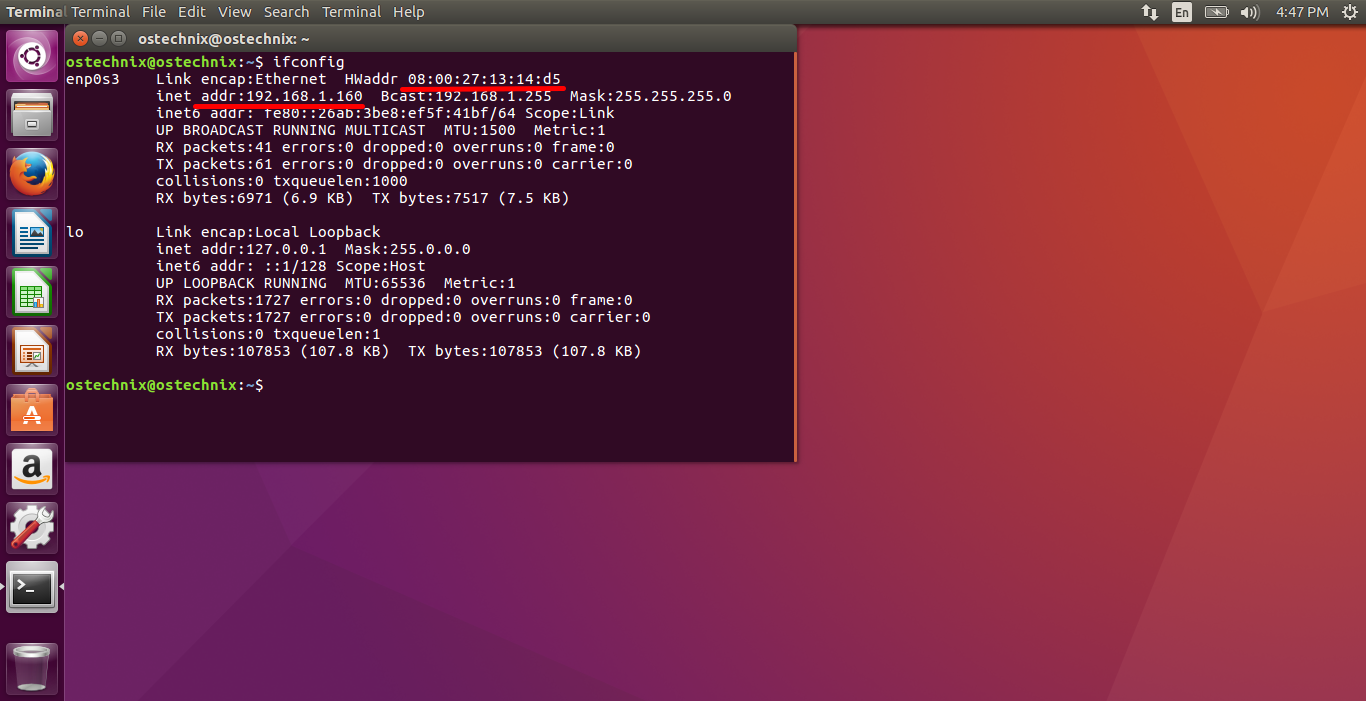
As you see in the above screenshot, My Ubuntu 16.04 LTS desktop system, which has MAC id 08:00:27:13:14:d5, has been assigned with a fixed IP address (192.168.1.160) from the DHCP server. Remember we have mentioned these values in dhcpd.conf file of our DHCP server.
Congratulations! DHCP server is working!!
Suggested read:
Thanks for stopping by!
Help us to help you:
- Subscribe to our Email Newsletter : Sign Up Now
- Support OSTechNix : Donate Via PayPal
- Download free E-Books and Videos : OSTechNix on TradePub
- Connect with us: Reddit | Facebook | Twitter | LinkedIn | RSS feeds
Have a Good day!!
12 comments
Pleasant usefull manual, but DHCP is simple and rare in using, but DNS must be up to show how to do
We will publish DNS article for Ubuntu soon. Thanks for your positive feedback. Keep visiting.
I’ve been subscribed to all your articles published and I read them with pleasure but I prefer Arch Linux.
Thank you brother. Your kindest feedback motivates me to write more stuffs. Keep visiting.
Thank you but i used the same steps but the isc field in running i don’t no way.
these is the status
isc-dhcp-server.service – ISC DHCP IPv4 server
Loaded: loaded (/lib/systemd/system/isc-dhcp-server.service; enabled; vendor preset: enabled)
Active: failed (Result: exit-code) since الاثنين 2018-04-02 13:44:14 EDT; 3s ago
Docs: man:dhcpd(8)
Process: 2574 ExecStart=/bin/sh -ec CONFIG_FILE=/etc/dhcp/dhcpd.conf; if [ -f /etc/ltsp/dhcpd.conf ]; then CONFIG_FILE=/etc/ltsp/dh
Main PID: 2574 (code=exited, status=1/FAILURE)
Nicely done, just configured a tiny 16.04 LTS machine (old HP microserver) for a friend with the help of your articles.
Appreciate the effort you put in this.
You’re welcome. Glad it helped you.
What a way of explaining ..wonderful…simple and cover all questions…..
Hello everyone! Have a question about multiple DHCP servers in LAN. If i create DHCP server on my new VM, and another DHCP server already exist in same LAN, how should i configure my new server to make thouse DHCP do not interfier each other.
hey why i can’t run dhcp server
i follow your explain TT
What is the problem?
I’m unable to setup time of the day on the same server.. Any idea