Today, we are going to talk about The Smallest Server Suite, shortly TheSSS, a lightweight Linux server distribution. It is specially designed for system administrators who wants to setup a simple and tiny set of server software for small local area networks. It could be used for developers who wants to test their applications without installing a complex Linux server setup. As the name implies, the size of this tiny Linux distribution is less than 70 MB.
Using TheSSS, we can install and configure FTP, HTTP, SFTP, SSH, Proxy server and Telnet in no time. It is based on 4MLinux server, a miniature Linux distribution. TheSSS comes with 4MLinux Firewall and Clam Antivirus by default. You can create a live USB and test it to verify if it fits to your needs, or install it on any virtual machine and start exploring it straight away.
In this tutorial, we will see how to install TheSSS and how to configure it.
Table of Contents
Install The Smallest Server Suite
Download the latest version from the link given below.
![]()
Once downloaded, make a bootable USB or CD. If you prefer USB, I recommend Etcher tool which is used to create bootable USB and SD cards. Refer the following link to know how to create bootable USB drive or SD card.
Boot your system with TheSSS boot medium. You should see a screen like below. Press ENTER to continue.

After few seconds, you'll be landed in the live session. The default username and password is root/root.

You can type "helpme" to bring up the help screen at anytime.

This is how help screen looks like.

As you see in the above screenshot, there are three important commands namely,
- server
- netconfig
- install2hd
These are main commands that we're going to use to install TheSSS.
It's also possible to backup your data using 4MLinux Backup Scripts (just try to execute 'backup', 'fsbackup' or 'image' commands). The 'lftp' and 'rsync' utilities are included, too.
The 'nmonitor' script will give you an access to a very wide set of system monitoring tools. ClamAV Antivirus can be downloaded & installed by means of the 'antivir' script.
You can execute 'mc' to open Midnight Commander when, for example, you must edit some configuration files. Run 'links' command if, for any reason, you need a small web browser.
Use one of the following tools for disk partitioning:
- 'cfdisk' (for MBR)
- 'cgdisk' (for GPT).
It's also possible to replace LILO with GRUB by running the 'update-grub' script.
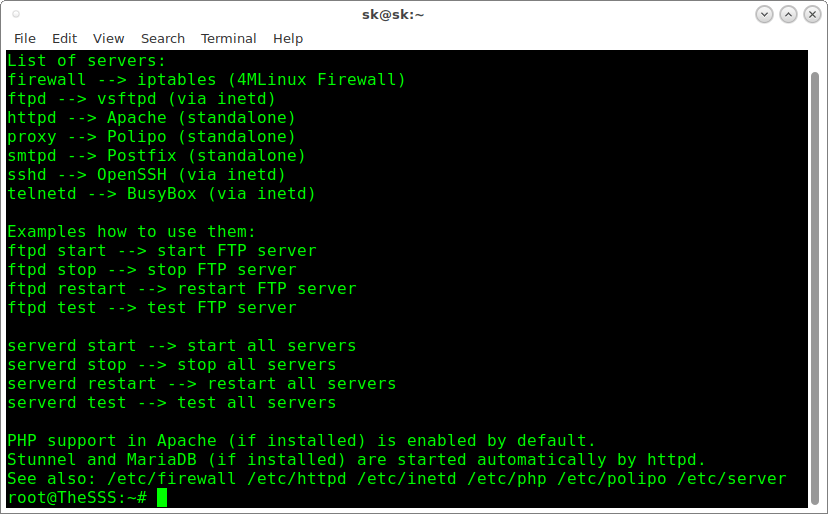
To view the list of servers, just type "server" in the prompt, without quotes of course.
server
Sample output would be:
You can always execute 'helpme' to return to the main menu.
Before installing TheSSS on your system, we need to partition the hard drive.
To check the partition table, run:
fdisk -l
Sample output:
Disk /dev/sda: 8 GiB, 8589934592 bytes, 16777216 sectors
Units: sectors of 1 * 512 = 512 bytes
Sector size (logical/physical): 512 bytes / 512 bytes
I/O size (minimum/optimal): 512 bytes / 512 bytes
As you see above, I have 8 GB hdd. Let us go ahead and partition the hard disk. You can either use 'cfdisk' (for MBR) or 'cgdisk' (for GPT) utilities. I am going to use cfdisk for the the purpose of this tutorial.
Type cfdisk in the prompt to partition the drive.
cfdisk
You will see a screen like below. Choose "dos" as label type.

We're going to create two partitions.
- Root partition, /dev/sda1, as primary bootable with size 5 GB and ext4 formatted.
- Swap partition, /dev/sda2, as primary with size 2xRAM size.
You can create as many partitions you want like separate HOME partition, but I am going to create two partitions.
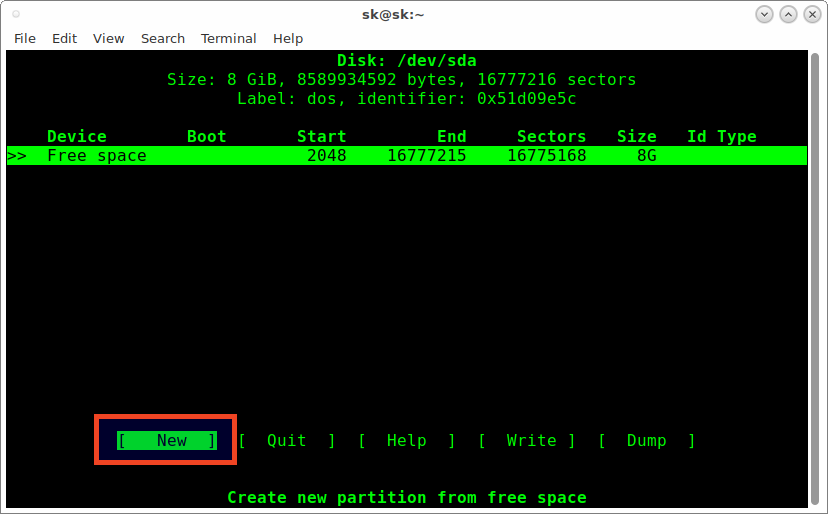
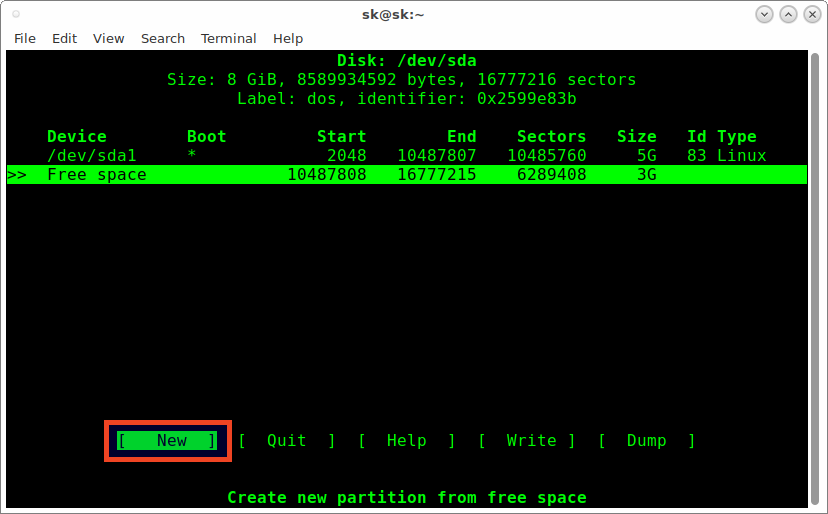
Select 'New'.
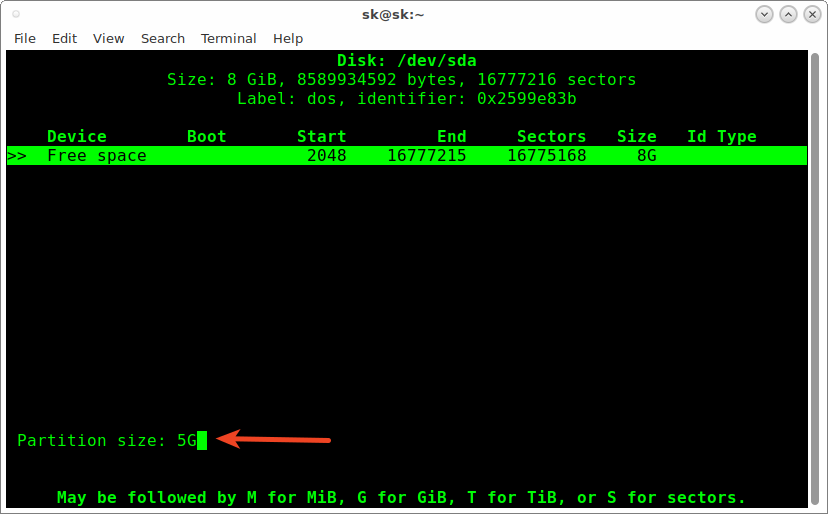
Enter partition size, in our case it is 5 GB. You can also specify size in MB using letter 'M'.
Then, we need to choose the type of the partition i.e primary, logical, swap etc. As I mentioned earlier, we make this partition as primary with bootable and ext4 formatted.

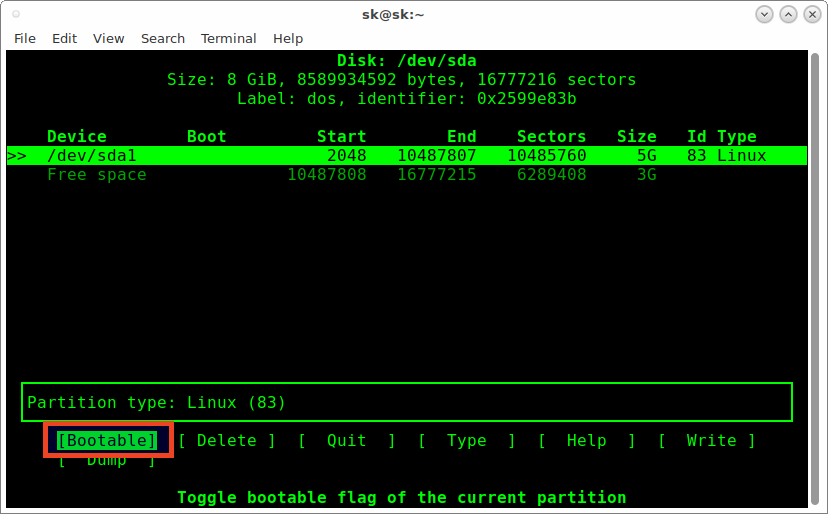
Next select 'Bootable' to make this partition as bootable partition.
Then, select 'Write' using left/right arrow button to write the partition changes.

Type 'Yes' to save the changes.

We have created the primary and bootable partition. Next, we will create swap partition.
Select the free space using up/down arrow and select 'New'.
Enter Swap partition size i.e 2XRAM size. I have assigned all remaining space to the swap partition.

Select partition type as 'Primary'.
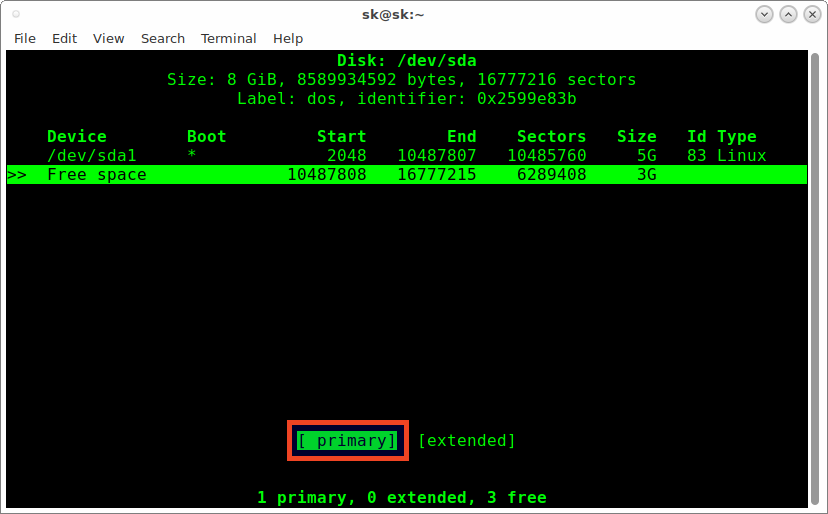
Select 'Write' and hit ENTER.

Type 'Yes' to save the changes.

Finally, select Quit and hit ENTER to close cfdisk utility.

Then, type udev in the prompt to save the partition table. Udev is the device manager for the Linux kernel that creates/removes device nodes in the /dev directory dynamically.
udev
You can verify the partition details using command:
fdisk -l
Sample output:
Disk /dev/sda: 8 GiB, 8589934592 bytes, 16777216 sectors
Units: sectors of 1 * 512 = 512 bytes
Sector size (logical/physical): 512 bytes / 512 bytes
I/O size (minimum/optimal): 512 bytes / 512 bytes
Disklabel type: dos
Disk identifier: 0x2599e83b

Device Boot Start End Sectors Size Id Type
/dev/sda1 * 2048 10487807 10485760 5G 83 Linux
/dev/sda2 10487808 16777215 6289408 3G 83 Linux
We have successfully created the partitions. Next, we are going to format them.
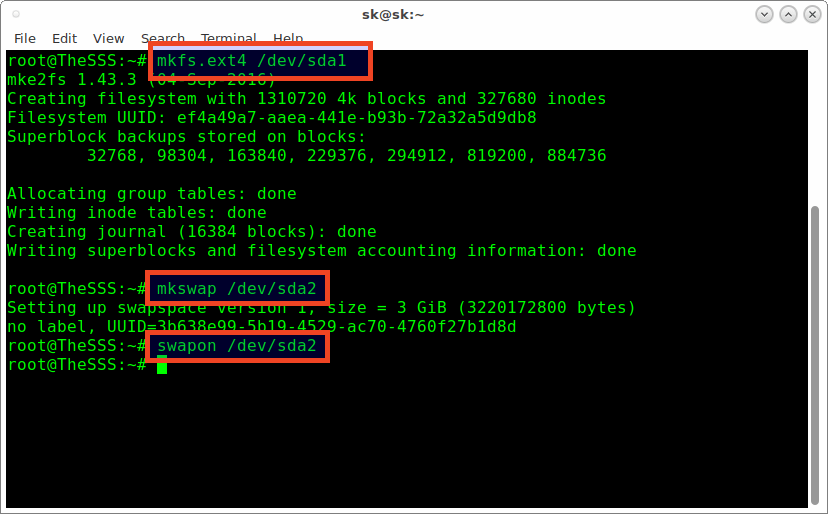
Format the primary partition using command:
mkfs.ext4 /dev/sda1
Then, format and activate the Swap partition using the following commands:
mkswap /dev/sda2
swapon /dev/sda2
It's time to install TheSSS on our system. To do so, type - install2hd in the bash prompt.
install2hd
You'll be greeted with a message like below. Just hit ENTER key to continue.
Welcome to TheSSS installation script!

You will be asked to choose a target partition, on which your new TheSSS
 will be installed. The target partition must be at least 1 GB in size.

You can choose any kind of the target partition (even NTFS or Linux swap),
 but it will be formatted to ext4 filesystem, meaning that all the data on
 this partition will be lost.

NOTE: it strongly recommended, so that you will make a backup of all your
 important data before installing any new operating system in your PC.

Press Enter to continue...
Next, enter the target partition number to install TheSSS server. You need to Enter the bootable partition number here.
Disk /dev/sda: 8 GiB, 8589934592 bytes, 16777216 sectors
Units: sectors of 1 * 512 = 512 bytes
Sector size (logical/physical): 512 bytes / 512 bytes
I/O size (minimum/optimal): 512 bytes / 512 bytes
Disklabel type: dos
Disk identifier: 0x2599e83b

Device Boot Start End Sectors Size Id Type
/dev/sda1 * 2048 10487807 10485760 5G 83 Linux
/dev/sda2 10487808 16777215 6289408 3G 83 Linux

On which partition should your new TheSSS be installed?
Give the number (1,or2) of the target partition: 1
Next, type 'y' to format the selected partition.
It is recommended to format /dev/sda1.
Do you agree to format 'sda1' (y/n)?: y
Next, the installer will ask if there is anyother operating systems on the drive. My harddisk is fresh and I typed y to continue and install the OS>
Is TheSSS to be the only operating system in your PC (y/n)?:y
Press ENTER key to start the installation.
A new boot loader will be installed.
It will replace the existing one !!!

After booting your new TheSSS, you must install GRUB.
This will allow you to access all other operating systems.

Press ENTER to continue...
Next, you will see the summary of changes so far. If everything okay, type 'y' to start the installation.
SUMMARY OF CHANGES:
1) TheSSS will be installed on /dev/sda1,
2) /dev/sda1 will be formatted to ext4,
3) A new boot loader will be installed for you.

WARNING: This is the last question:
Do you wish to start the installation right now (y/n)?:y
All installation files will be copied to the target partition. Once the copy process completed, you will be returned back to the bash prompt. Remove the installation medium and reboot your system to start the actual installation.

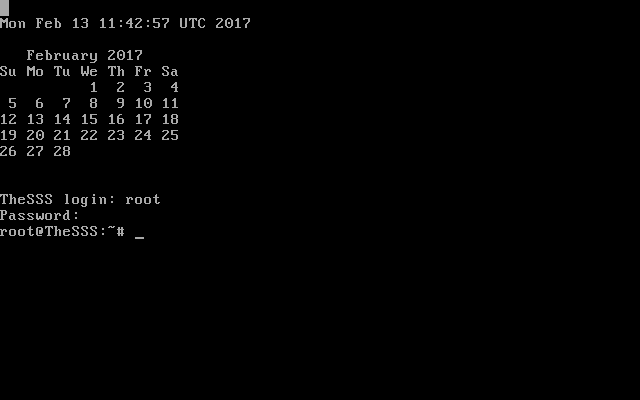
After the installation completed, you'll be asked to enter the new password for the root user. Enter any strong password of your choice.
Finally, you will see the root user prompt like below. Enter the password of root user.
Like I said already, you can bring up the help section by typing 'helpme' in the console, just in case you need any help.
Configure servers
All servers (ftp, httpd, proxy, sshd, smtpd, telent) will be installed automatically. All you have to do is just start the services.
Type 'server' to view the list of servers.
server
You'll see an output something like below.
List of servers:
firewall --> iptables (4MLinux Firewall)
ftpd --> vsftpd (via inetd)
httpd --> Apache (standalone)
proxy --> Polipo (standalone)
smtpd --> Postfix (standalone)
sshd --> OpenSSH (via inetd)
telnetd --> BusyBox (via inetd)

Examples how to use them:
ftpd start --> start FTP server
ftpd stop --> stop FTP server
ftpd restart --> restart FTP server
ftpd test --> test FTP server

serverd start --> start all servers
serverd stop --> stop all servers
serverd restart --> restart all servers
serverd test --> test all servers

PHP support in Apache (if installed) is enabled by default.
Stunnel and MariaDB (if installed) are started automatically by httpd.
See also: /etc/firewall /etc/httpd /etc/inetd /etc/php /etc/polipo /etc/server
As you can see in the above output, all commands are included to start, test, and stop servers. Say for example, to start httpd server, run:
httpd start
To test if it is working, run:
httpd test
To stop the service, run:
httpd stop
To start all servers at once, run:
serverd start
Similarly, you can restart, test and stop all servers at once like below.
serverd restart
serverd test
serverd stop
Configure Network settings
TheSSS will use dynamic IP address by default. If you want to assign a static IP, type 'netconfig' in the console and configure the network settings as per your needs.
netconfig
You will be given the following choices. Type the number to configure the respective network device. Here I chose 1.
 What do you wish to configure?
 1) Ethernet,
 2) WiFi (via Wireless Tools),
 3) WiFi (via WPA Supplicant),
 4) Dial-up.
 Your choice (1,2,3,4)?: 1
If you want to change the default network device, type Y, else type n to continue.
Network interface is set to eth0.
 Do you wish to change it (y/n)?: n
Like I said, TheSSS distribution uses use dynamic IPs by default. If you want to assign static IP. Press y and followin the onscreen instructions.
TheSSS uses dynamic IPs by default.
 Do you wish to set static IPs now (y/n)?:
Once you done, type 'connect' in the console to take effect the changes.
That's all for now folks. TheSSS server can be used for all sorts of testing servers. It is very resource-friendly server operating system that consumes very low system resources. It is best for any testing and development activities.
Resources: