
When your Software-as-a-Service (SaaS) product is engineered to meet a 99.99% Service Level Agreement (SLA), the infrastructure must be able to absorb failures automatically. A 99.99% SLA allows for only about 52 minutes of downtime per year. If a primary load balancer fails at 2 AM on a Sunday, the system needs to recover within seconds, long before an engineer can intervene.
An experienced Linux infrastructure administrator can use this stack when providing managed IT for SaaS applications that require highly available, non-disruptive operations. The stack combines three components:
- NGINX - serving your application on two (or more) web servers
- HAProxy - distributing traffic across those web servers with health checks
- Keepalived - running on two load balancer nodes, sharing one floating (virtual) IP address, with automatic failover via VRRP
Together, they provide automatic failover and resilient load balancing designed to minimize service disruption.
In this guide, we will explain how to build the entire stack from scratch. The architecture consists of two load balancers sharing a single floating IP address, with automatic failover between them, in front of two web servers.
The commands and configuration files have been tested on Ubuntu 26.04 LTS ("Resolute Raccoon") and also work unchanged on Ubuntu 24.04 LTS ("Noble Numbat").
By the end of this guide, you'll have a highly available SaaS infrastructure designed to minimize downtime and support applications targeting a 99.99% SLA.
Table of Contents
Architecture Overview
                         Internet / Clients
                                │
                                ▼
                      Floating IP: 192.168.0.100
                                │
                 ┌──────────────┴──────────────┐
                 │                              │
        node-lb01 (MASTER)             node-lb02 (BACKUP)
        192.168.0.11                    192.168.0.12
        Keepalived + HAProxy            Keepalived + HAProxy
                 │                              │
                 └──────────────┬───────────────┘
                                ▼
                  ┌─────────────┴─────────────┐
                  │                            │
              web01                        web02
         192.168.0.21 (NGINX)         192.168.0.22 (NGINX)
How it works:
- Keepalived runs on both load balancers and uses VRRP (Virtual Router Redundancy Protocol) to elect one node as MASTER. The MASTER holds the floating IP
192.168.0.100. - HAProxy runs on both load balancers at all times, listening on the floating IP, and forwards traffic to
web01andweb02based on health checks. - If
node-lb01fails (crashes, network drops, HAProxy dies), Keepalived onnode-lb02detects the missing VRRP advertisement and promotes itself to MASTER, taking over the floating IP within 1–3 seconds. - NGINX on
web01andweb02serves the actual application. HAProxy continuously checks their health and removes a dead node from rotation automatically.
Topology
| Role | Hostname | IP |
|---|---|---|
| Virtual / Floating IP | — | 192.168.0.100 |
| Primary Load Balancer | node-lb01 | 192.168.0.11 |
| Secondary Load Balancer | node-lb02 | 192.168.0.12 |
| Web Server 01 | web01 | 192.168.0.21 |
| Web Server 02 | web02 | 192.168.0.22 |
Prerequisites
- Five Ubuntu 26.04 LTS (or 24.04 LTS) machines or VMs matching the table above, all on the same layer-2 network (VRRP relies on multicast/broadcast, so the two LB nodes must share a subnet).
- Root or sudo access on all machines.
- Firewall rules allowing:
- Port
80/443to the floating IP from clients - Port
80from the LB nodes to the web servers - Protocol
VRRP(IP protocol 112) and multicast address224.0.0.18between the two LB nodes
- Port
- Basic familiarity with systemd and editing config files over SSH.
Ubuntu 26.04 ships with UFW (backed by nftables under the hood) but it's disabled out of the box, so it won't interfere with anything until you turn it on. If you do want it enabled, here are the rules matching this topology. Run on the appropriate hosts before enabling UFW, so you don't lock yourself out over SSH:
# On both node-lb01 and node-lb02
sudo ufw allow 22/tcp
sudo ufw allow 80/tcp
sudo ufw allow from 192.168.0.0/24 to any port 8404 proto tcp   # stats page, LAN only
sudo ufw allow from 192.168.0.11 to 224.0.0.18 proto vrrp
sudo ufw allow from 192.168.0.12 to 224.0.0.18 proto vrrp

# On both web01 and web02
sudo ufw allow 22/tcp
sudo ufw allow from 192.168.0.11 to any port 80 proto tcp
sudo ufw allow from 192.168.0.12 to any port 80 proto tcp

# Then, on each host:
sudo ufw enable
If your two load balancers are cloud VMs (AWS, Azure, GCP, etc.) rather than bare metal or on-prem VMs, check the note on unicast VRRP in Part 6 before proceeding. Most cloud networks silently drop the multicast traffic VRRP uses by default, and Keepalived will appear to work but never actually fail over.
Part 1: Set Up the Web Servers (web01, web02)
Run this section on both web01 and web02.
1.1 Update the system and install NGINX
sudo apt update && sudo apt upgrade -y
sudo apt install -y nginx
1.2 Confirm NGINX is running
sudo systemctl enable --now nginx
sudo systemctl status nginx
1.3 Create a distinguishing test page
This lets you visually confirm HAProxy is load balancing correctly later. Run the matching command on each host.
On web01:
echo "<h1>Response from web01 (192.168.0.21)</h1>" | sudo tee /var/www/html/index.html
On web02:
echo "<h1>Response from web02 (192.168.0.22)</h1>" | sudo tee /var/www/html/index.html
1.4 Add a lightweight health check endpoint
HAProxy will poll this path to determine if a backend is healthy. Keeping it separate from your app root means you can return a controlled 200/503 independently of your application logic.
echo "OK" | sudo tee /var/www/html/healthz
Verify from another machine:
curl http://192.168.0.21/healthz
curl http://192.168.0.22/healthz
Both should return OK.
Part 2: Set Up HAProxy (node-lb01, node-lb02)
Run this section on both load balancer nodes. The configuration is identical on both.
2.1 Install HAProxy
sudo apt update && sudo apt upgrade -y
sudo apt install -y haproxy
Ubuntu 26.04's default repositories ship HAProxy 3.2 directly, which is recent enough for everything in this guide (Ubuntu 24.04 ships HAProxy 2.8, which also works fine with the config below). So, no PPA or third-party repo is needed.
Verify what you got:
haproxy -v
Or,
sudo haproxy -v
Sample Output:
HAProxy version 3.2.9-1ubuntu2.2 2026/06/19 - https://haproxy.org/
Status: long-term supported branch - will stop receiving fixes around Q2 2030.
Known bugs: http://www.haproxy.org/bugs/bugs-3.2.9.html
Running on: Linux 7.0.0-28-generic #28-Ubuntu SMP PREEMPT_DYNAMIC Sun Jun 21 01:01:36 UTC 2026 x86_64
2.2 Configure HAProxy
Back up the default config, then replace it:
sudo cp /etc/haproxy/haproxy.cfg /etc/haproxy/haproxy.cfg.bak
sudo nano /etc/haproxy/haproxy.cfg
Use this configuration:
global
    log /dev/log local0
    log /dev/log local1 notice
    maxconn 4096
    user haproxy
    group haproxy
    daemon

defaults
    log     global
    mode    http
    option  httplog
    option  dontlognull
    timeout connect 5s
    timeout client  30s
    timeout server  30s
    retries 3

# Stats page for quick visibility into backend health
listen stats
    bind *:8404
    stats enable
    stats uri /stats
    stats refresh 10s
    stats auth admin:ChangeThisPassword!

frontend http_front
    bind 192.168.0.100:80
    default_backend web_servers

backend web_servers
    balance roundrobin
    option httpchk GET /healthz
    http-check expect status 200
    default-server inter 2s fall 3 rise 2
    server web01 192.168.0.21:80 check
    server web02 192.168.0.22:80 check
Notes on this config:
bind 192.168.0.100:80- HAProxy binds to the floating IP, not the node's own IP. This means HAProxy needsnet.ipv4.ip_nonlocal_bind = 1(covered below), since the floating IP won't be present on the BACKUP node's interface.option httpchk GET /healthzwithfall 3 rise 2- a backend is marked down after 3 consecutive failed checks and marked healthy again after 2 consecutive successes, checked every 2 seconds. This avoids flapping on a single dropped packet.- Change the stats page password before deploying to anything resembling production.
option httpchk GET /healthz(method + URI, nothing else appended) is still fully supported in HAProxy 3.2 and is the simplest form for a basic check. If you later want to add custom headers or a specific HTTP version to the check request, use the newerhttp-check send meth GET uri /healthz hdr Host example.comsyntax instead. Cramming that extra detail onto the end of theoption httpchkline itself is deprecated and will throw a config warning.
2.3 Allow HAProxy to bind to a non-local IP
Since the floating IP is only physically present on whichever node is currently MASTER, both nodes need permission to bind to it in advance:
sudo sysctl -w net.ipv4.ip_nonlocal_bind=1
echo "net.ipv4.ip_nonlocal_bind = 1" | sudo tee -a /etc/sysctl.conf
2.4 Validate and start HAProxy
sudo haproxy -c -f /etc/haproxy/haproxy.cfg
sudo systemctl enable --now haproxy
sudo systemctl status haproxy
Next we will set up Keepalived on both load balancers.
Part 3: Set Up Keepalived (node-lb01, node-lb02)
3.1 Install Keepalived
On both nodes:
sudo apt install -y keepalived
3.2 Create a health-check script
Keepalived should only advertise the floating IP from a node if HAProxy on that node is actually alive.
Create this script on both nodes:
sudo tee /etc/keepalived/check_haproxy.sh > /dev/null << 'EOF'
#!/bin/bash
# Exit 0 = healthy, exit 1 = unhealthy
if systemctl is-active --quiet haproxy; then
    exit 0
else
    exit 1
fi
EOF
Make it executable:
sudo chmod +x /etc/keepalived/check_haproxy.sh
3.3 Configure Keepalived on node-lb01 (MASTER)
Create a keepalived configuration file for Master node:
sudo nano /etc/keepalived/keepalived.conf
Add the following content:
vrrp_script chk_haproxy {
    script "/etc/keepalived/check_haproxy.sh"
    interval 2
    weight -60
    fall 3
    rise 2
}

vrrp_instance VI_1 {
    state MASTER
    interface eth0
    virtual_router_id 51
    priority 150
    advert_int 1

    authentication {
        auth_type PASS
        auth_pass ChangeThisSecret
    }

    virtual_ipaddress {
        192.168.0.100/24
    }

    track_script {
        chk_haproxy
    }
}
Replace
eth0with your actual network interface name. You can check withip acommand. On many cloud images this isens3,ens5, or similar.
3.4 Configure Keepalived on node-lb02 (BACKUP)
Same file, on the second node, with two differences: state BACKUP and a lower priority.
sudo nano /etc/keepalived/keepalived.conf
Add the following lines:
vrrp_script chk_haproxy {
    script "/etc/keepalived/check_haproxy.sh"
    interval 2
    weight -60
    fall 3
    rise 2
}

vrrp_instance VI_1 {
    state BACKUP
    interface eth0
    virtual_router_id 51
    priority 100
    advert_int 1

    authentication {
        auth_type PASS
        auth_pass ChangeThisSecret
    }

    virtual_ipaddress {
        192.168.0.100/24
    }

    track_script {
        chk_haproxy
    }
}
Key parameters explained:
virtual_router_id- Must be identical on both nodes; it's how they recognize each other as part of the same VRRP group. Must be unique on the LAN if other VRRP groups exist.priority- Higher wins the election.node-lb01(150) becomes MASTER when both are healthy;node-lb02(100) takes over whennode-lb01's effective priority drops below 100.weight -60onchk_haproxy- This is the piece that actually ties Keepalived's failover to HAProxy's health. In Keepalived, a negative weight is subtracted from the instance's priority once the tracked script has failedfall(3) consecutive times. A positive weight would do the opposite (add to priority on success) and wouldn't trigger a failover here. Withweight -60, if HAProxy dies onnode-lb01, its effective priority drops from 150 to 90 — belownode-lb02's 100 — sonode-lb02takes over the floating IP.auth_pass- Must match on both nodes. It prevents unrelated VRRP traffic on the same network from interfering. Note thatauth_type PASSsends this password in cleartext on the wire (only the first 8 characters are actually used). It's meant to stop accidental cross-talk between unrelated VRRP groups on a shared LAN, not to withstand a hostile actor already on that network. If you need real protection against spoofed VRRP traffic, look at Keepalived's newerauth_hmacoption instead.advert_int 1- MASTER sends an advertisement every 1 second; BACKUP considers MASTER dead after roughly 3 missed intervals.
3.5 Start Keepalived
On both nodes:
sudo systemctl enable --now keepalived
sudo systemctl status keepalived
3.6 Verify the floating IP
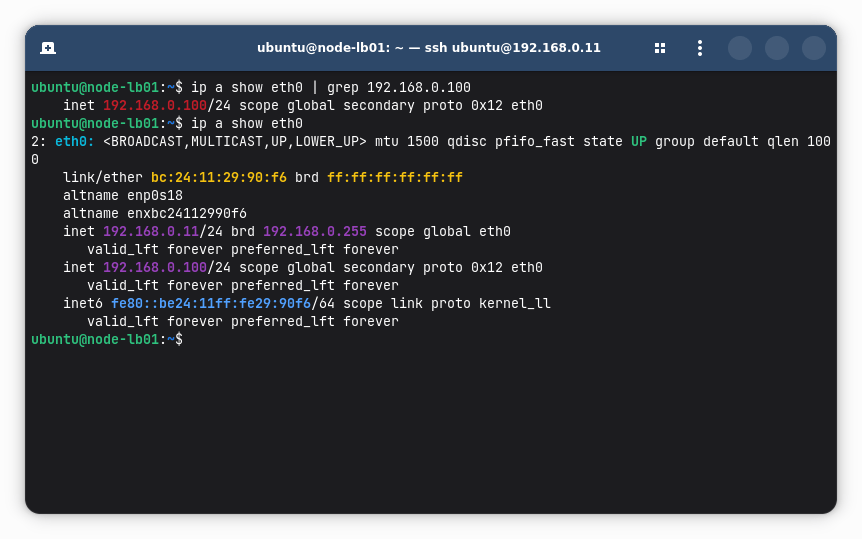
On node-lb01, confirm it now owns the floating IP:
ip a show eth0 | grep 192.168.0.100
ip a show eth0
You should see 192.168.0.100/24 listed as a secondary address in the MASTER node.
Sample output from node-lb01:
2: eth0: <BROADCAST,MULTICAST,UP,LOWER_UP> mtu 1500 qdisc pfifo_fast state UP group default qlen 1000
    link/ether bc:24:11:29:90:f6 brd ff:ff:ff:ff:ff:ff
    altname enp0s18
    altname enxbc24112990f6
    inet 192.168.0.11/24 brd 192.168.0.255 scope global eth0
       valid_lft forever preferred_lft forever
    inet 192.168.0.100/24 scope global secondary proto 0x12 eth0
       valid_lft forever preferred_lft forever
    inet6 fe80::be24:11ff:fe29:90f6/64 scope link proto kernel_ll
       valid_lft forever preferred_lft forever
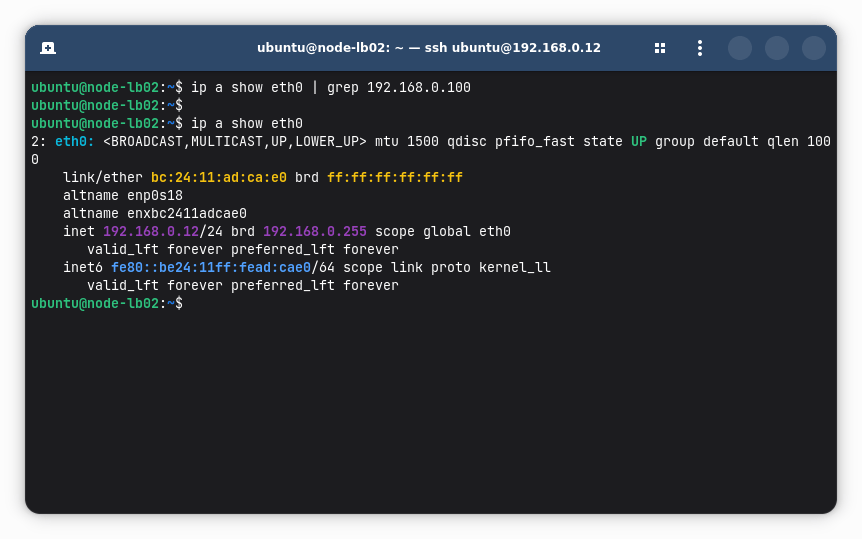
On node-lb02, that same command should show nothing. It's in BACKUP state.
Sample output from node-lb02:
Check the Keepalived logs to confirm the state transition:
sudo journalctl -u keepalived -n 30 --no-pager
On MASTER node, you would see:
[...]
Aug 09 08:52:57 node-lb01 Keepalived_vrrp[15913]: (VI_1) Entering MASTER STATE
On Backup node, you would see:
Aug 09 08:52:57 node-lb02 Keepalived_vrrp[15682]: (VI_1) Entering BACKUP STATE
Part 4: End-to-End Test
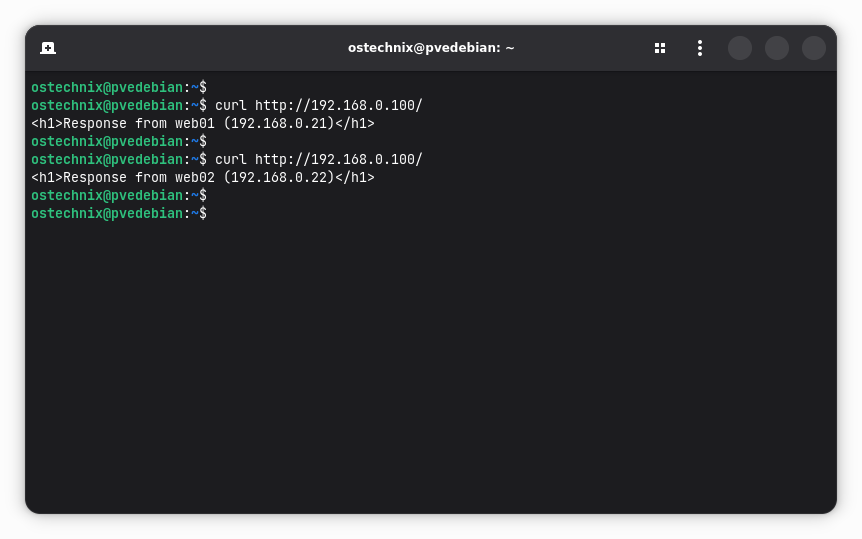
From any client machine on the network:
curl http://192.168.0.100/
Run it a few times and you should see the response alternate between "Response from web01" and "Response from web02" thanks to HAProxy's round-robin balancing.
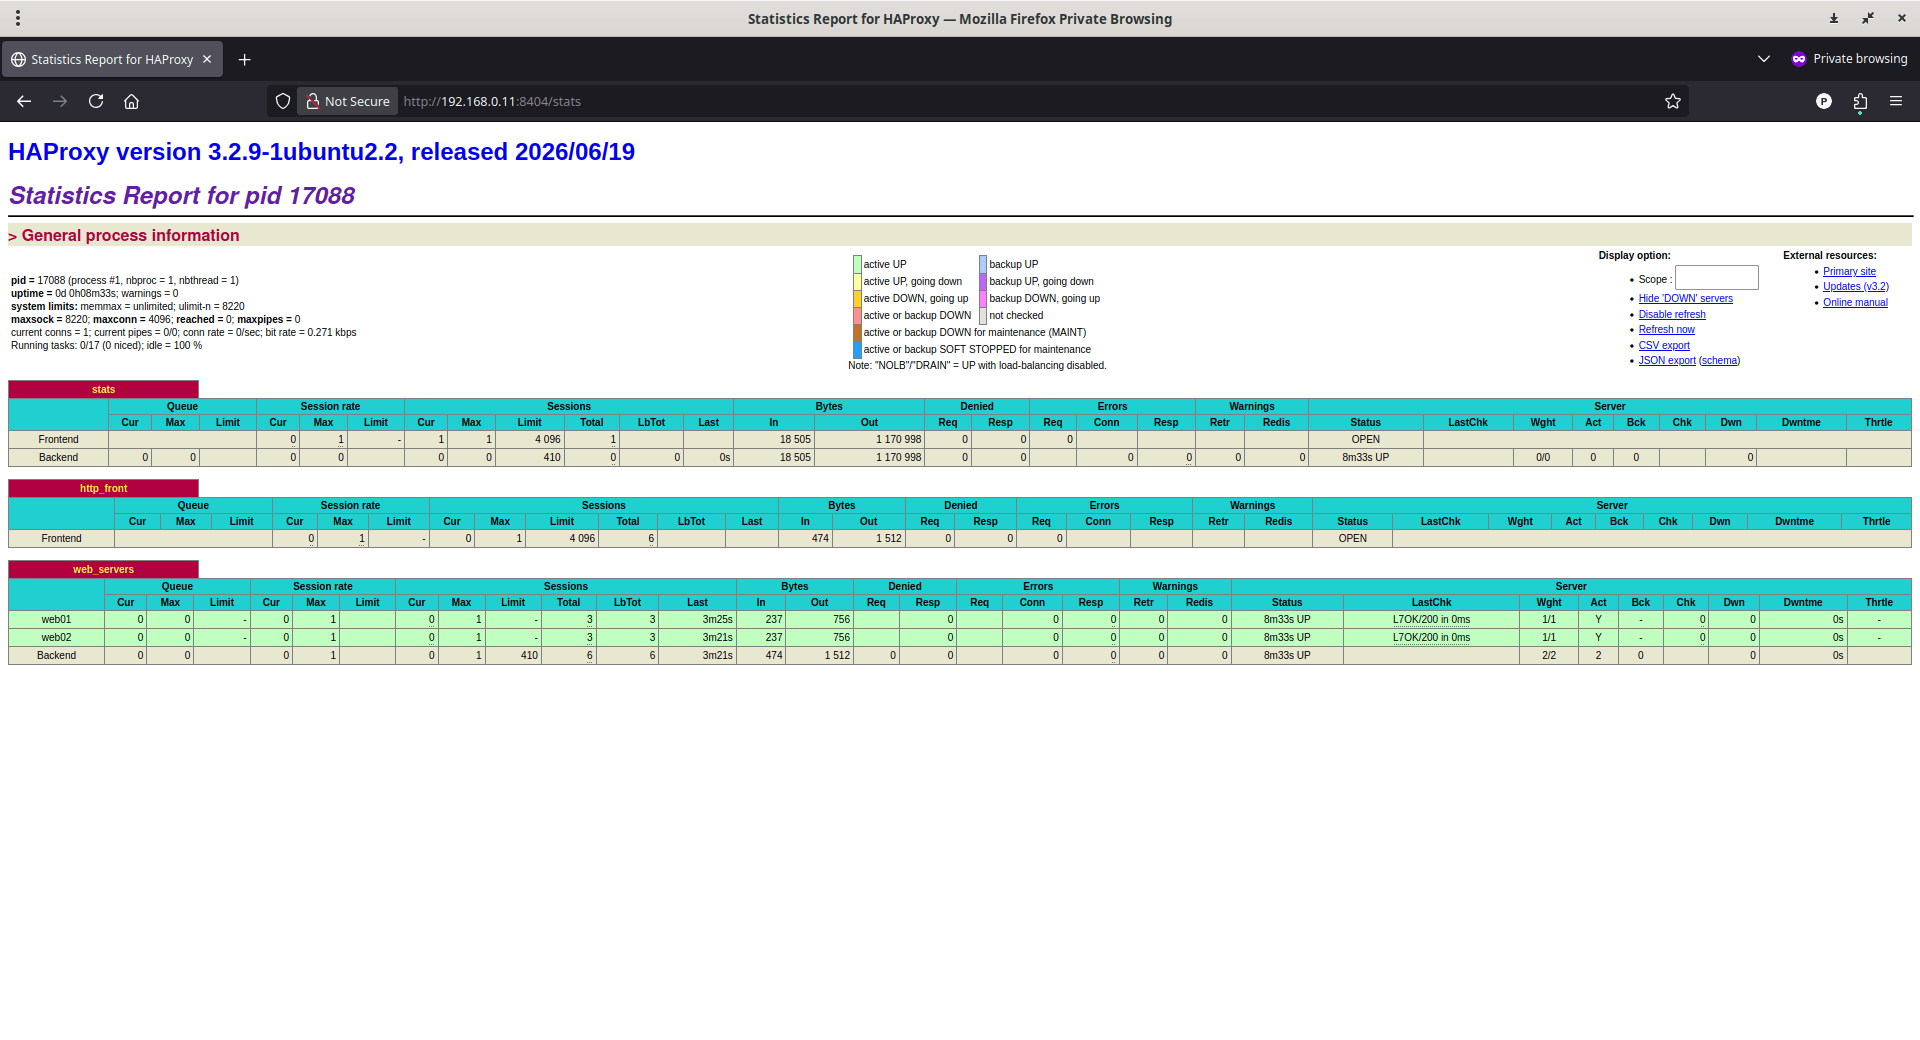
Check the HAProxy stats page (from a browser or via SSH tunnel, since it's not exposed externally by this config):
http://192.168.0.11:8404/stats
http://192.168.0.12:8404/stats
You should see both web01 and web02 listed as UP (green).
HAProxy Stats Page of the MASTER Node:
Part 5: Test Failover
This is the part that actually validates the "highly available" claim. Don't skip it.
5.1 Simulate a load balancer failure
On node-lb01 (the current MASTER), stop Keepalived:
sudo systemctl stop keepalived
Within a few seconds, go to node-lb02 and check the floating IP:
ip a show eth0 | grep 192.168.0.100
It should now show the floating IP. Meanwhile, run a continuous curl loop from a client to confirm there's no meaningful interruption:
while true; do curl -s -o /dev/null -w "%{http_code} %{time_total}s\n" http://192.168.0.100/; sleep 0.5; doneYou should see at most one or two failed/slow requests during the transition, then traffic resumes normally through node-lb02.
Restart Keepalived on node-lb01 to restore it as MASTER (its higher priority means it will reclaim the floating IP automatically):
sudo systemctl start keepalived
Go to node-lb02 and verify if it uses floating IP. This time you won't see the floating IP.
5.2 Simulate a web server failure
Stop NGINX on web01:
sudo systemctl stop nginx
Watch the HAProxy stats page. web01 should flip to DOWN within about 6 seconds (3 failed checks × 2s interval), and all traffic should shift to web02 with zero client-visible errors, since HAProxy stops routing to a backend the moment it's marked down.
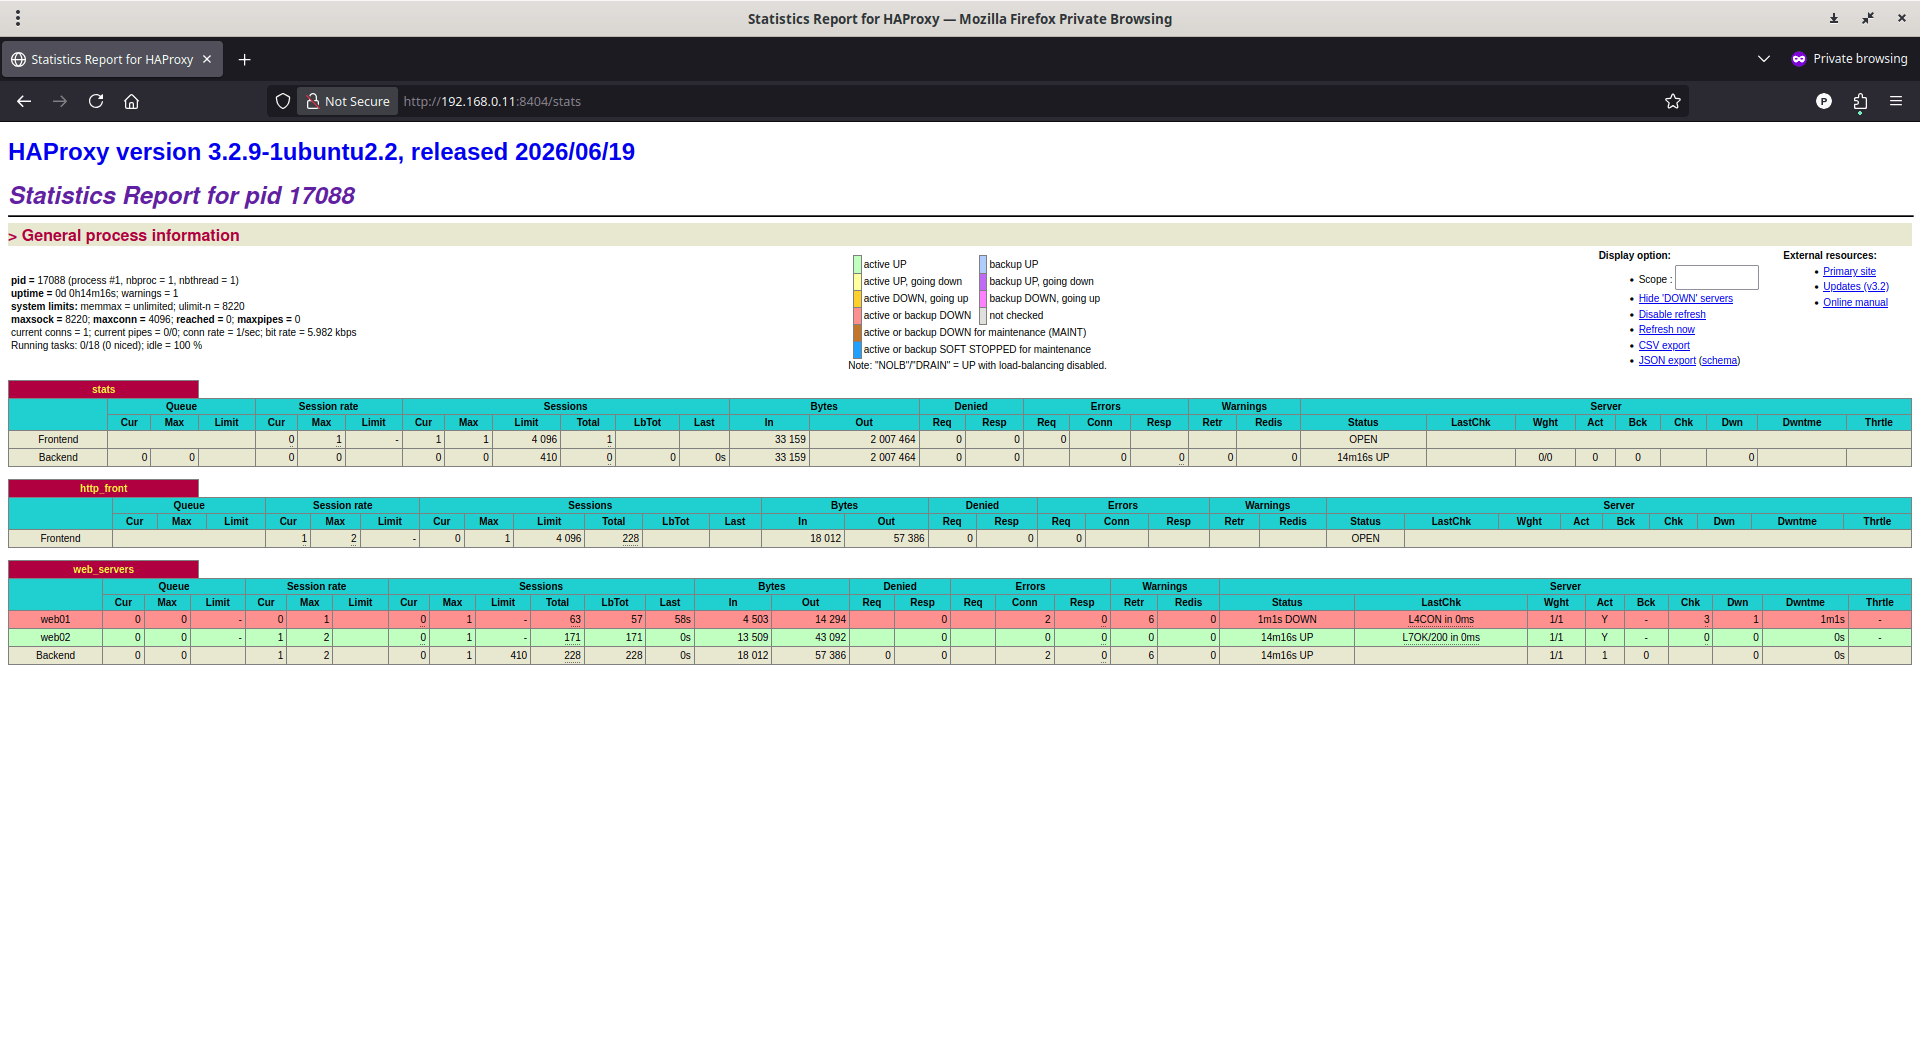
Bring NGINX back up and confirm web01 rejoins rotation:
sudo systemctl start nginx
5.3 Simulate an HAProxy failure on the active node
Stop HAProxy (not Keepalived) on whichever node is currently MASTER:
sudo systemctl stop haproxy
Because of the track_script block, Keepalived should detect this via check_haproxy.sh and demote itself, handing the floating IP to the other node, even though Keepalived itself is still running.
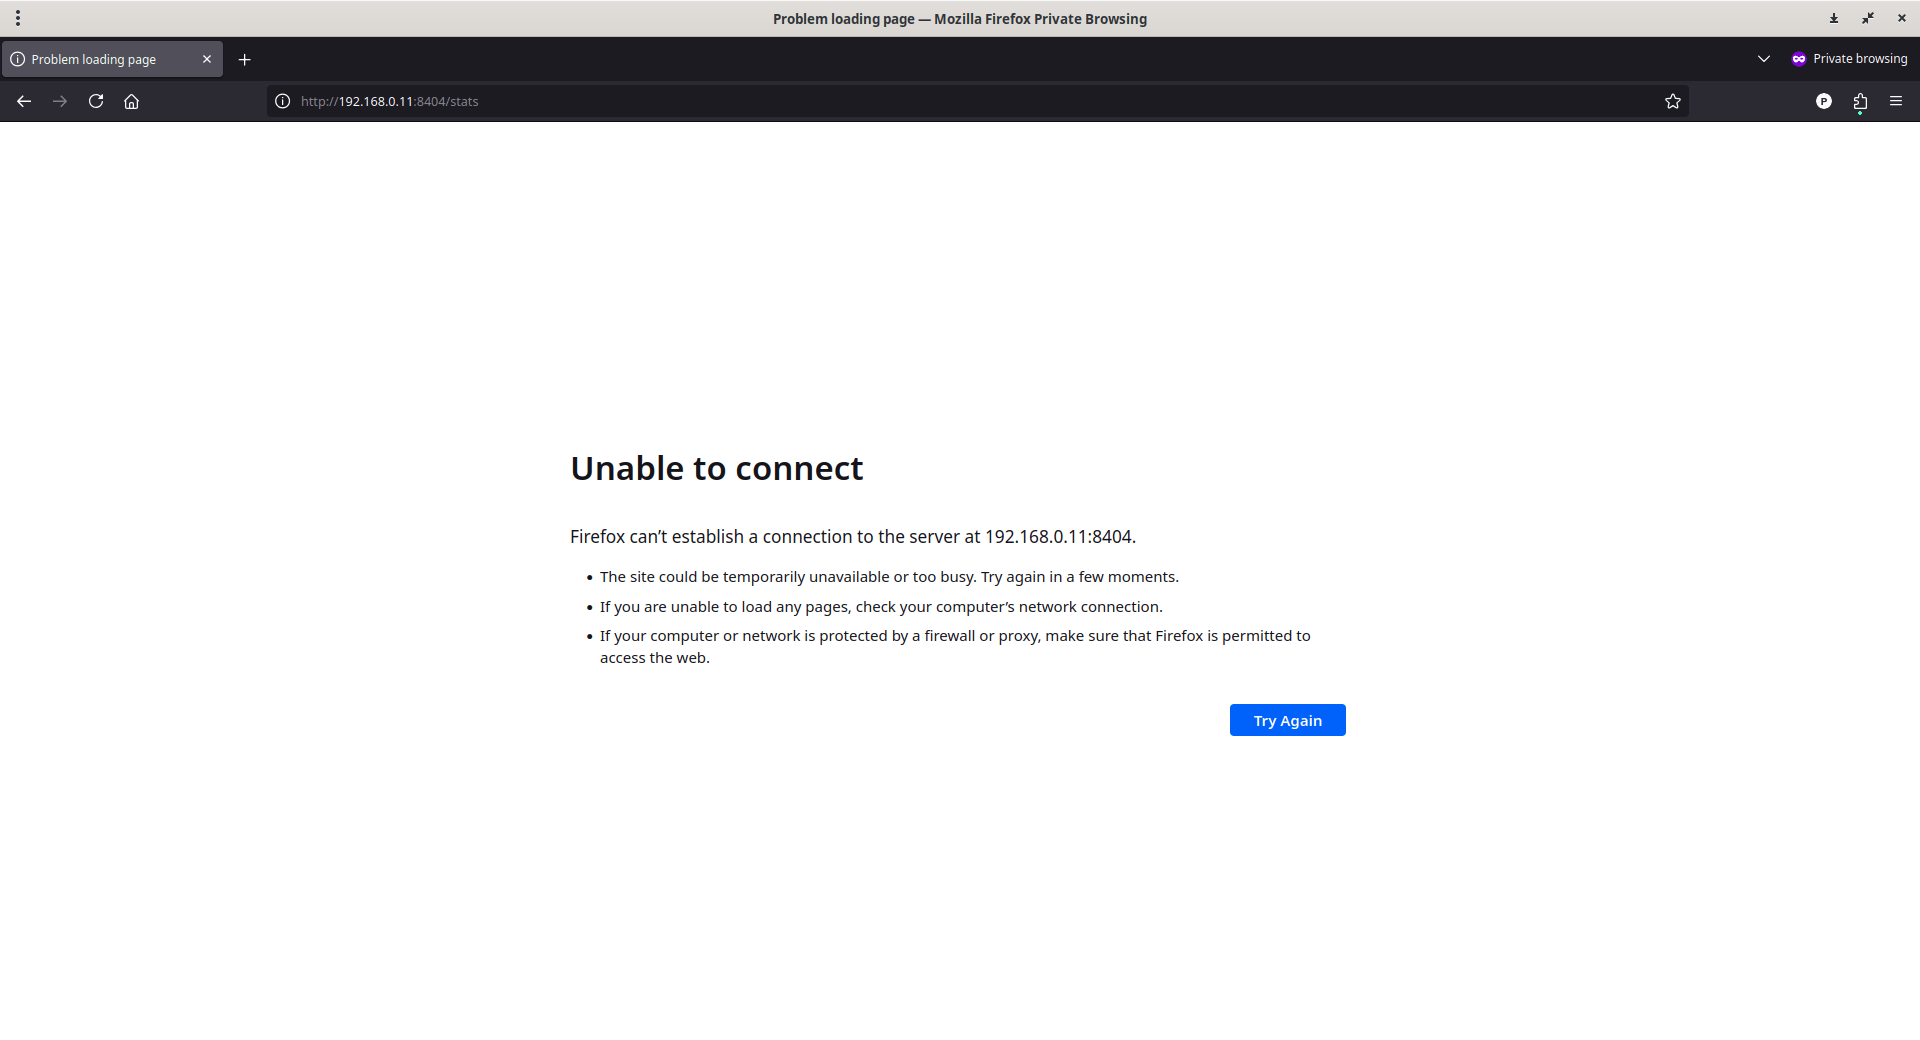
Now try to access the HAProxy stats page of the MASTER node i.e. http://192.168.0.11:8404/stats. It will not load.
You still can access the HAProxy stats page of the BACKUP node i.e. http://192.168.0.12:8404/stats and view all nodes stats.
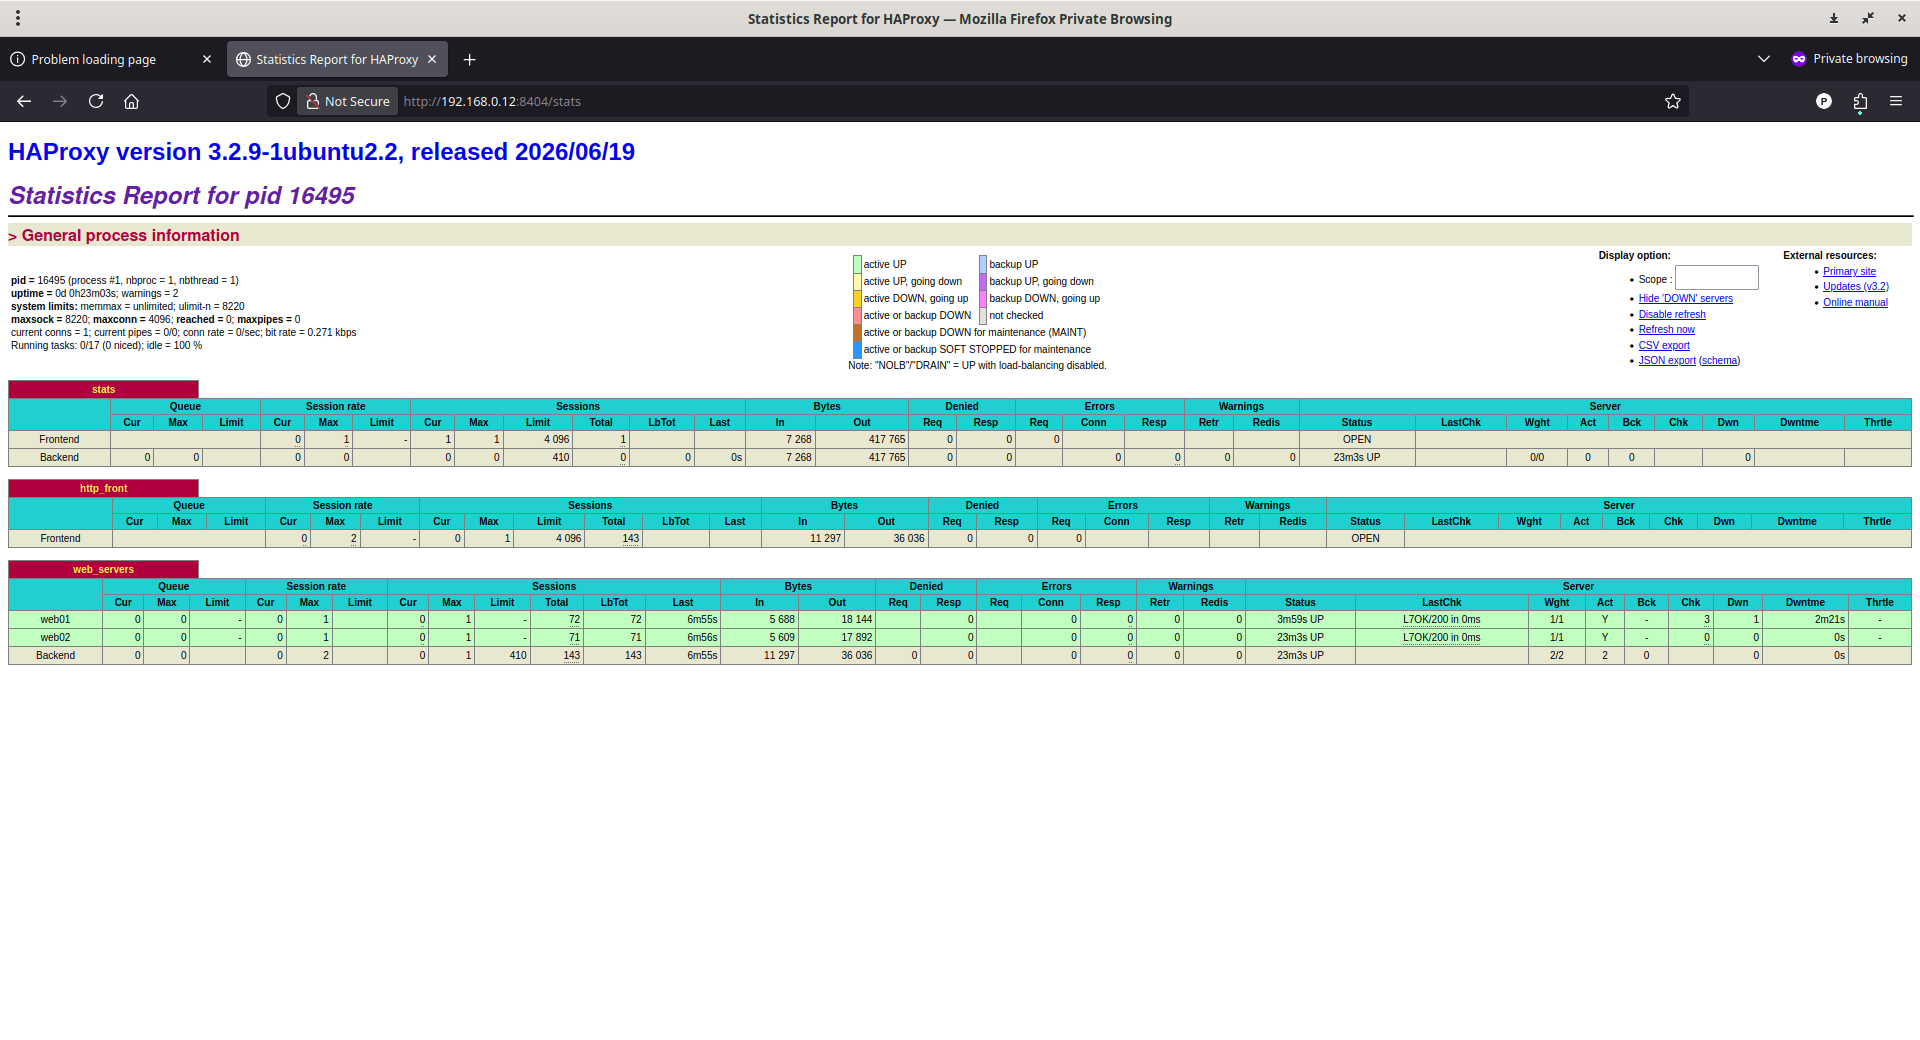
This is the scenario that a naive Keepalived-only setup (without health-checking HAProxy) would miss entirely, leaving the floating IP pointed at a node with a dead proxy.
Part 6: Hardening for Production
A working failover demo is not the same as a production-ready stack. Before this goes live, consider:
1. TLS termination
This guide used plain HTTP for clarity. In production, terminate TLS at HAProxy (or at NGINX on the backend, or both) using Let's Encrypt via certbot, and redirect port 80 to 443.
2. Unicast VRRP if multicast is unreliable
Some cloud providers (AWS, Azure, GCP) block multicast/broadcast traffic, which VRRP relies on by default. Use unicast_src_ip and unicast_peer directives inside vrrp_instance to run VRRP over unicast instead.
3. Firewall rules
Lock down the HAProxy stats page (port 8404) to internal IPs only, and restrict inbound VRRP traffic between the two LB nodes to each other.
4. More than two backend web servers
The pattern here extends cleanly. Add more server lines to the HAProxy backend block.
5. Monitoring and alerting
Ship HAProxy and Keepalived logs to a central system (e.g., Prometheus + the HAProxy exporter, or a log aggregator) and alert on VRRP state transitions. A failover working correctly is good, but you still want to know it happened.
6. Session persistence
If your application relies on server-side sessions (not stateless/JWT-based), add cookie SRVID insert to the backend block, or move session state to a shared store like Redis so either backend can serve any request.
7. Configuration management
Once this is validated manually, move the HAProxy and Keepalived configs into Ansible, Terraform, or your provisioning tool of choice so both LB nodes stay in sync and new nodes can be built reproducibly.
Why This Gets You Toward 99.99%
Uptime math is unforgiving. As we already said, 99.99% allows roughly 52 minutes and 36 seconds of downtime per year, or about 4.3 minutes per month. A single load balancer or single web server can easily blow that budget with one bad kernel update or one hardware failure.
This architecture removes single points of failure at two layers:
- Load balancer layer: Keepalived's VRRP failover typically completes in 1–3 seconds, and because it also tracks HAProxy's own health (not just whether the machine is up), a hung or crashed proxy process triggers failover too.
- Application layer: HAProxy's active health checks remove a failed web server from rotation within seconds, and traffic continues serving from the remaining node(s).
What this stack does not solve on its own are application-level bugs, database failover, DNS-level outages, or failures that take down both LB nodes simultaneously (e.g., a shared power/network dependency).
So if 99.99% is a hard SLA commitment, make sure the two load balancers and two web servers sit in genuinely independent failure domains (separate racks, availability zones, or hosts), not just separate VMs on the same hypervisor.
Summary
You now have:
- Two NGINX web servers serving content and a health-check endpoint
- Two HAProxy instances load-balancing across those web servers with active health checks
- Two Keepalived instances sharing a floating IP via VRRP, with failover tied to HAProxy's actual health, not just node liveness
This is the same pattern used under the hood by countless production SaaS platforms, and it's fully open source, self-hostable, and cloud-agnostic. From here, the natural next steps are TLS termination, configuration automation, and layering in monitoring so failovers are visible rather than silent.
