The df command is a popular tool for inspecting and managing filesystems in Linux. It displays the amount of disk space used and available on mounted filesystems. However, there are better alternatives, such as dysk, which provides more detailed information and features. This guide will discuss what dysk is, its features, how to install it on Linux, and how to use dysk to get information on Linux filesystems.
Table of Contents
Introduction
A filesystem in Linux refers to the method and data structure that an operating system uses to keep track of files on a disk or partition. It organizes and controls how data is read and written, ensuring that data can be stored and retrieved efficiently.
In Linux, understanding the structure and details of your filesystems is essential for efficient system administration and data management.
Many tools exist for identifying the currently available filesystems in Linux, with df command being the most commonly used command-line tool. A better alternative to the df command is dysk, which lists filesystems in Linux.
What is dysk?
Formerly known as 'lfs', the dysk utility is a command-line tool for displaying information about mounted disks in Linux. The developer claims that it is a slightly better alternative to the df -H command.
While most of the information provided by dysk is also available through df, dysk offers a few improvements, as listed below:
- dysk aids in identifying your disks by labeling them as "rem" (removable), "HDD", or "SSD".
- Unlike df, dysk exclusively uses SI units, eliminating the need to refer to the help section to find the right argument for the correct size units.
- dysk displays the type of filesystem.
- It sorts filesystems by size.
- In contrast to the
dfcommand, dysk presents the output in a tabular column format, whiledfdisplays the output in a listing format.
dysk is an open source program written in Rust. The code is freely available on GitHub.
Install dysk in Linux
Dysk can be installed using the Cargo package manager or via precombiled binaries.
Method 1: Installation via Cargo Package Manager
Install Rust:
If you don't have Rust installed on your Linux machine, you'll need to install it first.
Update Rust (if already installed):
Ensure you have the latest version of Rust by running the following command:
$ rustup update
Install Dysk:
With Rust updated, proceed to install Dysk using the Cargo package manager with the following command:
$ cargo install --locked dysk
Method 2: Installation via Precompiled Binaries
Download the Precompiled Binary:
If you prefer using a precompiled binary, download the latest release from the dysk releases page using the command below:
$ wget https://dystroy.org/dysk/download/x86_64-linux/dysk
Move the Executable to Your $PATH:
Move the dysk executable to a directory included in your system's $PATH, for example, /usr/local/bin/. This allows you to run the dysk command from anywhere:
$ sudo mv dysk /usr/local/bin/
Now, Dysk is installed and ready to use on your Linux system. You can begin exploring and managing your filesystems in Linux.
Get Linux Filesystems Information with dysk
Following are a few examples to access filesystems information in Linux using dysk utility.
Standard Overview:
Get a basic overview of your usual disks by simply typing:
$ dysk
This will list all of the disks that are currently mounted on your system, along with their size, used space, free space, and utilization percentage.
┌──────────┬────┬────┬────┬─────────┬────┬────┬───────────┐
│filesystem│type│disk│used│   use   │free│size│mount point│
├──────────┼────┼────┼────┼─────────┼────┼────┼───────────┤
│/dev/sda6 │ext4│HDD │3.2G│10% ▌    │ 30G│ 34G│/home      │
│/dev/sda1 │ext4│HDD │7.1G│40% ██   │ 11G│ 18G│/          │
└──────────┴────┴────┴────┴─────────┴────┴────┴───────────┘

List All Filesystems:
View all filesystems using the -a option:
$ dysk -a
This will list all of the filesystems that are currently mounted on your system, including those that are not associated with a disk, such as the tmpfs filesystem.

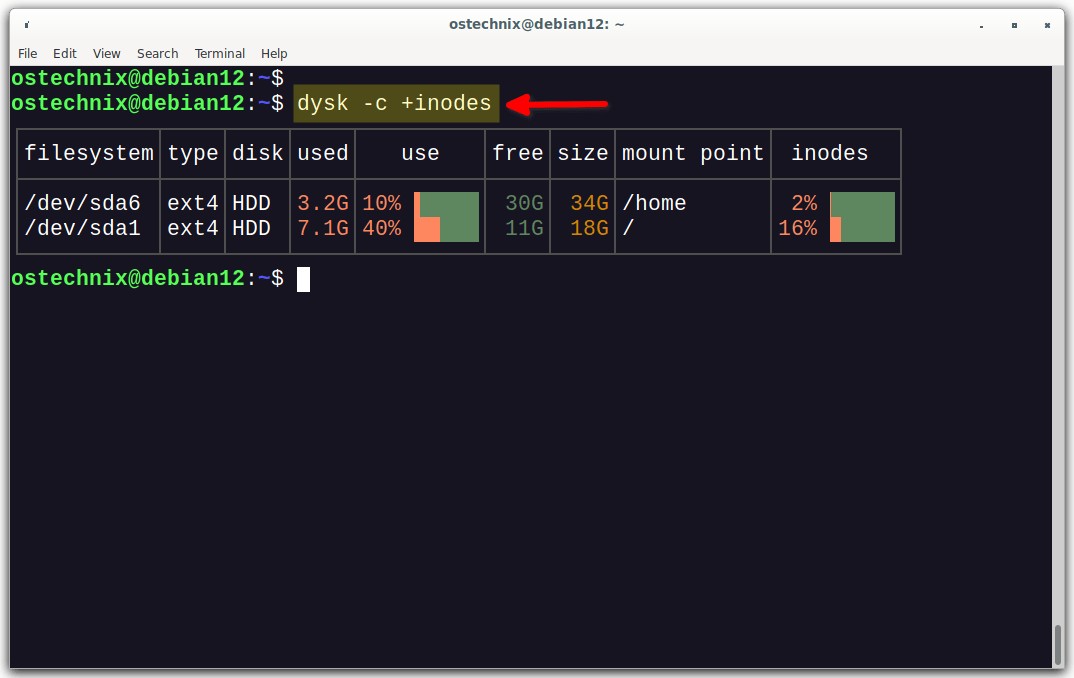
Display Inodes Information:
Access inodes information with the -c +inodes option:
$ dysk -c +inodes
This will add a column to the output that shows the number of inodes used and available on each filesystem.
Custom Column Display:
Tailor the displayed columns to your preference with the -c option. You can adjust the column order as needed:
$ dysk -c label+dev+
This will add two columns to the output: one for the label of the filesystem and one for the device name.

You can add any column that you want by specifying its name after the -c option. You can also use the + and - symbols to add or remove columns before or after the existing columns.
For additional column options and order adjustments, refer to dysk table columns page.
Current Directory Disk Info:
Check the disk information of the current directory by using .(dot):
$ dysk .
This will show information about the disk that the current directory is located on.

Low Space Filter:
Employ filters to view disks with usage over 65% or free space under 50G:
$ dysk -f 'use > 65% | free < 50G'
This will filter the output to only show filesystems that are using more than 65% of their space and have less than 50GB of free space. You can use any valid Boolean expression in the -f option to filter the output.
Exclude SSD Disks:
Filter out SSD disks using:
$ dysk -f 'disk <> SSD'
This will filter the output to only show filesystems that are not on SSD disks. You can use the disk field in the filter expression to filter by disk type.
Complex Filter:
Apply complex filtering for more nuanced searches:
$ dysk -f '(type=xfs & remote=no) | size > 5T'
This will filter the output to only show xfs filesystems that are not remote and are larger than 5TB. You can use multiple filters in a single expression by connecting them with the | operator.
Export as JSON:
Export disk information as a JSON file using the -j option:
$ dysk -j
This will export the output in JSON format.

This can be useful for piping the output to another program or for saving the output to a file.
Sort by Free Size:
Sort the output based on free size, and add -desc to sort in reverse:
$ dysk -s free
This will sort the output by free size in ascending order.

You can add the -desc option to the column name to sort in reverse order.
$ dysk -s free -desc
Display Help:
To view the help section, run:
$ dysk --help
Frequently Asked Questions
Here are some commonly asked questions (FAQ) about dysk utility.
A: dysk is a command-line utility in Linux designed to provide detailed information on mounted disks and filesystems, offering a more user-friendly and enhanced alternative to the traditional df command.
A: You can install dysk either through the Cargo package manager after installing Rust, or by downloading and utilizing the precompiled binaries available on the releases page on GitHub.
A: Unlike df, dysk presents information in a tabular format, provides custom column display, advanced filtering, and sorting options, and can export data in JSON format, among other features.
A: Simply run the command dysk without any options in your terminal for a standard overview of your usual disks.
A: To list all filesystems, use the command dysk -a.
A: Absolutely! dysk provides sorting and filtering options through -s and -f flags respectively. For example, dysk -f 'use > 65% | free < 50G' filters for specific space usage conditions.
A: You can export the output to a JSON file by using the command dysk -j.
A: Yes, to display inodes information, use the command dysk -c +inodes.
A: Yes, dysk is an opensource and free utility. The source code is freely available in GitHub.
Conclusion
Dysk is a nice alternative to the df command for displaying information about filesystems in Linux. It is more informative than the df command, and it provides a variety of features for filtering, sorting, and exporting the output.
Dysk is a valuable tool for any Linux user, and it is especially useful for system administrators and developers.
Here are some specific examples of how dysk can be used:
- System administrators can use dysk to monitor disk usage and identify filesystems that are running low on space.
- Developers can use dysk to verify the filesystem type and size of a disk before deploying an application.
- Users can use dysk to troubleshoot filesystem problems and to optimize system performance.
I encourage you to try dysk and see how it can help you get more information about your filesystems.
Resources:
Related read:
- The Best Modern Linux Commands For Beginners And Experts
- How To Find The Mounted Filesystem Type In Linux
- Some Good Alternatives To ‘du’ Command
- How To View Disk Usage With Duf On Linux And Unix
- Filelight – Visualize Disk Usage On Your Linux System
- How To Check Disk Space Usage In Linux Using Ncdu
- Agedu – Find Out Wasted Disk Space In Linux
- Duc – A Collection Of Tools To Inspect And Visualize Disk Usage