In this tutorial, we will discuss what is XCP-ng, and the key features of XCP-ng and finally how to install XCP-ng Hypervisor using ISO image file.
Table of Contents
What is XCP-ng?
XCP-ng is an Opensource Hypervisor based on XenServer. XCP-ng has a modern, powerful web UI to manage, monitor and administer all your VMs in one place.
It supports live migration i.e. allows you to migrate VMs with no downtime. It also supports live storage migration. Meaning - you can move the virtual disk within and across resource pools.
XCP-ng will automatically adjusts the amount of memory available for use by a guest VM's operating system.
Live patching is also supported, so you can patch hypervisors without needing to migrate, shut down or suspend VMs (no host reboots required too).
XCP-ng is an opensource project and completely FREE. No restrictions or limits on features! If you want commercial support, you can purchase a license.
XCP-ng Features
Concerning about XCP-ng features, we can list the following:
- Live patching,
- Live storage migration,
- Dynamic memory control,
- Maximum pool size,
- GPU and USB pass-through,
- SR-IOV Networking,
- Free and Opensource.
Create XCP-ng Bootable USB Disk
Download the latest XCP-ng ISO from the XCP-ng website. As of writing this, the latest version was 8.2.1 and it can be downloaded from the following link.
After downloading latest XCP-ng ISO, create bootable USB with XCP-ng ISO. There are many bootable USB creation tools available to create a bootable USB medium. We already have reviewed a few bootable USB creation applications. You can pick any one that suits you.
Command line bootable USB creation tools:
- How To Create Multiboot USB Drives With Ventoy In Linux
- How To Create Bootable USB Drive Using dd Command
- Bootiso Lets You Safely Create Bootable USB Drive In Linux
Graphical bootable USB creation tools:
- Create Bootable USB Drive With Ventoy WebUI In Linux
- Create Bootable USB Drives And SD Cards With Etcher In Linux
- Popsicle – Create Multiple Bootable USB Drives At Once
- Create Bootable USB Drive With USBImager In Linux
- Kindd – A Graphical Frontend To dd Command
After creating XCP-ng bootable USB, boot your system with the newly created bootable usb drive.
Install XCP-ng Hypervisor
You will be pleased with XCP-ng installer welcome screen. Press ENTER to start XCP-ng installation. If you don't press ENTER key, the installation will automatically after a few seconds.

If it is UEFI mode, you should the following screen:

Heads Up:
Please don't switch from BIOS to UEFI and vice versa after XCP-ng is installed. Just use the same mode that you chose during the install.
Select the Keymap you would like to use and HIT ENTER key:

Installing XCP-ng will erase all data in your hard drive. Choose OK and press ENTER to continue.

Choose "Accept EULA" and hit ENTER key to continue.

Next. the disk selection wizard will appear. If you have two disks, you must choose which disk to be used for the OS installation and which disk should be used for Virtual Machine storage. The disk where the VM disks will be stored is called a Storage Repository (SR).
If you have only one disk, you can use it for both OS installation and VM storage. I have only one disk, hence the installer uses it for both OS and VM storage.
The installer will also give you a choice whether you want to use "thick or thin provisioning". If you want to know the difference between thick and thin provisioning, refer this link.
By default, the installer will choose "thick provisioning" for you.
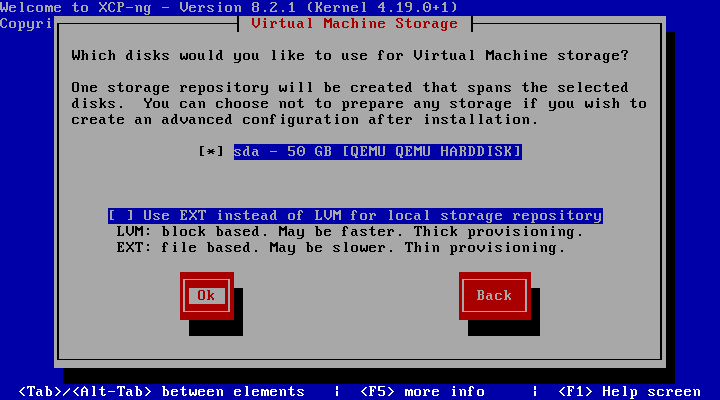
If you want to benefit from thin provisioning, I suggest you to select "Use EXT instead of LVM.." checkbox. Choose OK and hit ENTER to continue.

Select the type of installation source you'd like to use for this installation. If you use the default ISO, simply choose "Local media" and hit ENTER to continue.

The installer will prompt if you'd like to verify the installation source. I want to verify the source media, so I chose "Verify Installation Source" option.

The installer will check the source media and let you know if there is any problem with the installation media. My source media didn't have any issues, so I hit ENTER to continue.

Set a password for the root user account.

Set an IP address for the management configuration interface.

Enter a meaningful hostname for your XCP-ng server and enter the DNS server details.

Select the geographical area where the XCP-ng server is in and hit ENTER key.

Select the City that your XCP-ng server is located and press ENTER.

Next, choose how should the local system be determined.

Specify the NTP server details and hit ENTER to continue.

Heads Up:
I recommend you to ALWAYS use a NTP server. Because, It's a critical component to manage your host(s). If you don't know any NTP server, you can use pool.ntp.org.
If you want to manually set time, choose "Manual time entry".

Set your current local date and time in the following wizard.

So far we have entered all the required information for XCP-ng server installation. Now, choose "Install XCP-ng" to begin the installation.

Now the XCP-ng server installation will start. Keep an eye on the screen for further instructions.

After a few minutes, the installer will prompt you if you'd like to install any supplemental packs. if you choose "Yes", you should select supplemental pack source in the next window. I don't want to install supplemental packs, so I choose "No" and hit ENTER.

Now wait for the XCP-ng installation to complete. After a few minutes, you will see the "XCP-ng installation has completed" message.

Remove the installation media and press ENTER to reboot the server.
After server reboot, you will be pleased with the XCP-ng server configuration menu as shown in the following screenshot.

Congratulations! At this stage, your server is successfully installed with XCP-ng.
Conclusion
In this tutorial, we discussed what is XCP-ng, and how to install XCP-ng server using ISO. In our upcoming articles. we will see how to get started with XCP-ng server and how to deploy Virtual machines.
Resource: