Access control is one of the crucial concepts in all the Database environments. In this article, we will learn about Snowflake Role based Access Control (RBAC) and how to create custom roles and grant access to the roles from Snowflake WebUI and using SnowSQL CLI client.
Table of Contents
1. What is Role based Access Control (RBAC)?
Snowflake provides Role-based Access Control (RBAC) as a mechanism for granting or denying access to various database objects and actions to security principals (users, services, and so on).
2. What is Role?
Roles are the entities that may grant and revoke rights on securable objects. Users are allocated roles to allow them to undertake activities necessary for their organization's business functions.
A user can have several roles assigned to them. Users can swap roles to conduct different tasks with different sets of rights.
Roles can be assigned to other roles also which results role hierarchy. Custom roles can be created by users with suitable access. Any roles above that position in the hierarchy inherit the privileges associated with that role.
In a Snowflake account, there will be some system-defined roles which are inbuilt. Roles that are defined by the system cannot be removed and the privileges assigned to these roles cannot be revoked.
There are five system-defined roles, and Snowflake determines what "role" each system role should fulfill, which users should follow.
- ACCOUNTADMIN: The ACCOUNTADMIN position combines the SYSADMIN and SECURITYADMIN responsibilities into one.
- ORGADMIN: At the organisational level, this is a role that manages operation.
- SECURITYADMIN: This position is responsible for monitoring and managing users and roles.
- USERADMIN: This position is in charge of creating roles and users.
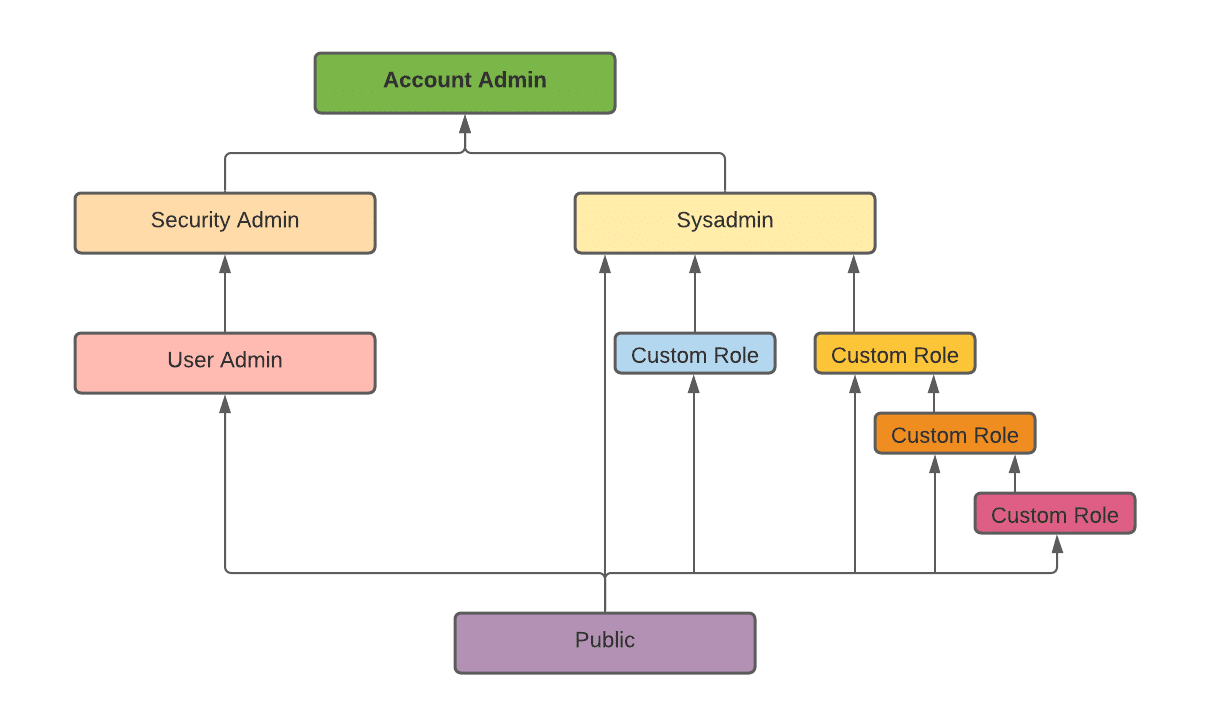
- SYSADMIN: In an account, this role has the ability to construct warehouses, databases, and other objects. SYSADMIN is supposed to roll up all custom roles.
- PUBLIC: This is a role that is automatically assigned to all users and roles in your account.
Apart from these system-defined roles, one can create roles according to the requirement and assign privileges to that role. That is called as Custom roles.
3. Role Hierarchy and Privilege Inheritance
The following diagram illustrates how the system defined roles are hierarchized and how the custom roles can be associated with system defined roles.
ORGADMIN is a distinct system role that oversees organization-wide operations. The hierarchy of system roles does not contain this role.
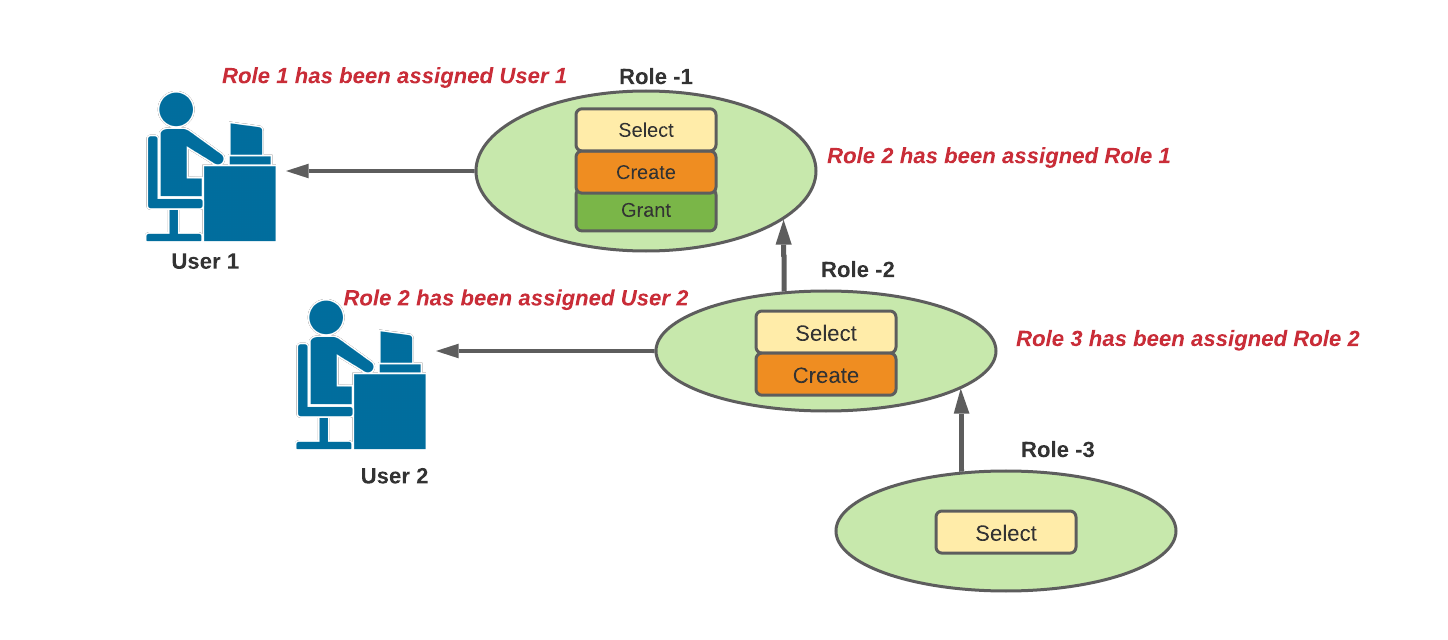
Example for Role Hierarchy and Privilege Inheritance:
In the above example,
- Role 2 inherits Privilege 'Select'.
- Role 1 inherits Privileges 'Select' and 'Create'.
- User 1 has been assigned Role-1, which means all three privileges.
- User 2 has been assigned Role-2, which means 'Select' and 'Create' privileges.
Note: Privileges will be granted to roles, and roles will be granted to users, to determine the actions/operations that the users can perform on objects in the system.
4. How to create Custom Roles
Here we are going to create the custom roles that we discussed earlier. We can creates rules from Snowflake's WebUI or using SnowSQL CLI client. First, we will see the graphical way.
4.1. Create roles from Snowflake WebUI
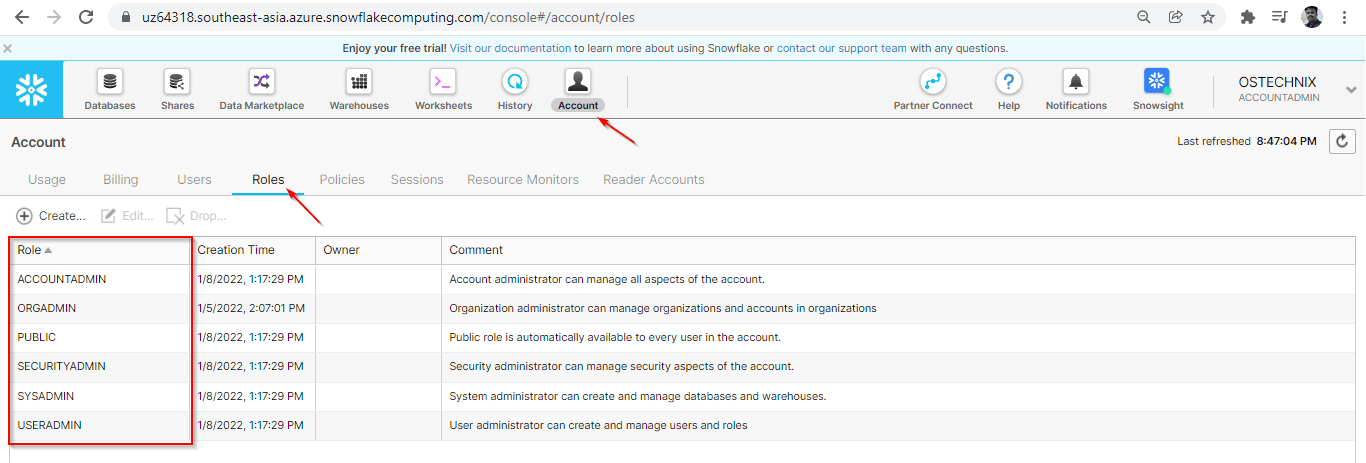
You can view the System defined roles in the Snowflake UI. Go to Snowflake-UI ? Account ? Roles.
Create a new Role named 'dev_ostechnix'. To do so, go to Snowflake-UI ? Account ? Roles ? Create.
Fill the role name, select the parent role and comment about this role.
The new role 'dev_ostechnix' will be created once you hit the 'Finish' button.
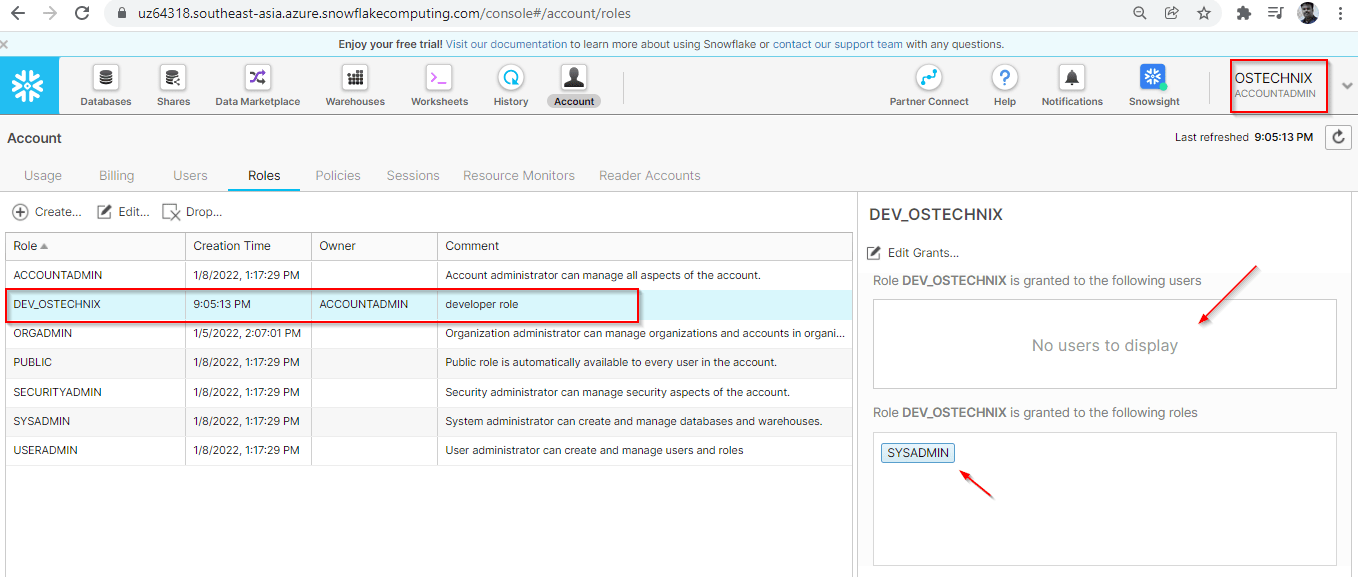
We have created this custom role with the system defined role 'ACCOUNTADMIN'. Currently no users have been granted this role. As the parent role is SYSADMIN, the role 'dev_ostechnix' is granted to 'SYSADMIN'.
4.2. Create roles from commandline using SnowSQL
Connect Snowflake with SnowSQL using the command below:
# snowsql -a uz64318.southeast-asia.azure -u OSTECHNIX
Enter your account password:
Password:
* SnowSQL * v1.2.21
Type SQL statements or !help
OSTECHNIX#COMPUTE_WH@(no database).(no schema)>
ACCOUNT ADMIN is the super privilege role, we have logged in with this role. Now we are going to create a custom role by the role ACCOUNT ADMIN.
You can check the current role by using below command:
OSTECHNIX#COMPUTE_WH@(no database).(no schema)>select current_role();
+----------------+
| CURRENT_ROLE() |
|----------------|
| ACCOUNTADMIN   |
+----------------+
1 Row(s) produced. Time Elapsed: 0.133s
OSTECHNIX#COMPUTE_WH@(no database).(no schema)>
Create the role 'TEST_OSTECHNIX' with the comment 'tester role' using the below command.
OSTECHNIX#COMPUTE_WH@(no database).(no schema)>CREATE ROLE "TEST_OSTECHNIX" COMMENT = 'tester role';
Sample output:
+-------------------------------------------+
| status                                    |
|-------------------------------------------|
| Role TEST_OSTECHNIX successfully created. |
+-------------------------------------------+
1 Row(s) produced. Time Elapsed: 0.753s
OSTECHNIX#COMPUTE_WH@(no database).(no schema)>
You can view the roles by using the below command.
OSTECHNIX#COMPUTE_WH@(no database).(no schema)>show ROLES;
As of now, no privileges are granted to the role 'TEST_OSTECHNIX'.
Verify the grants using the below command.
OSTECHNIX#COMPUTE_WH@(no database).(no schema)>show grants to role TEST_OSTECHNIX;
5. Grant Privileges to the Role
Each Object category will have their own set of privileges. For example, 'Virtual Warehouse' will have the below privileges.
- MODIFY: Allows to alter the properties of Warehouse.
- MONITOR: Allows to monitor the queries running in the Warehouse and the usage it’s statistics of Warehouse.
- OPERATE: Allows to change the state of the Warehouse like Stop, Start, Suspend & Resume. Also allows to view the past & present queries in the Warehouse and abort the queries.
- USAGE: Allows to use the Warehouse, ie., allows to execute the queries in the Warehouse.
- OWNERSHIP: Allows full control of the Warehouse. Only a single role can have this privilege on an Object at a time.
- ALL: Allows all privileges except the OWNERSHIP.
Here we are granting privileges of the object 'Virtual Warehouse' to the role we created above.
5.1. Grant privileges to the Role from Snowflake WebUI
You can switch the role if the role has been granted to the role. As we are using the role ACCOUNT ADMIN, it will be having super control. Switch the role by clicking the options under Account in the top right corner.
Now we are in the role 'ACCOUNT ADMIN'. It will be having all the privileges on the Warehouses in the system.
As soon as we switch the role, we can see that the role 'DEV_OSTECHNIX' does not able to view any Warehouses in the system. Role 'DEV_OSTECHNIX' does not have any privileges.
To grant privileges, the user has to switch to the role which has privileges to grant the role. As we are using ACCOUNT_ADMIN, we are switching to it and granting privileges to the role DEV_OSTECHNIX.
Select the row of the Warehouse to which you want to provide privilege, you will get a popup of provision privileges on the right side.
No privileges are granted now. Click the 'Grant Privileges' to grant privileges to the role.
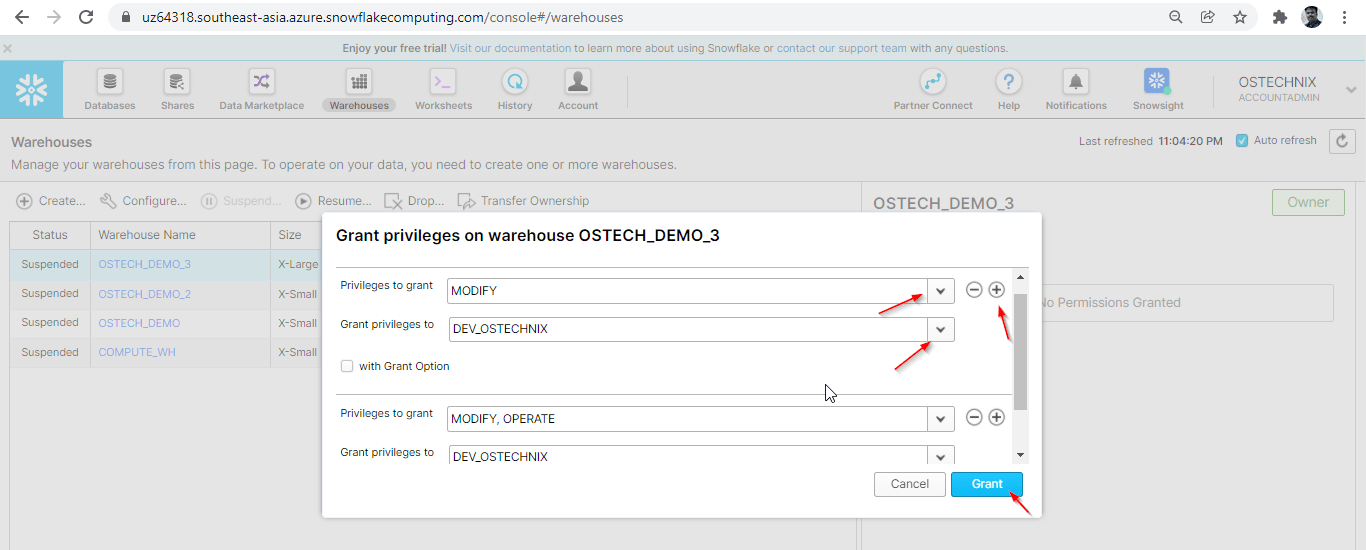
Select what privilege you want to grant and select the role to which you want to grant that privilege. You can click + symbol in the top right to add the privileges to grant.
Here, we are granting MODIFY and OPERATE privileges to the role DEV_OSTECHNIX.
You can verify the privileges by switching the role to DEV_OSTECHNIX.
5.2. Grant privileges to the role using SnowSQL CLI Client
Make sure you are in the role which should be having privileges to grant. Here, we are using ACCOUNT_ADMIN in this demonstration.
OSTECHNIX#COMPUTE_WH@(no database).(no schema)>select current_role();
+----------------+
| CURRENT_ROLE() |
|----------------|
| ACCOUNTADMIN   |
+----------------+
1 Row(s) produced. Time Elapsed: 0.133s
OSTECHNIX#COMPUTE_WH@(no database).(no schema)>
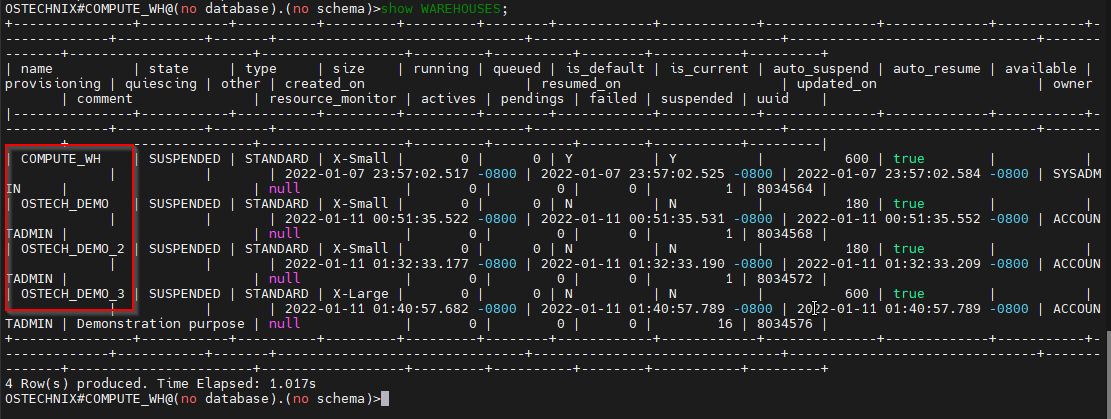
View the Warehouses available in the system by using the below 'show' command.
OSTECHNIX#COMPUTE_WH@(no database).(no schema)>show WAREHOUSES;
Switch the role to TEST_OSTECHNIX.
OSTECHNIX#COMPUTE_WH@(no database).(no schema)>use role TEST_OSTECHNIX;
Verify the privileges on the Warehouses by just viewing the Warehouses.
As of now, no privileges are granted to the role TEST_OSTECHNIX.
To grant the privileges, switch back to the role ACCOUNT_ADMIN.
OSTECHNIX#(no warehouse)@(no database).(no schema)>use role ACCOUNTADMIN;
Grant the privileges on the Warehouse ‘OSTECH_DEMO_3’ to the role TEST_OSTECHNIX.
OSTECHNIX#COMPUTE_WH@(no database).(no schema)>grant MODIFY, OPERATE on warehouse OSTECH_DEMO_3 to role TEST_OSTECHNIX;
Verify the privileges by switching into the role TEST_OSTECHNIX.
OSTECHNIX#COMPUTE_WH@(no database).(no schema)>use role TEST_OSTECHNIX;
OSTECHNIX#(no warehouse)@(no database).(no schema)>show WAREHOUSES;
Now you can ensure that the role TEST_OSTECHNIX can view the Warehouse OSTECH_DEMO_3, and it is in Suspended state.
Start the Warehouse by using the below command.
OSTECHNIX#(no warehouse)@(no database).(no schema)>alter WAREHOUSE OSTECH_DEMO_3 RESUME;
Verify the status by using the 'show' command.
Now we can ensure the role TEST_OSTECHNIX has the granted privileges on warehouse OSTECH_DEMO_3.
Note: Whatever queries we are using in SnowSQL CLI, the same can be used in Snowflake worksheet available in WebUI.
Conclusion
In this article we have gone through role-based access control (RBAC) in Snowflake. We have demonstrated the RBAC simply creating roles and granting privileges to role on the object 'Virtual Warehouse'.
Similarly, we can provision the access on other objects like Databases, Tables etc. We will have detail understanding about user management and provisioning access to users in the next article.
Resource:









1 comment
Thanks. I never know about it. Will look into it.