
Table of Contents
Quick Summary
- Verifying an Ubuntu ISO confirms two things: that the file genuinely came from Ubuntu, and that it wasn't corrupted or altered during download.
- The Ubuntu ISO verification process has two steps, done in order: a GPG signature check on the
SHA256SUMSfile first, then a SHA256 checksum check on the ISO itself. - The GPG step is important because it proves the checksum file wasn't tampered with. Without it, comparing your ISO to an unverified checksum proves nothing.
- If the Ubuntu ISO is genuine, you will get output like
Good signaturefrom the GPG step andOKfrom the SHA256 step. Anything else means the file is unsafe to use.
Introduction
You just downloaded an Ubuntu ISO. Before you write it to a USB drive and boot your computer, you should verify it. This step takes only a few minutes, and it protects you from corrupted downloads and tampered files.
In this guide, I'll walk you through the steps to verify the integrity and authenticity of an Ubuntu ISO from start to finish, using the actual output from a real verification session. I'll also explain every command so you understand what you're doing and why.
Why You Should Verify Your Ubuntu ISO
When you download an ISO from the internet, two things can go wrong. First, the file might get corrupted during transfer. A dropped connection or a disk error can quietly damage part of the file. Second, and more seriously, someone could replace the file with a malicious version.
Ubuntu provides two tools to protect against both problems. GPG signatures prove that the checksum file genuinely came from Canonical, the company behind Ubuntu. SHA256 checksums, on the other hand, prove that your ISO matches that trusted file exactly.
Think of it this way: GPG confirms the ruler is real, and then the ruler measures your ISO. You must do these steps in order, because the second check depends on the first.
| What you're checking | Tool | What it proves |
|---|---|---|
| Authenticity | GPG signature | The checksum file came from Ubuntu |
| Integrity | SHA256 checksum | Your ISO matches the checksum file |
What You'll Need Before You Start
Before we begin, gather a few things.
- First, you need the ISO file you downloaded.
- Second, you need two small files from the Ubuntu website:
SHA256SUMSandSHA256SUMS.gpg. - Third, you need a terminal and two command-line tools called
gpgandsha256sum.
Most Ubuntu systems already have these tools installed. If you use Windows, I recommend installing WSL (Windows Subsystem for Linux), because PowerShell cannot handle the GPG step. If you use macOS, you can install the tools with Homebrew.
Step 1: Confirm Your Tools Are Ready
Open your Terminal. Here's how to open one on each system:
- Ubuntu desktop: Press
Ctrl + Alt + T - Windows: Open your WSL terminal
- macOS: Open Terminal from Applications → Utilities
Once your terminal is open, type these two commands one at a time:
gpg --version
sha256sum --version
If both commands print a version number, you're ready to continue. If you see "command not found," install the tools with this command on Ubuntu:
sudo apt install gnupg coreutils
Step 1: Put All Three Files in One Folder
This step is important, and beginners often miss it. All three files must sit in the same folder. Otherwise, the commands won't find them.
Here's what you need:
- An Ubuntu ISO. For demonstration purpose, we will be using Ubuntu 26.10 beat image.
SHA256SUMSSHA256SUMS.gpg
Navigate to your download folder:
cd ~/Downloads
Check if all files are there:
$ ls
SHA256SUMS  SHA256SUMS.gpg  ubuntu-26.10-beta-desktop-amd64.iso
If the gpg signature and sha26 checksum files are missing, go to the Ubuntu download page and download those files. They will usually located near the top of the download page.
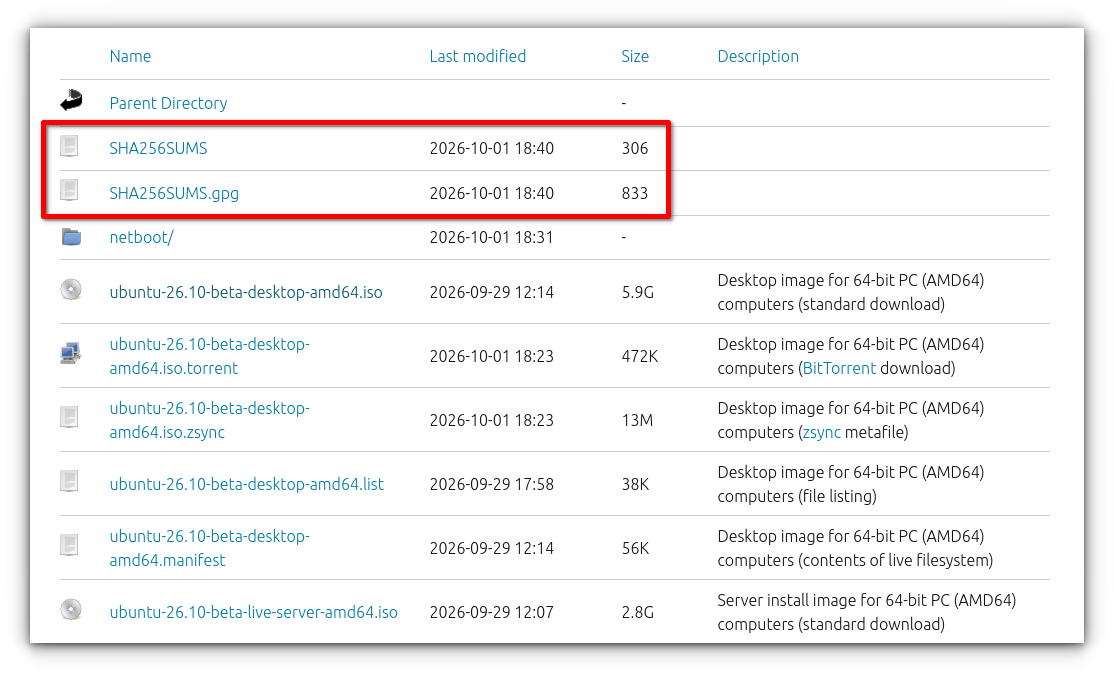
Download both files with curl:
curl -O https://releases.ubuntu.com/26.10/SHA256SUMS
curl -O https://releases.ubuntu.com/26.10/SHA256SUMS.gpg
Or with wget:
wget https://releases.ubuntu.com/26.10/SHA256SUMS
wget https://releases.ubuntu.com/26.10/SHA256SUMS.gpg
You can also simply right on those files and save them.
Now verify again with ls command. You should now see all three filenames listed together.
Step 4: Import Ubuntu's Public Key
When you download two files, the ISO and the SHA256SUMS checksum file, you have no inherent reason to trust either one. They both came from the same place over the same connection. If someone tampered with one, they could have tampered with both.
What GPG actually does
Ubuntu creates the SHA256SUMS file and then uses their private key to generate a digital signature for it. This signature is stored in the SHA256SUMS.gpg file.
The private key is secret. Only Ubuntu has it. Nobody else can produce a valid signature with it.
How verification works
Ubuntu also publishes a public key, which anyone can download. This public key can verify signatures made with the matching private key, but it cannot create them.
When you run gpg --verify SHA256SUMS.gpg SHA256SUMS, GPG does three things:
- It reads the signature file.
- It checks the signature mathematically against the
SHA256SUMSfile. - It checks that the signature was made using the private key matching Ubuntu's public key (which you imported earlier).
If all three checks pass, you get Good signature. This proves two things:
- The
SHA256SUMSfile has not been modified since Ubuntu signed it. - The signature was genuinely made by whoever holds Ubuntu's private key.
Why this matters
An attacker can modify the SHA256SUMS file. But they cannot generate a new valid signature for it, because they don't have Ubuntu's private key. So the GPG check catches the tampering.
Once you know the SHA256SUMS file is genuine, you can trust the checksums inside it. Then, and only then, does the SHA256 check on your ISO mean something.
To put this in simple terms, GPG works like a wax seal on an envelope. To check that a document bears Ubuntu's seal, you first need a copy of Ubuntu's seal on your computer.
Now, let us import the Ubuntu official public key:
gpg --keyid-format long --keyserver hkp://keyserver.ubuntu.com:80 --recv-keys 0x46181433FBB75451 0xD94AA3F0EFE21092
Let me break this down. The --keyserver flag points to the public server where Ubuntu's key lives. I've added :80 to force a port that usually works when the default one is blocked. The --recv-keys flag fetches the two specific key IDs shown at the end.
Here's the actual output from our session:
gpg: key D94AA3F0EFE21092: public key "Ubuntu CD Image Automatic Signing Key (2012) <cdimage@ubuntu.com>" imported
gpg: key 46181433FBB75451: public key "Ubuntu CD Image Automatic Signing Key <cdimage@ubuntu.com>" imported
gpg: Total number processed: 2
gpg:               imported: 2
You only need to do this once. The keys stay on your computer for future verifications.
Step 5: Verify the Signature (Authenticity Check)
Now we check that the SHA256SUMS file really carries Ubuntu's seal.
gpg --keyid-format long --verify SHA256SUMS.gpg SHA256SUMS
The first file is the signature, and the second is the file being signed.
Here's the real output from our session:
gpg: Signature made Friday 02 October 2026 12:10:39 AM IST
gpg:                using RSA key 843938DF228D22F7B3742BC0D94AA3F0EFE21092
gpg: Good signature from "Ubuntu CD Image Automatic Signing Key (2012) <cdimage@ubuntu.com>" [unknown]
gpg: WARNING: This key is not certified with a trusted signature!
gpg:          There is no indication that the signature belongs to the owner.
Primary key fingerprint: 8439 38DF 228D 22F7 B374  2BC0 D94A A3F0 EFE2 1092
Let's read this line by line.
The first two lines tell you when the signature was made and which key was used. The fingerprint at the bottom is a unique identifier for the key.
The third line is the one that matters: Good signature. That tells you the seal is genuine.
You will also see this warning:
gpg: WARNING: This key is not certified with a trusted signature!
Don't worry about it. This warning confuses almost everyone the first time. It simply means you haven't personally signed Ubuntu's key with a key of your own. Since you fetched the key directly from Ubuntu's official keyserver, you can trust it. The Good signature line is what matters.
However, if you see BAD signature instead, stop immediately. That means the checksum file has been tampered with. Delete both SHA256SUMS files and download them again.
Step 6: Verify the Ubuntu ISO (Integrity Check)
Now that we trust the checksum file, we use it as a ruler to measure the ISO.
sha256sum --check SHA256SUMS --ignore-missing
The --check flag tells the tool to compare files against the list. The --ignore-missing flag prevents errors about files in the list that you didn't download, such as the server ISO.
Here's the actual output from our session:
ubuntu-26.10-beta-desktop-amd64.iso: OK
The word OK means your ISO's fingerprint matches the official one exactly. If you see FAILED instead, the ISO is corrupted or tampered with, so delete it and download it again.
Troubleshooting Common Problems
If something goes wrong, check this table before you panic. Every entry here comes from real problems users hit during verification.
| Error message | What it means | How to fix it |
|---|---|---|
can't open 'SHA256SUMS.gpg': No such file or directory | The file isn't in your current folder | Run ls, then cd to the right folder or download the file |
keyserver receive failed: Server indicated a failure | The key server isn't responding | Add :80 to the server address, as shown in Step 4 |
not a key ID: skipping | A stray character got into the command | Retype the command carefully |
Good signature plus a trust warning | Normal on first use | Ignore it, the signature is still valid |
FAILED on the ISO check | The ISO is damaged | Re-download the ISO |
What to Do After Verification
Once you see OK, your ISO is confirmed safe. Therefore, you can now write it to a USB drive or boot it in a virtual machine.
There are many reliable tools available to write the ISO to a USB drive.
Command line bootable USB creation tools:
- How To Create Multiboot USB Drives With Ventoy In Linux
- How To Create Bootable USB Drive Using dd Command
- Bootiso Lets You Safely Create Bootable USB Drive In Linux
Graphical bootable USB creation tools:
- Create Bootable USB Drive With Ventoy WebUI In Linux
- Create Bootable USB Drives And SD Cards With Etcher In Linux
- Popsicle – Create Multiple Bootable USB Drives At Once
- Create Bootable USB Drive With USBImager In Linux
- Kindd – A Graphical Frontend To dd Command
If you intend to install and test Ubuntu on a hypervisor such as VirtualBox, KVM, or Proxmox, there's no need to create a bootable media. Instead, you can directly boot up the Ubuntu ISO image within your virtualization software.
Frequently Asked Questions (FAQ)
A: Yes, you should. Verification takes only a few minutes, and it protects you from corrupted files and tampered downloads. Additionally, it confirms you're installing exactly what Ubuntu released.
A: Because the checksum file is your ruler. If someone tampered with the ruler, then every measurement you take with it becomes meaningless. By verifying the checksum file first, you establish a chain of trust that makes the second check meaningful.
A: It means you haven't personally signed Ubuntu's public key with your own key. This warning appears for almost everyone on the first verification. As long as you see Good signature and you fetched the key from Ubuntu's official keyserver, you can safely ignore it.
A: No, not for the full process. PowerShell can calculate SHA256 hashes, but it cannot verify GPG signatures easily. For that reason, WSL is the better choice on Windows.
A: Your ISO is either corrupted or tampered with. In either case, you should delete it immediately and download a fresh copy from the official Ubuntu website. Then run the verification steps again.
Summary
Here's the entire workflow in five lines:
- Open a terminal
- Put the ISO, SHA256SUMS, and SHA256SUMS.gpg in one folder
- Import Ubuntu's public key (one-time step)
- Run
gpg --verifyand look for "Good signature" - Run
sha256sum --checkand look for "OK"
Two checks, in that order. If both pass, your ISO is safe to use.
Final Thoughts
Verifying an Ubuntu ISO is important, because it confirms two things before you trust the file with your computer: that the ISO genuinely came from Ubuntu, and that it wasn't corrupted or altered during download.
Without verification, you're taking a risk in two ways. A corrupted ISO can fail to boot or install, wasting your time and possibly damaging your system. A tampered ISO is even worse. It could contain malware that runs with full access to your machine once you boot or install it.
The verification process catches both problems. The GPG signature check on the checksum file proves the file came from Ubuntu and hasn't been modified. The SHA256 check then proves your ISO matches that trusted file exactly. Together, they give you certainty that what you're about to run is exactly what Ubuntu released.
Related Read:
