Ubuntu 16.04 LTS final is due for the release on April 21st, 2016. You can track the complete schedule list from the link below.
As you probably know, the second alpha release of Ubuntu 16.04 LTS, codenamed Xenial Xerus, is already out few weeks ago.
You can download and test the latest development edition from the following link.
And, the first beta of Ubuntu 16.04 LTS has been released. Check the following link for more details.
Some of you might want to upgrade to Ubuntu 16.04 LTS from Ubuntu 15.10 and older versions. If yes, read on. The upgrade process went good so far, but with some errors.
Note: Alpha and beta releases are only for development and testing purposes. You should not use it in production environment.
This tutorial describes how to upgrade to Ubuntu 16.04 LTS from Ubuntu 15.10.
Before going to upgrade, we need to update the system.
Open up the Terminal and enter the following commands.
sudo apt-get update && sudo apt-get dist-upgrade
The above command will download and install the latest available packages.
Reboot your system to finish installing updates.
sudo reboot
Now, enter the following command to upgrade to new available version.
sudo update-manager -d
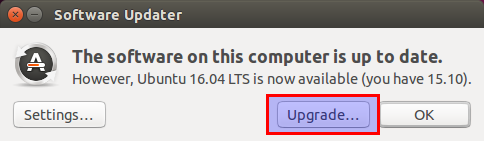
Software Updater window will show up and it is going to search for the available new release.
After a few seconds, you will see a screen like below that saying:
“The software on this computer is up to date.
However, Ubuntu 16.04 LTS is available now (you have 15.10)”.
Click Upgrade button to start the upgrade.
Then, Click Upgrade.
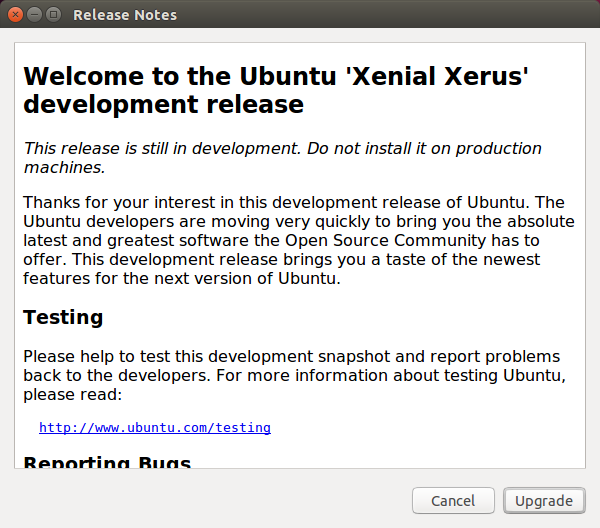
Be mindful that this release is still in development stage. Do not install it in production systems. The final stable version will be available on August 21, 2016.
Few minutes later, the software updater will ask you to start the upgrade. Click Start upgrade to continue.
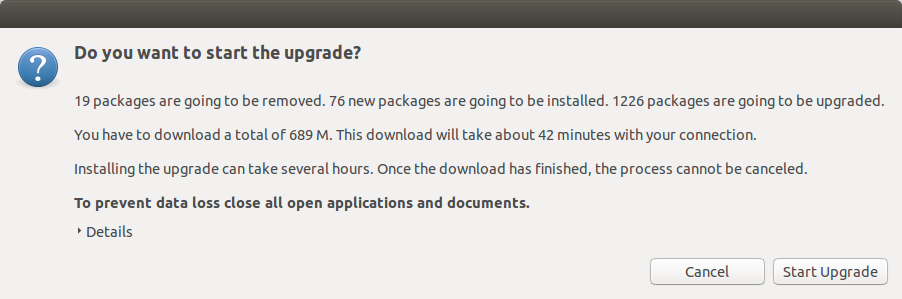
Now, the distribution upgrade will download new packages. Sit back and grab a cup of coffee. It will take a while depending upon your Internet connection speed.


Like I said earlier, Ubuntu 16.04 LTS is not yet ready. During upgrade, you might encountered with few errors. For me, most of them were Kernel 4.4 related errors. I suppose the latest Kernel and it's dependencies have not pushed in the repositories yet. However the upgrade process was completed with some errors.
Click Close to complete the upgrade process and reboot your system.
![Ubuntu 15.10 desktop [Running] - Oracle VM VirtualBox_002](https://ostechnix.com/wp-content/uploads/2016/02/Ubuntu-15.10-desktop-Running-Oracle-VM-VirtualBox_002-1.jpg)
Congratulations. Ubuntu 15.10 has been successfully upgraded to version 16.04.
![Ubuntu 15.10 desktop [Running] - Oracle VM VirtualBox_003](https://ostechnix.com/wp-content/uploads/2016/02/Ubuntu-15.10-desktop-Running-Oracle-VM-VirtualBox_003.jpg)
Log in to the newly upgraded Ubuntu 16.04 desktop.
![Ubuntu 15.10 desktop [Running] - Oracle VM VirtualBox_004](https://ostechnix.com/wp-content/uploads/2016/02/Ubuntu-15.10-desktop-Running-Oracle-VM-VirtualBox_004.jpg)
Here you can see the desktop of Ubuntu 16.04 LTS.
![Ubuntu 15.10 desktop [Running] - Oracle VM VirtualBox_005](https://ostechnix.com/wp-content/uploads/2016/02/Ubuntu-15.10-desktop-Running-Oracle-VM-VirtualBox_005.jpg)
To view the Ubuntu desktop details, go to System settings > Details.
![Ubuntu 15.10 desktop [Running] - Oracle VM VirtualBox_006](https://ostechnix.com/wp-content/uploads/2016/02/Ubuntu-15.10-desktop-Running-Oracle-VM-VirtualBox_006-1.jpg)
That’s it. Since Ubuntu 16.04 LTS is still under constant and heavy development, I strongly recommend not to use it for production environment. If you're a developer and curious to know what's in there, give it a try.
Server Upgrade
We saw how to upgrade to Ubuntu 16.04 desktop. Now, we will see how to upgrade from Ubuntu 15.10 server to Ubuntu 16.04 server.
First, Install the update-manager-core package if it is not installed yet using command:
sudo apt-get install update-manager-core
Then, Edit the file /etc/update-manager/release-upgrades,
sudo nano /etc/update-manager/release-upgrades
and set Prompt=normal or Prompt=lts as shown below.
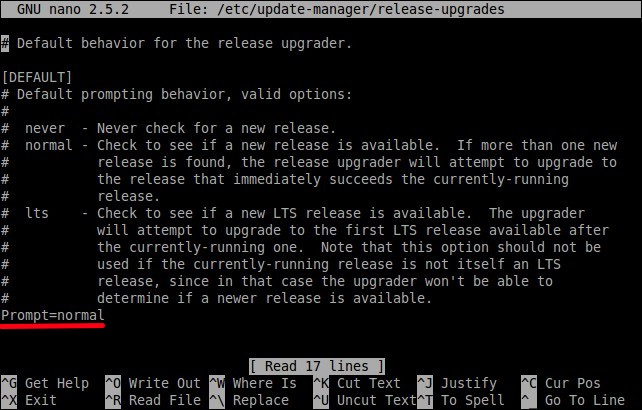
# Default behavior for the release upgrader.

[DEFAULT]
# Default prompting behavior, valid options:
#
#  never  - Never check for a new release.
#  normal - Check to see if a new release is available.  If more than one new
#           release is found, the release upgrader will attempt to upgrade to
#           the release that immediately succeeds the currently-running
#           release.
#  lts    - Check to see if a new LTS release is available.  The upgrader
#           will attempt to upgrade to the first LTS release available after
#           the currently-running one.  Note that this option should not be
#           used if the currently-running release is not itself an LTS
#           release, since in that case the upgrader won't be able to
#           determine if a newer release is available.
Prompt=normal
- Normal – Check to see if a new release is available. If more than one new release is found, the release upgrader will attempt to upgrade to the release that immediately succeeds the currently-running release.
- LTS – Check to see if a new LTS release is available. The upgrader will attempt to upgrade to the first LTS release available after the currently-running one. Note that this option should not be used if the currently-running release is not itself an LTS release, since in that case the upgrader won’t be able to determine if a newer release is available.
Ubuntu 16.04 is the next available version to Ubuntu 15.10, so I simply left it as normal.
Now, it is time to upgrade your server system to latest version using the following commands:
sudo apt-get update && sudo apt-get dist-upgrade
Reboot your system to apply the updates.
sudo reboot
In case you're upgrading via SSH, it is better to start the upgrade session within screen session. Because in case of any SSH connection failure during upgrade process, you can easily reconnect with the upgrade session.
To install the screen tool, run:
sudo apt-get install screen
Then start the screen session using command:
screen
In case of any failure, you can re-attach to the upgrade session with command:
screen -Dr
Now, start the upgrade process with command:
sudo do-release-upgrade -d
Type Y and press ENTER.
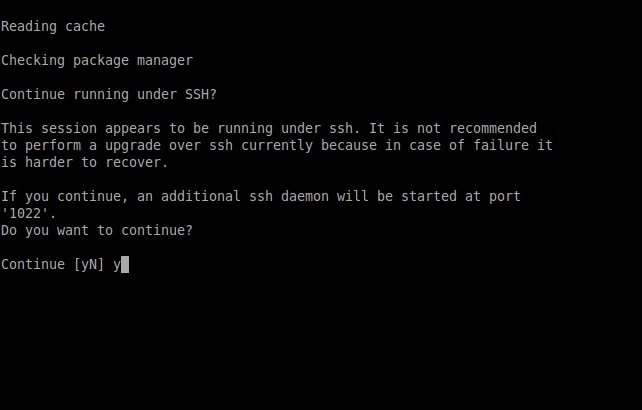
Press ENTER again.
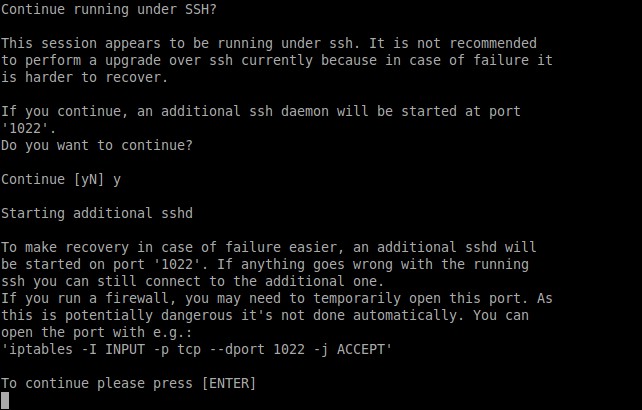
After a while, you'll be asked to continue the upgrade process. Type Y and press ENTER to continue.
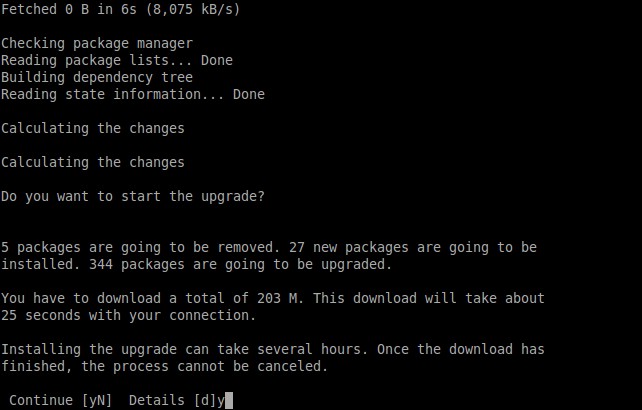
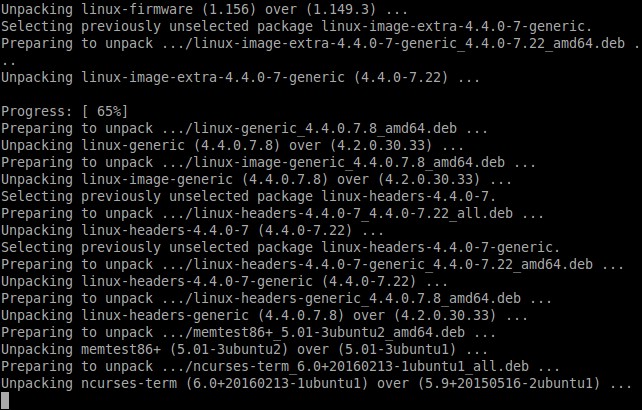
The upgrade process will take place. Sit back and grab a cup of coffee.
It will take few minutes to hours depending upon the speed of your Internet.
Once the latest packages are downloaded and installed, type Y and press ENTER to remove the obsolete packages.
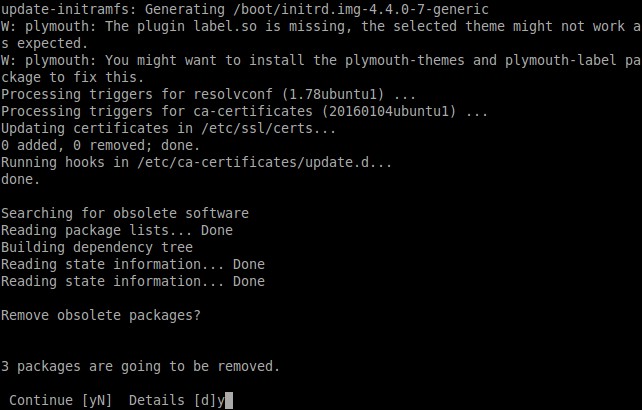
Finally, to finish the upgrade type Y and press ENTER.
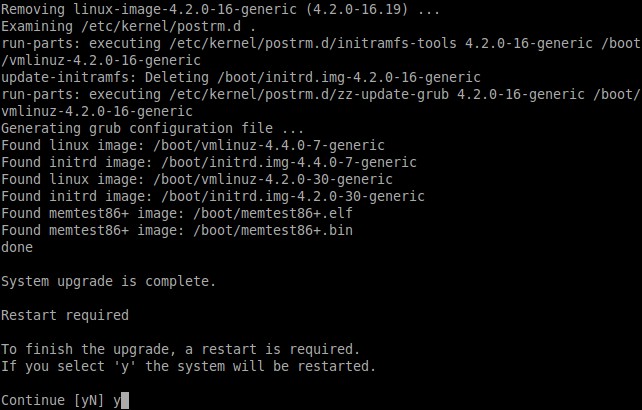
Congratulations! Welcome to Ubuntu 16.04 LTS Xenial Xerus development version.
![Ubuntu 15.10 server [Running] - Oracle VM VirtualBox_009](https://ostechnix.com/wp-content/uploads/2016/02/Ubuntu-15.10-server-Running-Oracle-VM-VirtualBox_009-1.jpg)
Unlike Desktop version, the upgrade process went smooth without a single issue. It's time to explore what's new in Ubuntu 16.04 server.
Again, I remind you do not use it on your production server or desktop. It is still in development stage.
I will be here soon with another interesting article. Until then stay tuned with us and share this article to your social networks.
Thanks for visiting our site. Cheers!!