This step by step guide walks you through the steps to install and configure Ansible in Linux. It also explains how to setup Ansible homelab in Linux to learn ansible basics.
Table of Contents
1. Introduction
Ansible is an IT automation tool through which you can automate "N" number of tasks in your software environment. To know what is Ansible and its features, check out our "Introduction to Ansible" guide.
Ansible is obviously designed for configuration management at scale. If your goal is learning and being able to recreate your environment quickly, then you are on the right track!
Ansible is an agentless architecture. Meaning - no ansible agents/processes are running on managed nodes.
As I already mentioned in the Ansile introductory article, there are two types of nodes in ansible.
- Master/Controller Node - Server/Workstation at which ansible will be installed. From this node, you will run all ansible playbooks and ansible commands.
- Managed Nodes - List of hosts that will be managed using ansible.
All managed nodes don’t need to be running with the same distribution version or type. You can have different flavors of Linux as managed nodes.
Communication between the controller and managed nodes will take place using ssh key-based authentication.
This hands-on guide will teach you how to set up Ansible lab in Linux distributions.
Note:
- You cannot use windows as the controller node.
- It is possible to configure multiple controller nodes.
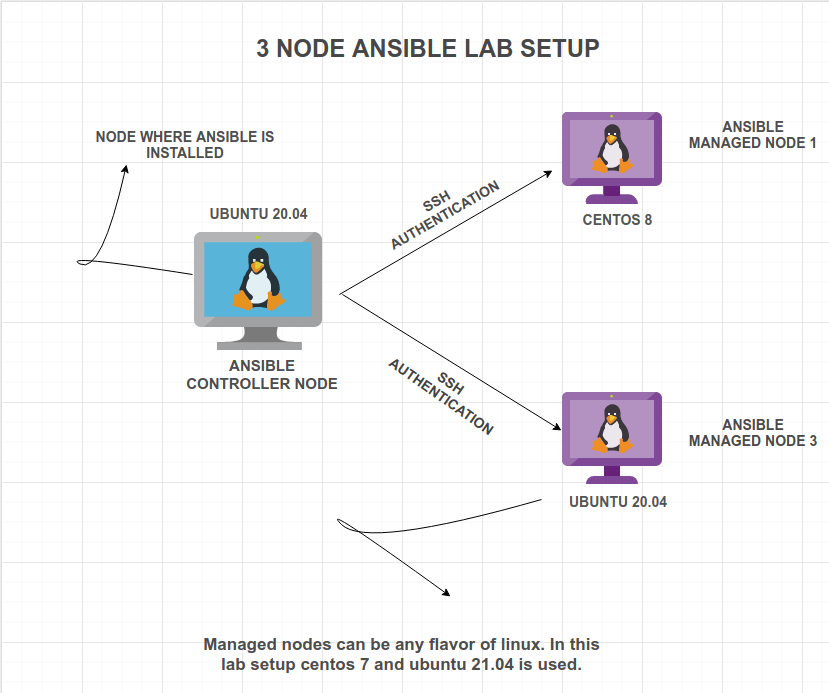
Before getting started with Ansible, let me show you the pictorial representation of my Ansible homelab setup.
2. Architectural diagram for 3 node ansible lab
The following graphical illustration gives you a nice pictorial representation of how the lab will look like.
For demonstration purposes, I am setting up a Controller node on Ubuntu 20.04 and 2 managed nodes on CentOS 8 and Ubuntu 21.04.
3. Install And Configure Ansible In Linux
First, we will see how to setup Ansible managed node in Linux.
3.1. Install Ansible in Linux
Since Ansible is written in Python, your Linux machine should have python installed for ansible to work.
Luckily all Linux distributions comes with Python preinstalled. Ansible supports both Python 2.7 and Python 3.5 and above.
To check what version of python is installed on your machine you can use the following commands. The output may vary depending upon how python is set up in your distribution.
$ which python python2 python3
/usr/bin/python2
/usr/bin/python3
Check Python version:
$ python2 --version
Python 2.7.18rc1
$ python3 --version
Python 3.8.5
$ compgen -c python | grep -P '^python..\d'
python3.8
python3.8-config
python2.7
You can install ansible in Linux in two ways.
- Using operating system package manager
- Using PIP - Python package manager
3.1.1. Install Ansible using system package manager
First, will see how to use your distribution's package manager to install ansible. Based upon your Linux distribution, run the following commands.
Install Ansible in Arch Linux, EndeavourOS, Manjaro Linux:
$ sudo pacman -S ansible
Debian:
Edit /etc/apt/sources.list file:
$ sudo nano /etc/apt/sources.list
Add following line:
deb http://ppa.launchpad.net/ansible/ansible/ubuntu trusty main
Then run the following commands:
$ sudo apt-key adv --keyserver keyserver.ubuntu.com --recv-keys 93C4A3FD7BB9C367
$ sudo apt update
$ sudo apt install ansible
Fedora:
$ sudo dnf install ansible
CentOS, RHEL, AlmaLinux, Rocky Linux:
$ sudo dnf install epel-release
$ sudo dnf install ansible
Ubuntu and its derivatives:
$ sudo apt update
$ sudo apt install software-properties-common
$ sudo add-apt-repository --yes --update ppa:ansible/ansible
$ sudo apt install ansible
Your distribution may ship with outdated version of Ansible. If you want to install an updated Ansible version on your system, you can use Pip, the python package manager.
3.1.2. Install Ansible using Pip
First, verify if PIP is installed by running the following commands:
$ which pip pip3
/usr/bin/pip
/usr/bin/pip3
$ pip --version
pip 20.0.2 from /usr/lib/python3/dist-packages/pip (python 3.8)
$ pip3 --version
pip 20.0.2 from /usr/lib/python3/dist-packages/pip (python 3.8)
If PIP is not installed, run the following commands to install it.
$ curl https://bootstrap.pypa.io/get-pip.py -o get-pip.py
$ python3 get-pip.py --user
Once PIP is installed, run the following command to install ansible:
$ sudo python3 -m pip install ansible
This will install latest Ansible version.
You can also install a specific Ansible version, for example 2.9, like below:
$ sudo python3 -m pip install 'ansible==2.9'
After installing Ansible, run the following command to check the ansible version:
$ ansible --version
This command gives information about where your host file, configuration file, and ansible binary file is and which version of Ansible is installed.
Sample output:
ansible 2.9.0
  config file = /etc/ansible/ansible.cfg
  configured module search path = ['/home/karthick/.ansible/plugins/modules',
  '/usr/share/ansible/plugins/modules']
  ansible python module location = /usr/local/lib/python3.8/dist-packages/ansible
  executable location = /usr/local/bin/ansible
  python version = 3.8.5 (default, Jan 27 2021, 15:41:15) [GCC 9.3.0]
3.2. Configure Ansible
As stated earlier, Ansible will communicate with managed nodes using ssh authentication protocol.
We will create ssh keypair and distribute them across all managed nodes. So whenever an ansible command is submitted, it will authenticate with managed nodes using these keys.
3.2.1. Generate SSH keypair for managed nodes
Create a new user called ansible in both controller and managed nodes.
$ sudo useradd ansible               ##create user
$ sudo passwd ansible                ##set password for ansible user.
Login/Switch as ansible user and create ssh keypair using commands:
$ su - ansible
$ ssh-keygen -t rsa
This command will generate a pair of SSH keys.
Now distribute the public key to all managed nodes.
You can use the ssh-copy-id command to copy the public key to the target node.
To copy the public key to target node with ssh-copy-id command, run:
$ ssh-copy-id -i ~/.ssh/id_rsa ansible@host-name
If you have more nodes, use for loop to copy the ssh key to all the target nodes.
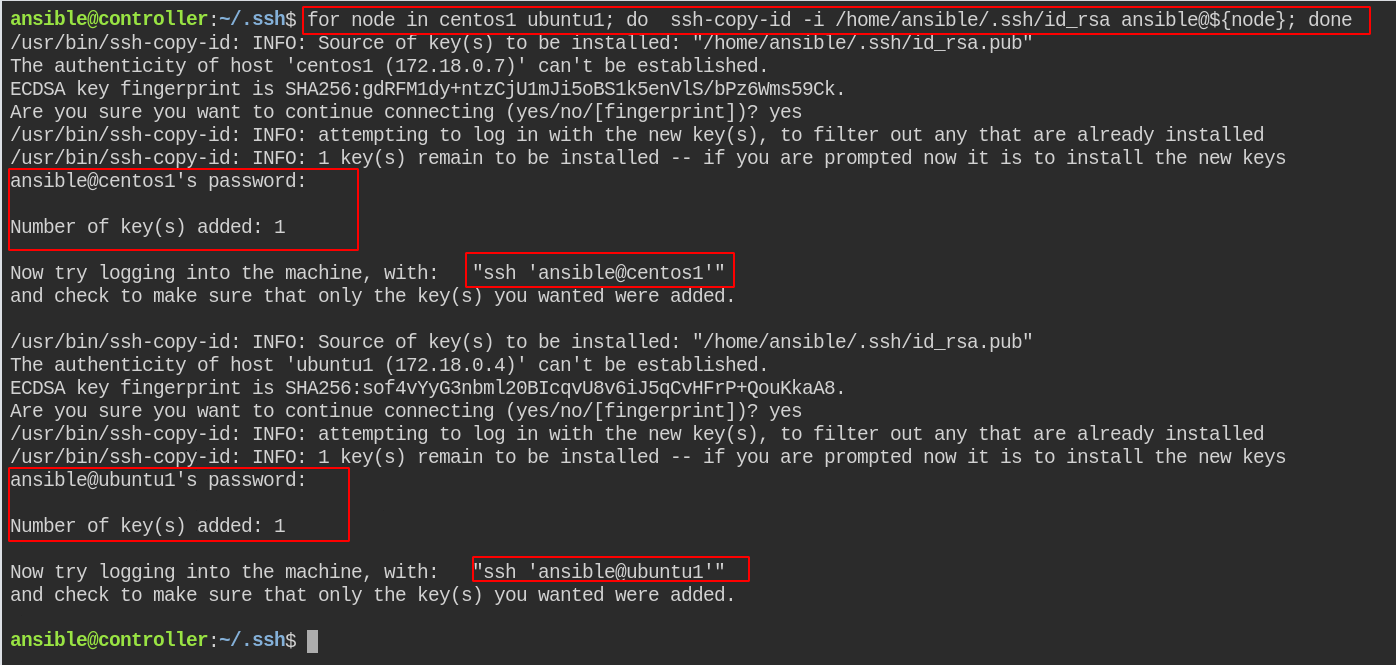
For the purpose of this guide, I have 2 managed nodes and named them centos1 (centos8) and ubuntu1 (ubuntu 20.04). To copy the key to both nodes, I used the following code:
$ for node in centos1 ubuntu1; do ssh-copy-id -i /home/ansible/.ssh/id_rsa ansible@${node} doneNow login to your managed node to check if key-based authentication works fine.
$ ssh username@hostname
Now ansible setup is completed. As the next step, an inventory file should be created and run some ansible commands against managed hosts.
3.2.2. Test Ansible configuration
Ansible has two important files which are required to submit Adhoc or playbook commands.
Ansible.cfg- ansible configuration file.Hosts- Inventory file where host details are provided.
Well, discuss more in-depth about configuration and inventory files in a separate article. At the moment to run the first ansible command, you just need to add your managed node hostnames in the inventory file.
Ansible config file is located in /etc/ansible/ansible.cfg file. You can also get this detail by running the ansible version command:
$ ansible --version
ansible 2.9.0
 config file = /etc/ansible/ansible.cfg
 configured module search path = ['/home/karthick/.ansible/plugins/modules',
'/usr/share/ansible/plugins/modules']
 ansible python module location = /usr/local/lib/python3.8/dist-packages/ansible
 executable location = /usr/local/bin/ansible
 python version = 3.8.5 (default, Jan 27 2021, 15:41:15) [GCC 9.3.0]
Open ansible.cfg file and look for parameter inventory. This parameter will be referred to by ansible during run time to get the inventory file path.
$ sudo grep -iw "^#Inventory" /etc/ansible/ansible.cfg
#inventory        = /etc/ansible/hosts
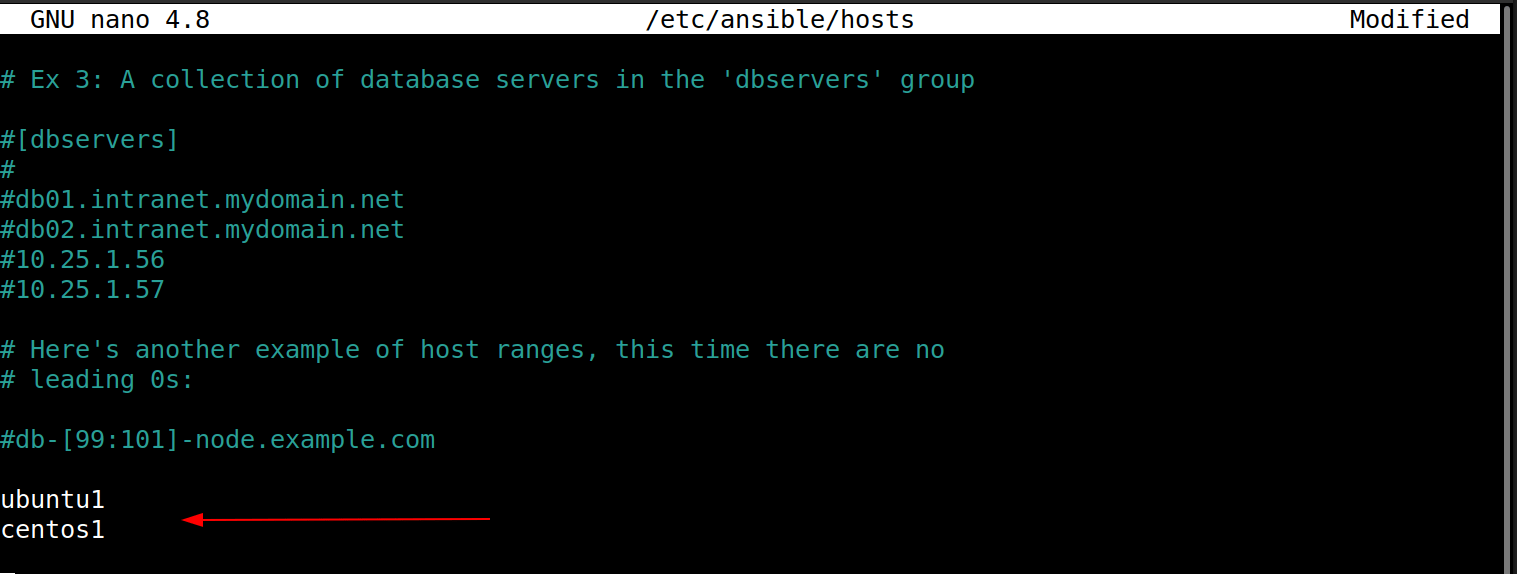
Inventory by default points to /etc/ansible/hosts file. Open hosts file and add the managed node hostname/Ip address.
I have a DNS to IP mapping, so I have given the dns name in the host’s file. You can also give the IP address.
Everything is set up to run our task in ansible!
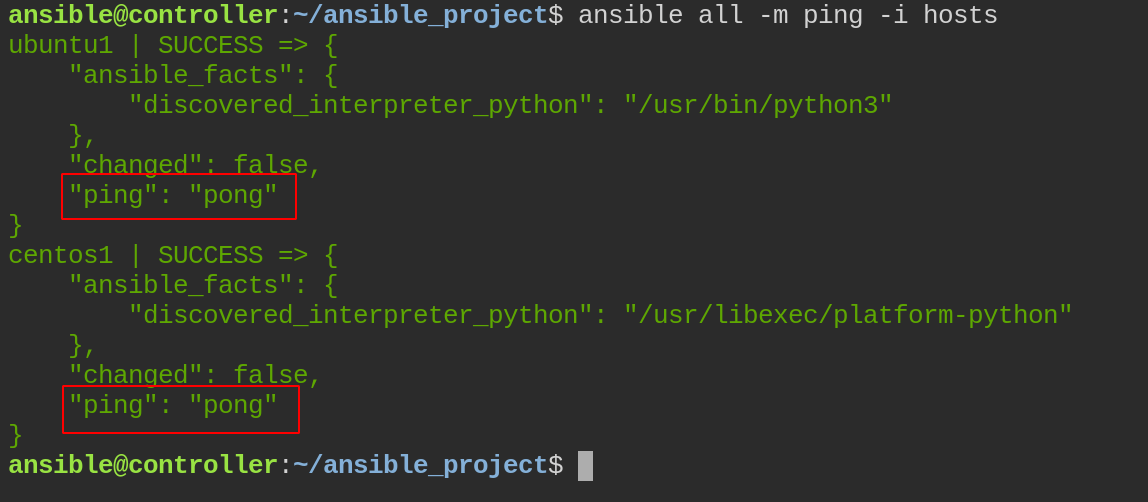
Similar to the "Hello world" program in programming, ansible also has a tradition of running a ping module as the first command to check the connectivity between the controller and managed nodes.
The ping module will try to reach managed nodes and check if any python interpreter is available to use and respond as pong.
$ ansible all -m ping
You can also explicitly specifying hosts file using -i flag like below:
$ ansible all -m ping -i flag <path-to-host-file>
Now you can start playing with whatever module you want to play with.
If you wish to add more controller nodes, all you have to do is copy the SSH key from the controller node to the new node and add the IP/DNS entry in the host’s file. And then, ansible can start picking up the newly added managed node. It is simple as that!
Conclusion
In this guide, we discussed how to install and configure Ansible in Linux. We also have shown you how to set up a three-node Ansible homelab manually.
There are other automated solutions like setting up ansible lab using Vagrant or Docker. We will cover those topics in our upcoming articles.
Ansible is a vast topic! We covered only the Ansible basics. Check out the offcial Ansible documentation to know more about Ansible usage.


