In this guide, we will see what is GNU Screen and the basic usage of Screen command with examples in Linux and Unix operating systems.
Table of Contents
What is GNU Screen?
GNU Screen is a terminal multiplexer (window manager). As the name says, Screen multiplexes the physical terminal between multiple interactive shells, so we can perform different tasks in each terminal session.
All screen sessions run their programs completely independent. So, a program or process running inside a screen session will keep running even if the session is accidentally closed or disconnected.
For instance, when upgrading Ubuntu server via SSH, Screen command will keep running the upgrade process just in case your SSH session is terminated for any reason.
The GNU Screen allows us to easily create multiple screen sessions, switch between different sessions, copy text between sessions, attach or detach from a session at any time and so on.
GNU Screen is one of the important command line tool every Linux admins should learn and use wherever necessary.
Let us see how to manage multiple Terminal sessions using Screen command with examples in Linux.
Install GNU Screen in Linux
GNU Screen is available in the default repositories of most Linux operating systems.
To install GNU Screen on Arch Linux, EndeavourOS, Manjaro Linux, run:
$ sudo pacman -S screen
On Debian, Ubuntu, Linux Mint:
$ sudo apt-get install screen
On Fedora, RHEL, CentOS. AlmaLinux, Rocky Linux:
$ sudo dnf install screen
Or,
$ sudo yum install screen
On CentOS 8, Screen is not available in the official repositories. So you need to enable [EPEL] repository and then install screen.
$ sudo dnf install epel-release
$ sudo dnf install screen
On SUSE/openSUSE:
$ sudo zypper install screen
Let us go ahead and see some screen command examples.
Screen Command Examples
The default prefix shortcut to all commands in Screen is Ctrl+a. You need to use this shortcut a lot when using Screen. So, just remember this keyboard shortcut.
Create new Screen session
Let us create a new Screen session and attach to it. To do so, type the following command in terminal:
screen
Now, run any program or process inside this session. The running process or program will keep running even if you're disconnected from this session.
Detach from Screen sessions
To detach from inside a screen session, press Ctrl+a and d. You don't have to press the both key combinations at the same time. First press Ctrl+a and then press d. After detaching from a session, you will see an output something like below.
[detached from 29149.pts-0.sk]
Here, 29149 is the screen ID and pts-0.sk is the name of the screen session. You can attach, detach and kill Screen sessions using either screen ID or name of the respective session.
Create a named session
You can also create a screen session with any custom name of your choice other than the default username like below.
screen -S ostechnix
The above command will create a new screen session with name "xxxxx.ostechnix" and attach to it immediately. To detach from the current session, press Ctrl+a followed by d.
Naming screen sessions can be helpful when you want to find which processes are running on which sessions. For example, when a setup LAMP stack inside a session, you can simply name it like below.
screen -S lampstack
Create detached sessions
Sometimes, you might want to create a session, but don't want to attach it automatically. In such cases, run the following command to create detached session named "senthil":
screen -S senthil -d -m
Or, shortly:
screen -dmS senthil
The above command will create a session called "senthil", but won't attach to it.
List Screen sessions
To list all running sessions (attached or detached), run:
screen -ls
Sample output:
There are screens on:
    29700.senthil   (Detached)
    29415.ostechnix (Detached)
    29149.pts-0.sk  (Detached)
3 Sockets in /run/screens/S-sk.
As you can see, I have three running sessions and all are detached.
If there were no running screen sessions, you will an output like below.
No Sockets found in /run/screen/S-sk.
Attach to Screen sessions
If you want to attach to a session at any time, for example 29415.ostechnix, simply run:
screen -r 29415.ostechnix
Or,
screen -r ostechnix
Or, just use the screen ID:
screen -r 29415
To verify if we are attached to the aforementioned session, simply list the open sessions and check.
screen -ls
Sample output:
There are screens on:
        29700.senthil   (Detached)
        29415.ostechnix (Attached)
        29149.pts-0.sk  (Detached)
3 Sockets in /run/screens/S-sk.
As you see in the above output, we are currently attached to 29415.ostechnix session. To exit from the current session, press ctrl+a, d.
Create nested sessions
When we run "screen" command, it will create a single session for us. We can, however, create nested sessions (a session inside a session).
First, create a new session or attach to an opened session. I am going to create a new session named "nested".
screen -S nested
Now, press Ctrl+a and c inside the session to create another session. Just repeat this to create any number of nested Screen sessions. Each session will be assigned with a number. The number will start from 0.
You can move to the next session by pressing Ctrl+n and move to previous by pressing Ctrl+p.
Here is the list of important Keyboard shortcuts to manage nested sessions.
- Ctrl+a ” - List all sessions
- Ctrl+a 0 - Switch to session number 0
- Ctrl+a n - Switch to next session
- Ctrl+a p - Switch to the previous session
- Ctrl+a S - Split current region horizontally into two regions
- Ctrl+a l - Split current region vertically into two regions
- Ctrl+a Q - Close all sessions except the current one
- Ctrl+a X - Close the current session
- Ctrl+a \ - Kill all sessions and terminate Screen
- Ctrl+a ? - Show keybindings. To quit this, press ENTER.
Lock sessions
Screen has an option to lock a screen session. To do so, press Ctrl+a and x. Enter your Linux password to lock the screen.
Screen used by sk <sk> on ubuntuserver.
Password:
Logging sessions
You might want to log everything when you're in a Screen session. To do so, just press Ctrl+a and H.
Alternatively, you can enable the logging when starting a new session using -L parameter.
screen -L
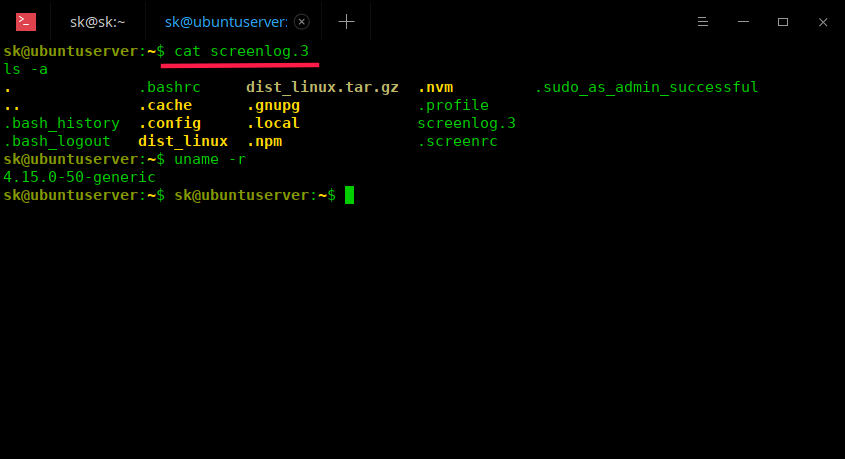
From now on, all activities you've done inside the session will recorded and stored in a file named screenlog.x in your $HOME directory. Here, x is a number.
You can view the contents of the log file using cat command or any text viewer applications.
Suggested read:
Autostart Screen sessions
Auto-starting Screen sessions will greatly help when running a long running process via SSH. If you lost the network connectivity for any reason, the process will keep running inside the Screen session in the remote system and you can reattach to it when the network comes back online. To know how to autostart a screen on system startup, refer the following link.
Check If you are an a Screen session or not
As you might have noticed, the normal session and Screen session will look exactly same. You won't see any obvious indication whether you are inside the Screen session or normal session. To know whether you are in Screen session or not, follow the steps given in the below link.
Kill Screen sessions
If a session is not required anymore, just kill it. To kill a detached session named "senthil":
screen -r senthil -X quit
Or,
screen -X -S senthil quit
Or,
screen -X -S 29415 quit
If there are no open sessions, you will see the following output:
$ screen -ls
No Sockets found in /run/screens/S-sk.
For more details, refer man pages.
$ man screen
There is also a similar command line utility named "Tmux" which does the same job as GNU Screen does. To know more about it, refer the following guide.
Resource:
2 comments
Hi, this is a really nicely done article, comprehensive and helpful.
There’s a small item to notify you about, you use the phrase “nested sessions” when what you probably mean is “windows.”
Totally not trying to be a jerk, just wanted to let you know that just about everything you have in that section only needs to say “window” or “windows” instead of “session” or “sessions”.
A nested session, which is not really called that, is when you are in a session, such as level1a and you use ‘screen -m -S level2a’ to run another session from inside that one.
Unlike a session that has been created from the originating shell, sessions created inside another session have an odd relationship with the parent shell, and are dependent on it.
You might even have issues connecting to the sub-shell, and have to use ‘screen -Dr sessionname’ to properly reattach to it.
Again, nice article, just being helpful!
Thanks for pointing it out, Ross Brunson. I will update this guide with your inputs soon.