
n8n makes it surprisingly easy to build powerful automations. You can connect applications, work with APIs, transform data, trigger workflows on a schedule, respond to webhooks, and automate tasks that would otherwise require a surprising amount of manual work.
Before using n8n in production, you can experiment with it locally, learn how it works, and build some simple automations. Once you're familiar with n8n and comfortable managing it, you can move your setup to a real VPS or cloud environment.
For this walkthrough, we will be using a freshly installed Ubuntu 26.04 LTS virtual machine. There is no domain, no VPS, and no production workload involved. Our main objective is simply to build a functional self-hosted n8n environment, understand how its components fit together, and learn what is involved in operating it.
The deployment will use Docker and Docker Compose, with n8n and PostgreSQL running as separate services and their important data stored persistently.
Once the fundamentals are understood, the same knowledge can be carried forward to a more public deployment.
The goal here isn't to create a production-ready n8n server.
It's to understand what is actually involved in running n8n yourself.
Table of Contents
Why Self-host in the First Place
n8n is a workflow automation platform that connects apps and APIs and lets you build automations with little or no code. You can use n8n Cloud or self-host it, including with Docker. Cloud is obviously the easier path if all you want to do is use n8n. But you may want to understand the infrastructure underneath it, not just the app.
“Just deploy n8n on a VPS” sounds simple until you start pulling on the thread:
- Where does it actually run?
- Where's the data?
- What database does it use?
- What happens when the server reboots,
- When you upgrade n8n, or when a container disappears?
- How do you back all of this up,
- And how do you expose it to the internet without turning it into a liability?
Those are the questions worth answering, not whether you can make the login screen appear.
Our Testing Lab
Our demo lab is quite minimal: an Ubuntu 26.04 LTS VM, no domain, no VPS, no public DNS, and nothing that needs to be reachable from the outside world. Just Docker, n8n, and PostgreSQL.
The VM is disposable, which is exactly the point. You can break it without worrying about taking down something that matters.
Here's the rough shape of what you're building looks like this:
                    My Host System
                        │
                        │ HTTP
                        ▼
                Ubuntu 26.04 VM
                        │
                  Docker Engine
                        │
                 Docker Compose
                    ┌───┴───┐
                    │       │
                    ▼       ▼
                   n8n   PostgreSQL
                    │       │
                    ▼       ▼
              n8n storage  DB storage
There is no reverse proxy, Caddy, Let's Encrypt certificate, or domain in this setup. Those belong to a later experiment when you move beyond the local lab.
n8n uses SQLite by default, and for many setups that's perfectly fine. Here, we are using PostgreSQL on purpose, not because n8n requires it, but because we want the extra complexity as something to learn from. More on that below.
Prepare What You Actually Want to Learn
Before starting the setup, write down what you want this experiment to teach you.
Linux and Docker: How Docker should be installed on Ubuntu, what Compose is really doing, how containers behave across starts, stops, and restarts, and what survives a reboot of the host itself.
n8n specifically: How n8n talks to its database, where it keeps persistent state, what happens to my workflows if the container gets recreated, and what a sensible upgrade path looks like.
Operations: How to read logs properly, how to tell if a service is actually healthy rather than just “running,” how to recover from a failed container, and what needs to be backed up before I touch anything important.
Security: What's acceptable for a private lab that isn't public, and what changes the moment this becomes internet-facing.
If you can answer those questions honestly, the experiment has already paid for itself before you build a single useful workflow.
Starting with the Ubuntu 26.04 VM itself
Before installing anything, know your Ubuntu system details.
cat /etc/os-release
uname -a
free -h
df -h
ip addr
These commands tell you the Ubuntu version, kernel, available memory, disk space, and network configuration.
If something breaks later, you can easily find whether the problem is n8n, Docker, storage, networking, or the VM itself.
Skipping this step is how you end up debugging the wrong layer for an hour.
Installing Docker Engine on Ubuntu 26.04 LTS
For this lab, we will be using Docker Engine rather than Docker Desktop, and installing it the way Docker recommends rather than reaching for whatever Ubuntu happens to ship.
Ubuntu 26.04 LTS is supported in Docker's current documentation. The recommended approach is to use Docker's official apt repository, which provides the Engine, CLI, containerd, Buildx, and Docker Compose plugin.
Update Ubuntu
Update your Ubuntu 26.04 LTS system using the following commands:
sudo apt update
sudo apt full-upgrade -y
Reboot your system to apply the updates:
sudo reboot
Install Docker Engine
Install prerequisites:
sudo apt update
sudo apt install -y ca-certificates curl gnupg
Add Docker's official signing key:
sudo install -m 0755 -d /etc/apt/keyrings
sudo curl -fsSL https://download.docker.com/linux/ubuntu/gpg \
  -o /etc/apt/keyrings/docker.asc
sudo chmod a+r /etc/apt/keyrings/docker.asc
Add Docker's official repository:
echo \
  "deb [arch=$(dpkg --print-architecture) signed-by=/etc/apt/keyrings/docker.asc] \
  https://download.docker.com/linux/ubuntu \
  $(. /etc/os-release && echo "$VERSION_CODENAME") stable" |
  sudo tee /etc/apt/sources.list.d/docker.list > /dev/null
Install Docker Engine and Compose:
sudo apt update
sudo apt install -y \
  docker-ce \
  docker-ce-cli \
  containerd.io \
  docker-buildx-plugin \
  docker-compose-plugin
Enable Docker service:
sudo systemctl enable --now docker
Add User to Docker Group
Add your current user to Docker group to allow him to run Docker without sudo:
sudo usermod -aG docker "$USER"
Now log out and back in so the group change takes effect.
Alternatively, you can run:
newgrp docker
Verify Docker Installation
Run the following commands to verify Docker and Docker Compose version:
docker version
docker compose version
And finally:
docker run --rm hello-world
You should see the Docker "Hello from Docker!" message.
If hello-world runs successfully, the VM can run containers.
Setting up the n8n Deployment Directory
I kept everything under /opt/n8n:
sudo mkdir -p /opt/n8n
sudo chown "$USER:$USER" /opt/n8n
cd /opt/n8n
It will eventually hold a Compose file and an environment file:
/opt/n8n/
├── compose.yaml
└── .env
The directory name doesn't matter much. What matters is giving the deployment one clear home instead of scattering files across whatever directory I happen to be working in.
Why PostgreSQL, given SQLite Would be Simpler
Here, I am running n8n and PostgreSQL as separate services, each with its own persistent volume.
I could have kept this simpler. SQLite ships with n8n and is perfectly suitable for many use cases. I chose PostgreSQL anyway because I wanted to learn how a multi-container application behaves, not just how a single container behaves.
             n8n
              │
              │ database connection
              ▼
          PostgreSQL
              │
              ▼
        persistent storage
With two services instead of one, there's suddenly something worth diagnosing. If n8n won't start, is n8n itself broken? Is PostgreSQL down, unreachable, or simply not healthy yet? Or did I get a credential wrong in the .env file? These are exactly the questions that matter when the same setup eventually runs on a VPS instead of a VM I can reset in thirty seconds.
Keeping Secrets Out of the Compose File
Next comes the environment file:
nano /opt/n8n/.env
Add the following lines:
POSTGRES_USER=n8n
POSTGRES_PASSWORD=replace-with-a-random-password
POSTGRES_DB=n8n

N8N_ENCRYPTION_KEY=replace-with-a-long-random-key
I generated real random values here rather than leaving placeholder text in, obviously. The point worth remembering is that .env isn't just another config file. It contains SECRETS. It doesn't go into Git, and its file permissions shouldn't be any looser than necessary.
The N8N_ENCRYPTION_KEY is worth calling out specifically because n8n uses it to encrypt sensitive data it stores, including credentials. Setting it explicitly gives me a value I control and can preserve across redeployments, rather than relying on an automatically generated key that could change when the instance is recreated.
Wiring n8n to PostgreSQL
Inside the Compose network, n8n doesn't need to know the VM's IP address. It just needs the service name, which Docker Compose resolves automatically:
n8n container
     │
     │ host = postgres
     ▼
PostgreSQL container
The PostgreSQL connection settings go in the same /opt/n8n/.env file created earlier. They tell n8n which database service to connect to and provide the credentials it needs:
DB_TYPE=postgresdb
DB_POSTGRESDB_HOST=postgres
DB_POSTGRESDB_PORT=5432
DB_POSTGRESDB_DATABASE=${POSTGRES_DB}
DB_POSTGRESDB_USER=${POSTGRES_USER}
DB_POSTGRESDB_PASSWORD=${POSTGRES_PASSWORD}
The important part here is DB_POSTGRESDB_HOST=postgres. postgres is the name of the PostgreSQL service that we'll define in the Compose file. Docker Compose makes that service name available to n8n on the internal network, so n8n doesn't need the VM's IP address.
This is one of those Docker details that clicks a lot faster once you've actually seen it work. The containers can communicate using service names instead of fixed IP addresses.
So the final /opt/n8n/.env file should look like this:
POSTGRES_USER=n8n
POSTGRES_PASSWORD=your-random-password
POSTGRES_DB=n8n

N8N_ENCRYPTION_KEY=your-long-random-key
N8N_SECURE_COOKIE=false

GENERIC_TIMEZONE=Asia/Kolkata

DB_TYPE=postgresdb
DB_POSTGRESDB_HOST=postgres
DB_POSTGRESDB_PORT=5432
DB_POSTGRESDB_DATABASE=${POSTGRES_DB}
DB_POSTGRESDB_USER=${POSTGRES_USER}
DB_POSTGRESDB_PASSWORD=${POSTGRES_PASSWORD}
Make sure you have set correct values to GENERIC_TIMEZONE, POSTGRES_PASSWORD and N8N_ENCRYPTION_KEY.
By default, N8N_SECURE_COOKIE is set to true, which means n8n will only issue cookies over a secure HTTPS connection. Since, I am running n8n on my local machine for testing and accessing it via http://localhost:5678, I set it to false.
You should only use N8N_SECURE_COOKIE=false for development or testing, and always enable HTTPS with the secure cookie flag set to true in production
Building the Compose File
Now the actual stack: two services, postgres and n8n, tied together.
Create Compose file:
nano /opt/n8n/compose.yaml
Add the following content:
services:

  postgres:
    image: postgres:latest
    restart: unless-stopped
    environment:
      POSTGRES_USER: ${POSTGRES_USER}
      POSTGRES_PASSWORD: ${POSTGRES_PASSWORD}
      POSTGRES_DB: ${POSTGRES_DB}
    healthcheck:
      test: ["CMD-SHELL", "pg_isready -U ${POSTGRES_USER} -d ${POSTGRES_DB}"]
      interval: 5s
      timeout: 5s
      retries: 10
    volumes:
      - db_storage:/var/lib/postgresql

  n8n:
    image: docker.n8n.io/n8nio/n8n:latest
    restart: unless-stopped
    environment:
      DB_TYPE: ${DB_TYPE}
      DB_POSTGRESDB_HOST: ${DB_POSTGRESDB_HOST}
      DB_POSTGRESDB_PORT: ${DB_POSTGRESDB_PORT}
      DB_POSTGRESDB_DATABASE: ${DB_POSTGRESDB_DATABASE}
      DB_POSTGRESDB_USER: ${DB_POSTGRESDB_USER}
      DB_POSTGRESDB_PASSWORD: ${DB_POSTGRESDB_PASSWORD}
      N8N_ENCRYPTION_KEY: ${N8N_ENCRYPTION_KEY}
      N8N_SECURE_COOKIE: ${N8N_SECURE_COOKIE}
      GENERIC_TIMEZONE: ${GENERIC_TIMEZONE}
    depends_on:
      postgres:
        condition: service_healthy
    ports:
      - "5678:5678"
    volumes:
      - n8n_storage:/home/node/.n8n

volumes:
  db_storage:
  n8n_storage:
For this initial lab, I'm using the latest image for both n8n and PostgreSQL. The goal here is to get the environment working and understand how the pieces fit together. Before moving to a VPS, I'll revisit version pinning as part of the upgrade and maintenance process.
Making PostgreSQL Prove It's Actually Ready
A container being running doesn't necessarily mean the service inside it is ready to accept connections. PostgreSQL provides the pg_isready command to check whether the database is ready, so we'll use it as a Docker health check.
This is why we have added the following under the postgres service in /opt/n8n/compose.yaml file in the previous step:
healthcheck:
  test: ["CMD-SHELL", "pg_isready -U ${POSTGRES_USER} -d ${POSTGRES_DB}"]
  interval: 5s
  timeout: 5s
  retries: 10
Also, we have added depends_on under the n8n service, so n8n waits for PostgreSQL's health check to pass:
depends_on:
  postgres:
    condition: service_healthy
The startup sequence now looks like this:
PostgreSQL starts
       │
       ▼
pg_isready checks it
       │
       ▼
PostgreSQL becomes healthy
       │
       ▼
n8n starts
       │
       ▼
n8n connects to PostgreSQL
This gives you a useful distinction: running tells you that the container is running; healthy tells you that the configured health check has passed.
Launch n8n Stack
With the Compose file and environment variables in place, it's time to start the n8n stack.
Go to the directory where you keep the Compose file and start the containers:
cd /opt/n8n
docker compose up -d
Watch for two things: PostgreSQL reporting healthy and n8n starting without getting stuck in a restart loop.
[+] up 3/3
 ✔ Network n8n_default      Created                                                                 0.1s
 ✔ Container n8n-postgres-1 Healthy                                                                 6.4s
 ✔ Container n8n-n8n-1      Started                                                                 6.5s
You can list all containers defined in your docker-compose.yml file along with their current status with command:
docker compose ps
This command shows:
- Container name
- Image being used
- Current status (Up, Exited, Restarting, etc.)
- Port mappings
Sample Output:
NAME             IMAGE                            COMMAND                  SERVICE    CREATED         STATUS                   PORTS
n8n-n8n-1        docker.n8n.io/n8nio/n8n:latest   "tini -- /docker-ent…"   n8n        2 minutes ago   Up 2 minutes             0.0.0.0:5678->5678/tcp, [::]:5678->5678/tcp
n8n-postgres-1   postgres                         "docker-entrypoint.s…"   postgres   2 minutes ago   Up 2 minutes (healthy)   5432/tcp
If you want to view real-time logs from all containers, run:
docker compose logs -f
This will show logs as they happen and keep streaming until you press Ctrl+C.
Access n8n Web Interface
Now, launch the n8n web interface (editor) via your browser using the VM's IP address and port 5678:
http://localhost:5678

(Or)

http://<VM-IP-Address>:5678
If it is CLI-only Ubuntu system, you can access n8n web interface from any remote system on the local network.
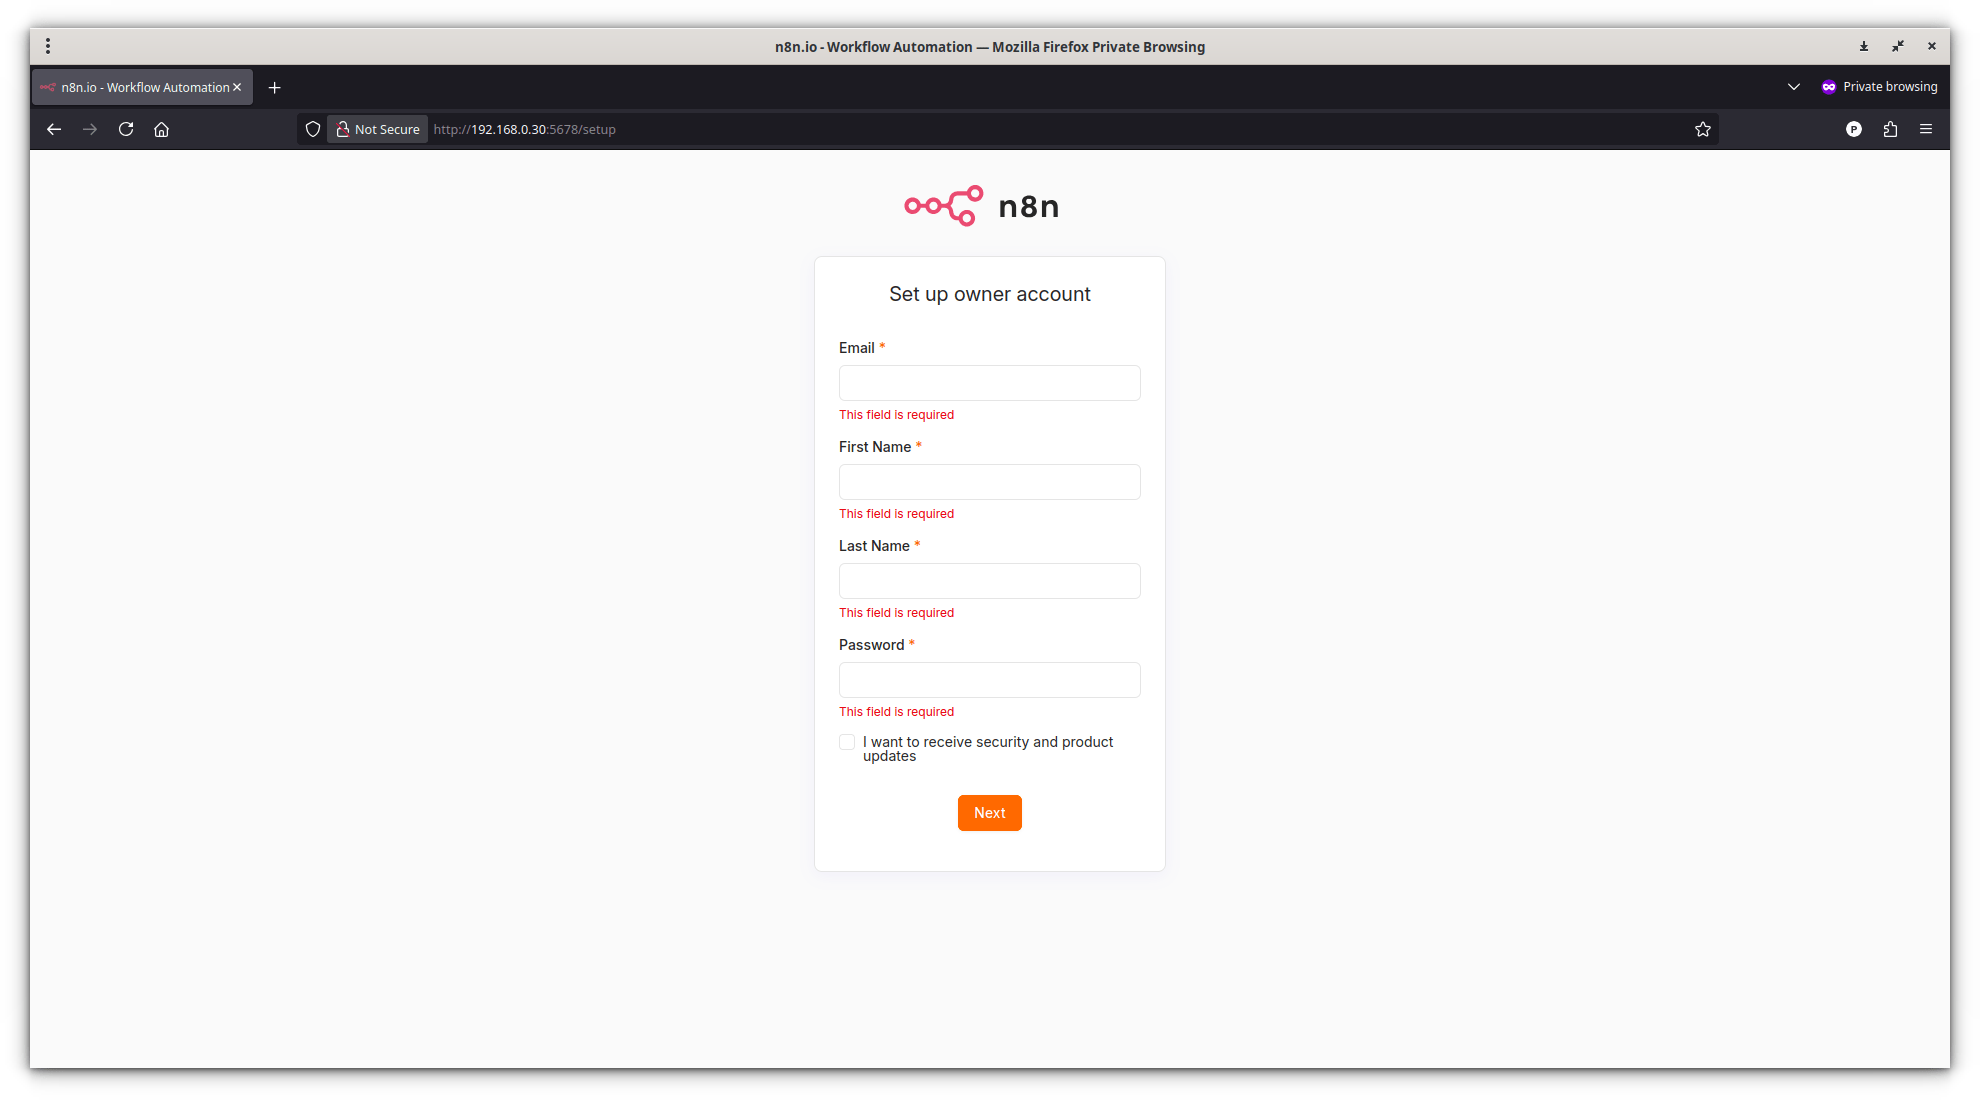
Register a new owner account for n8n and log in.
When you login for the first time, you will be asked to setup AI assistant. The primary purpose of the AI Assistant is to let you build, edit, test, and troubleshoot workflows using natural language. The setup process likely involves connecting it to a large language model (LLM), as n8n itself doesn't generate the AI responses.
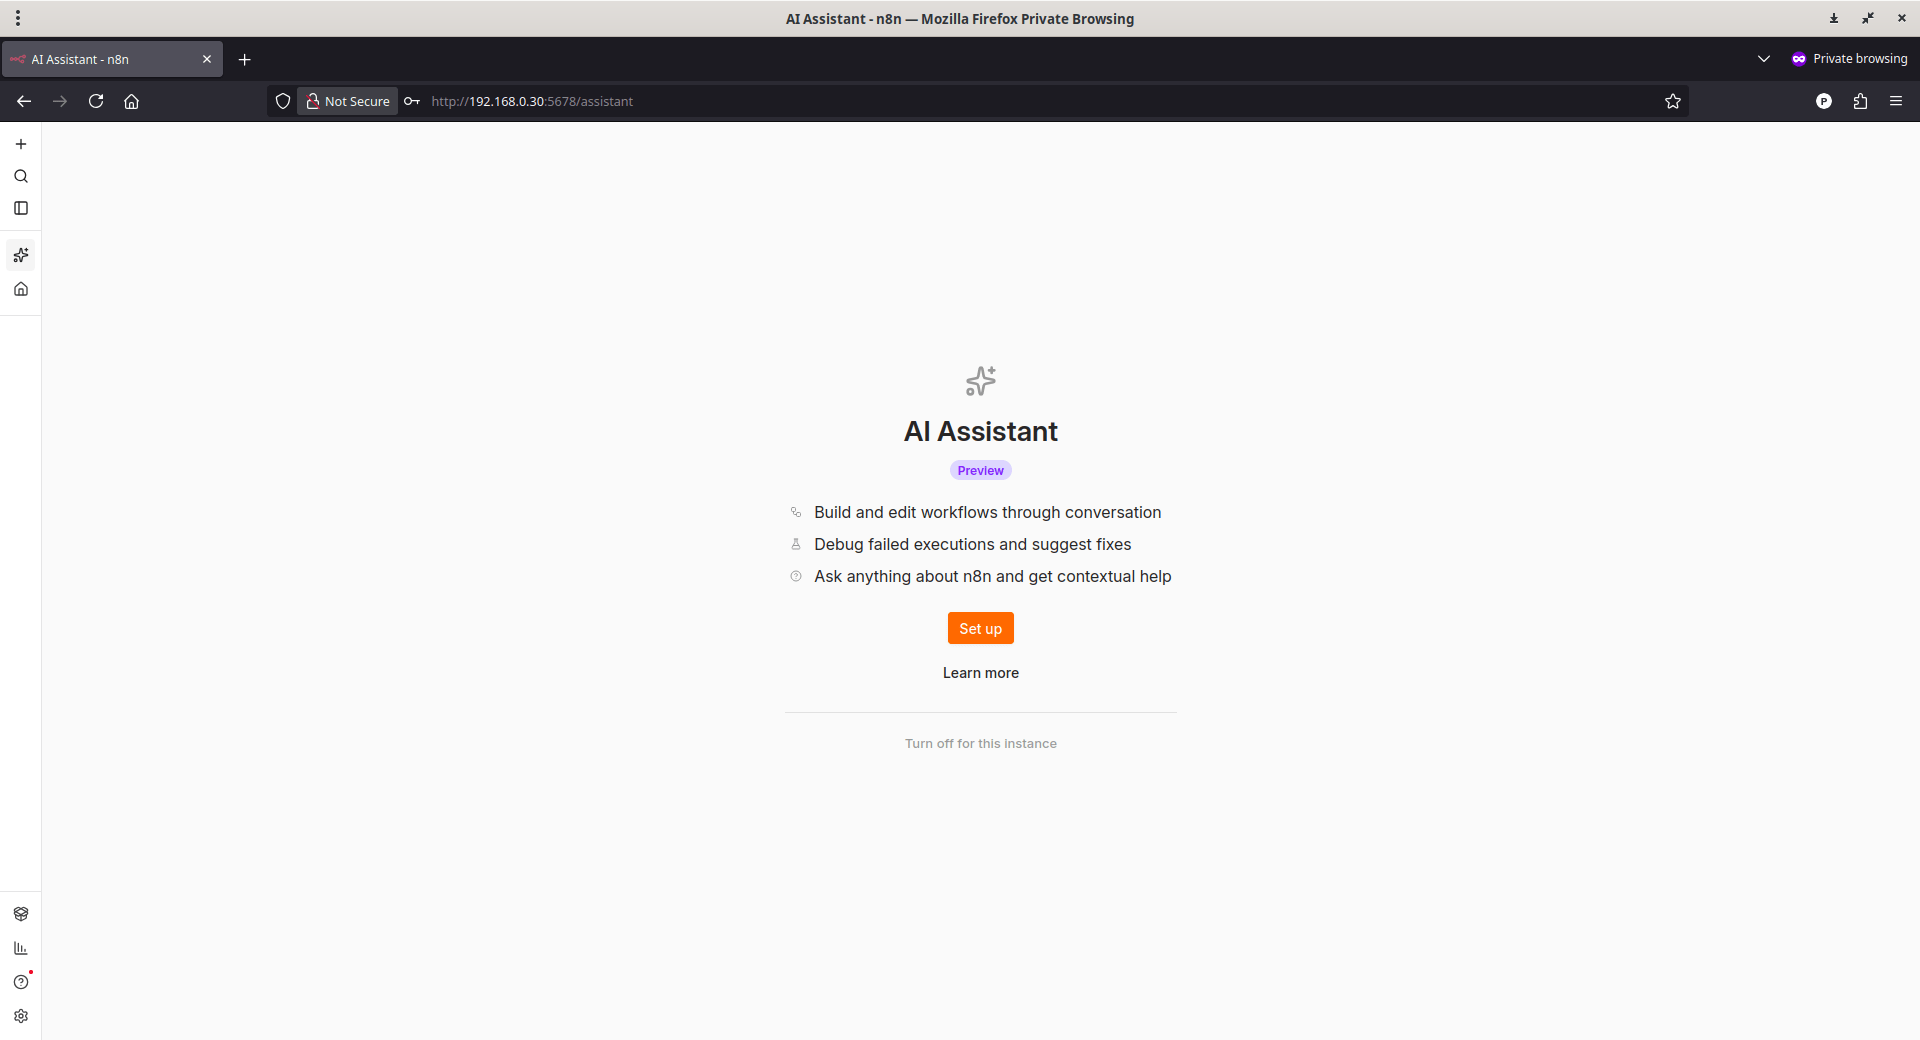
If you want to setup AI assistant, you'll need an API key from a provider like OpenAI or Anthropic.
If you don't need the AI Assistant immediately, you can simply skip it by clicking the "Turn off for this instance" link and continue to the main n8n editor.
You can enable the AI Assistant at any time from n8n's Settings and add your LLM provider's API key directly through the user interface. Once you've added the key and restarted n8n, the AI Assistant should appear and be ready to use.
I skipped the AI assistant setup for now.
Congratulations! You can now start building your first workflow.
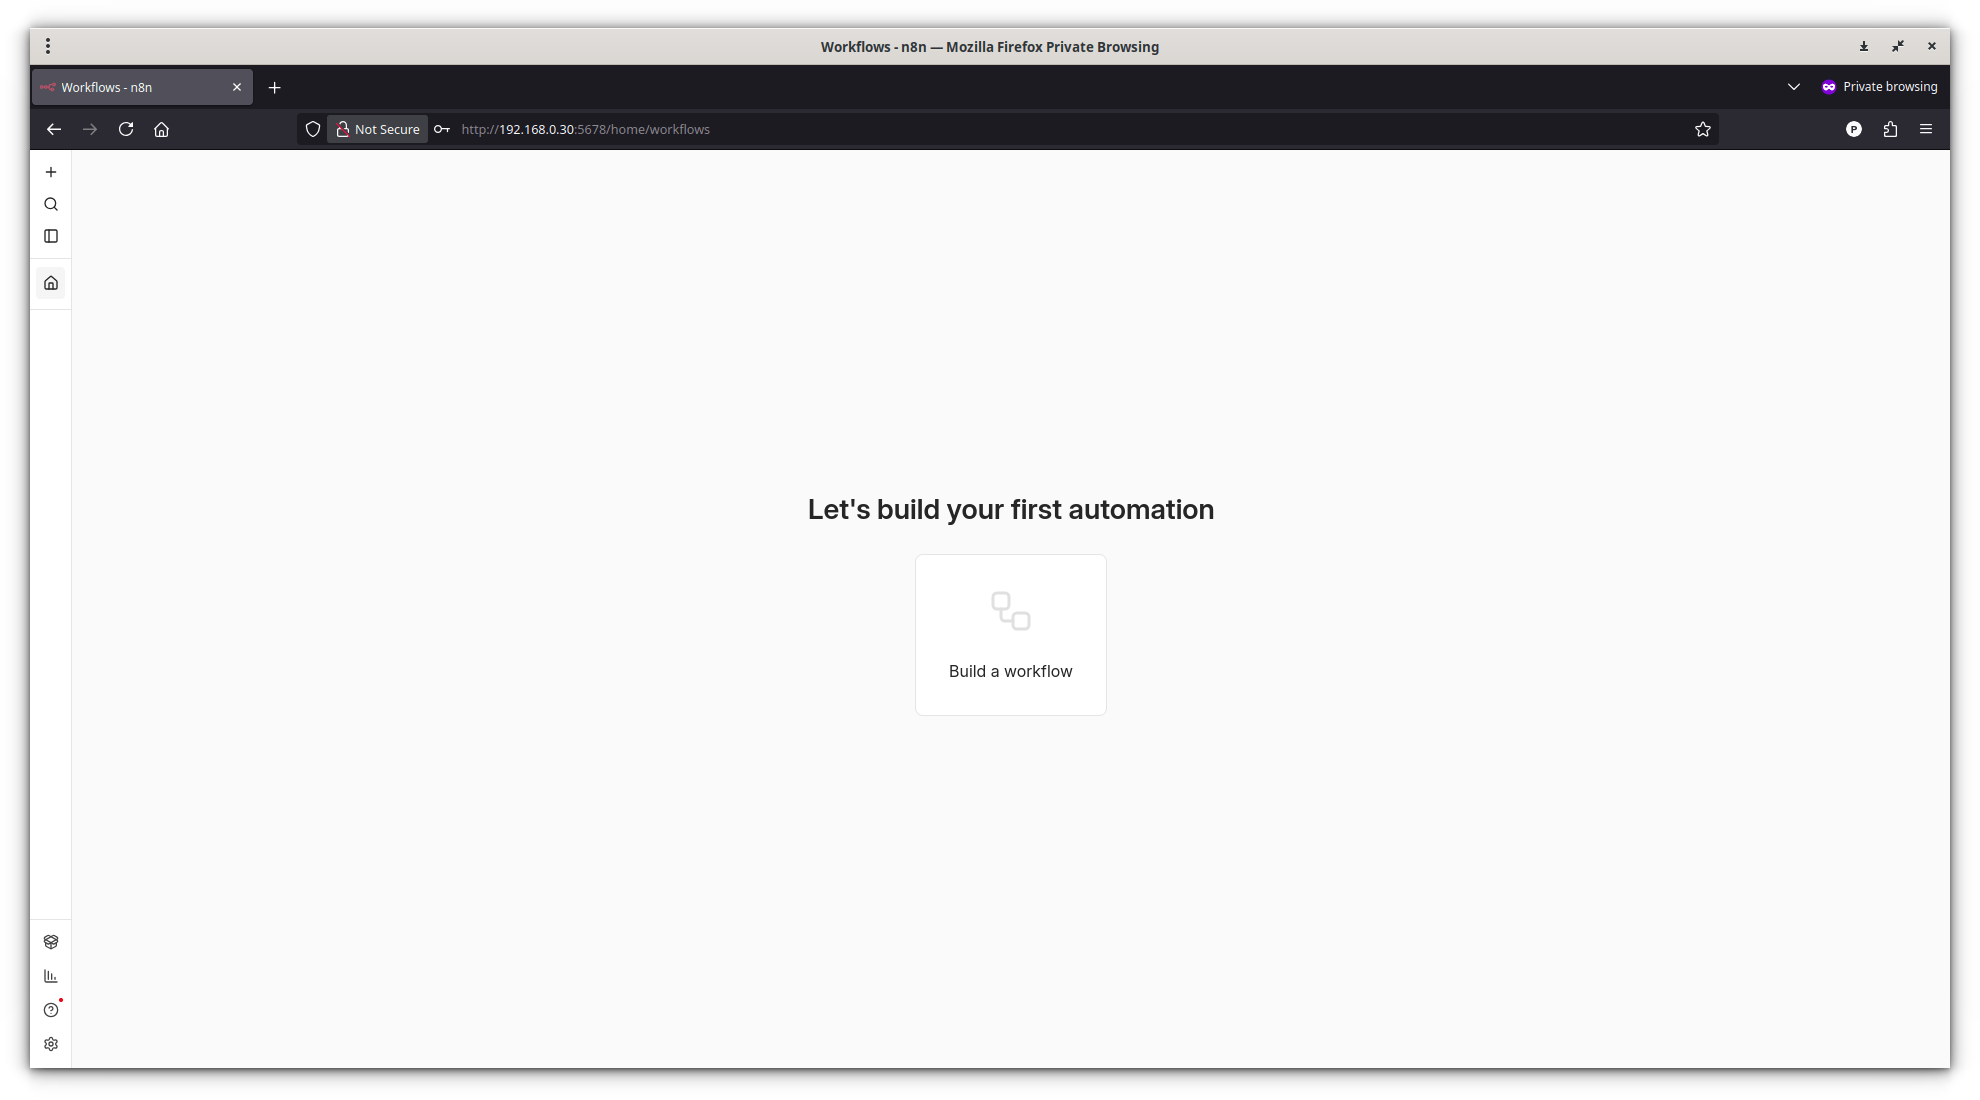
We're not done yet. All we've proven at that point is that the application can start.
The real questions are still ahead:
- Where does the data actually live?
- What survives a restart or reboot?
- What happens when a container is deleted?
- and what happens if PostgreSQL disappears entirely?
We will find answers to these questions in the following sections.
Building a Simple n8n Workflow
Let us create a small n8n workflow that runs on a schedule and records the current date and time.
Create a New Workflow
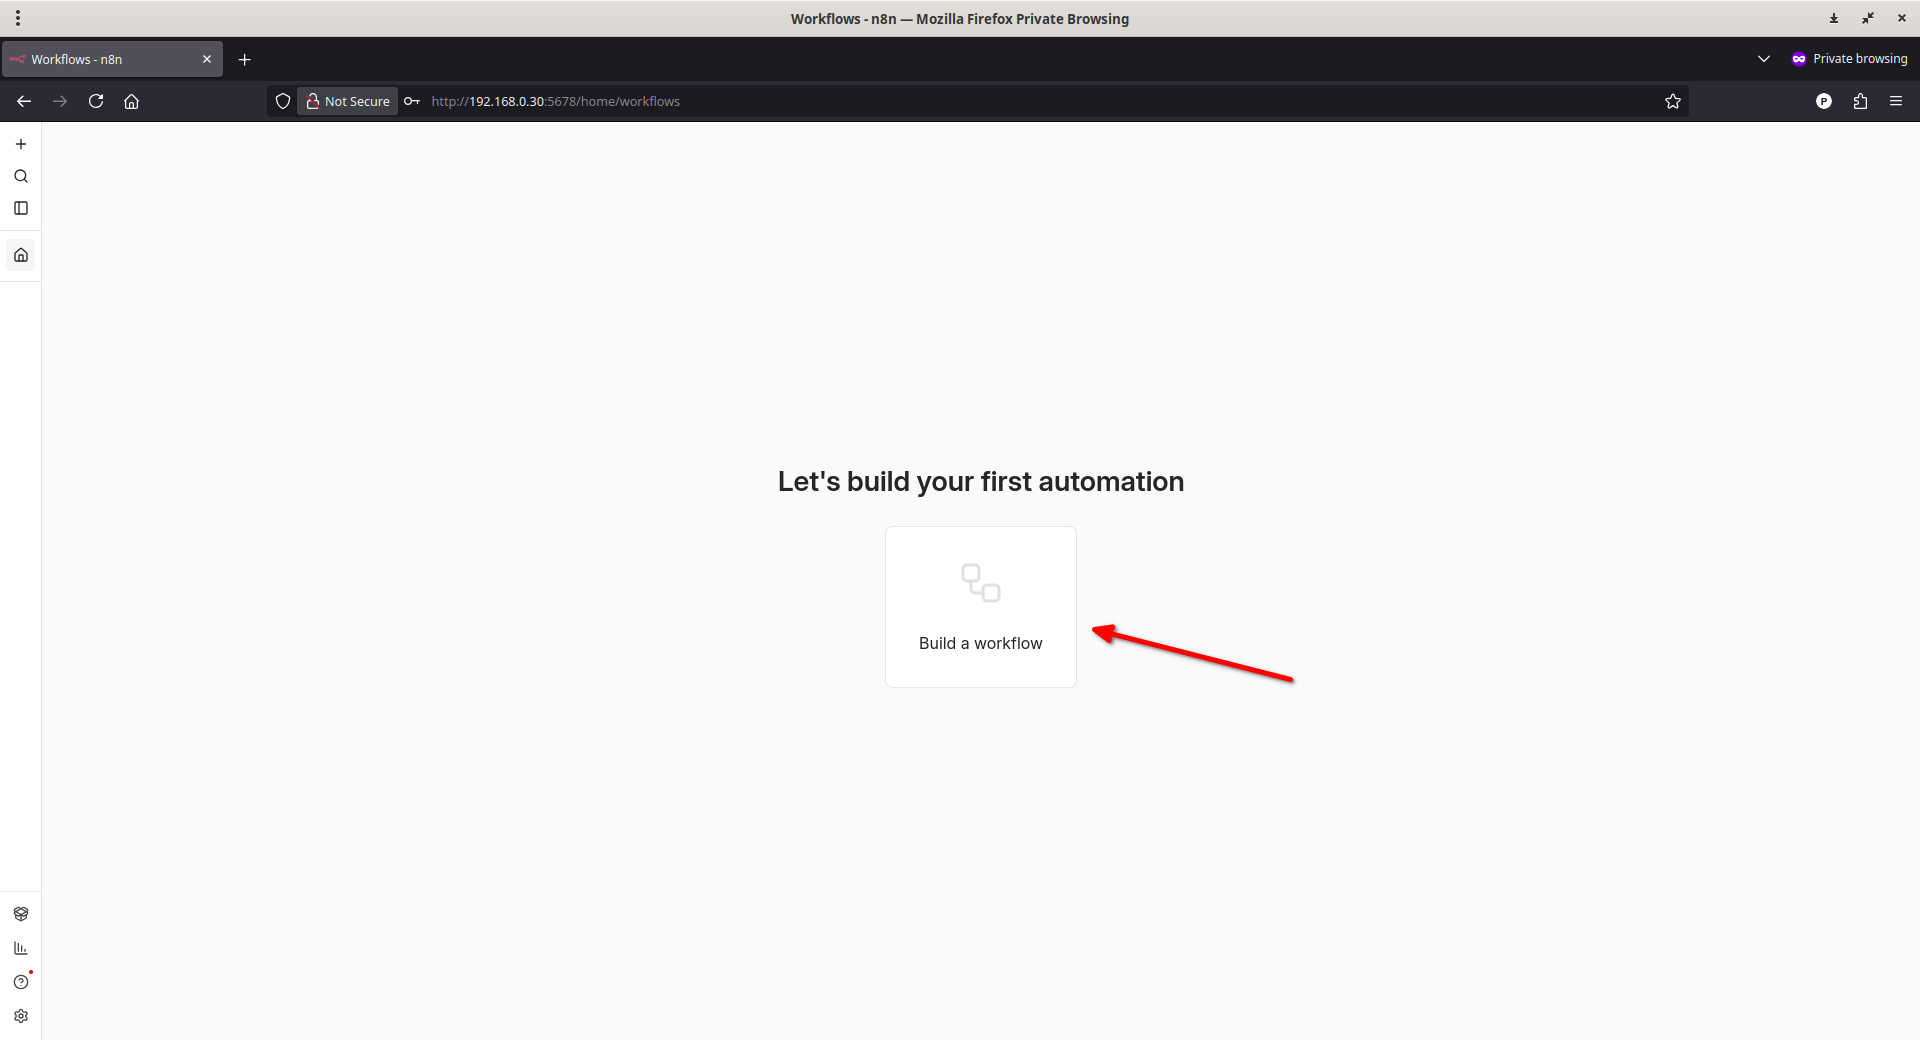
Click the Build a Workflow button to open a new, blank canvas where you'll build your automation.
Add and Configure the Schedule Trigger
This is the heart of your scheduled automation. Every workflow needs a starting point, and the Schedule Trigger node is what tells n8n when to begin.
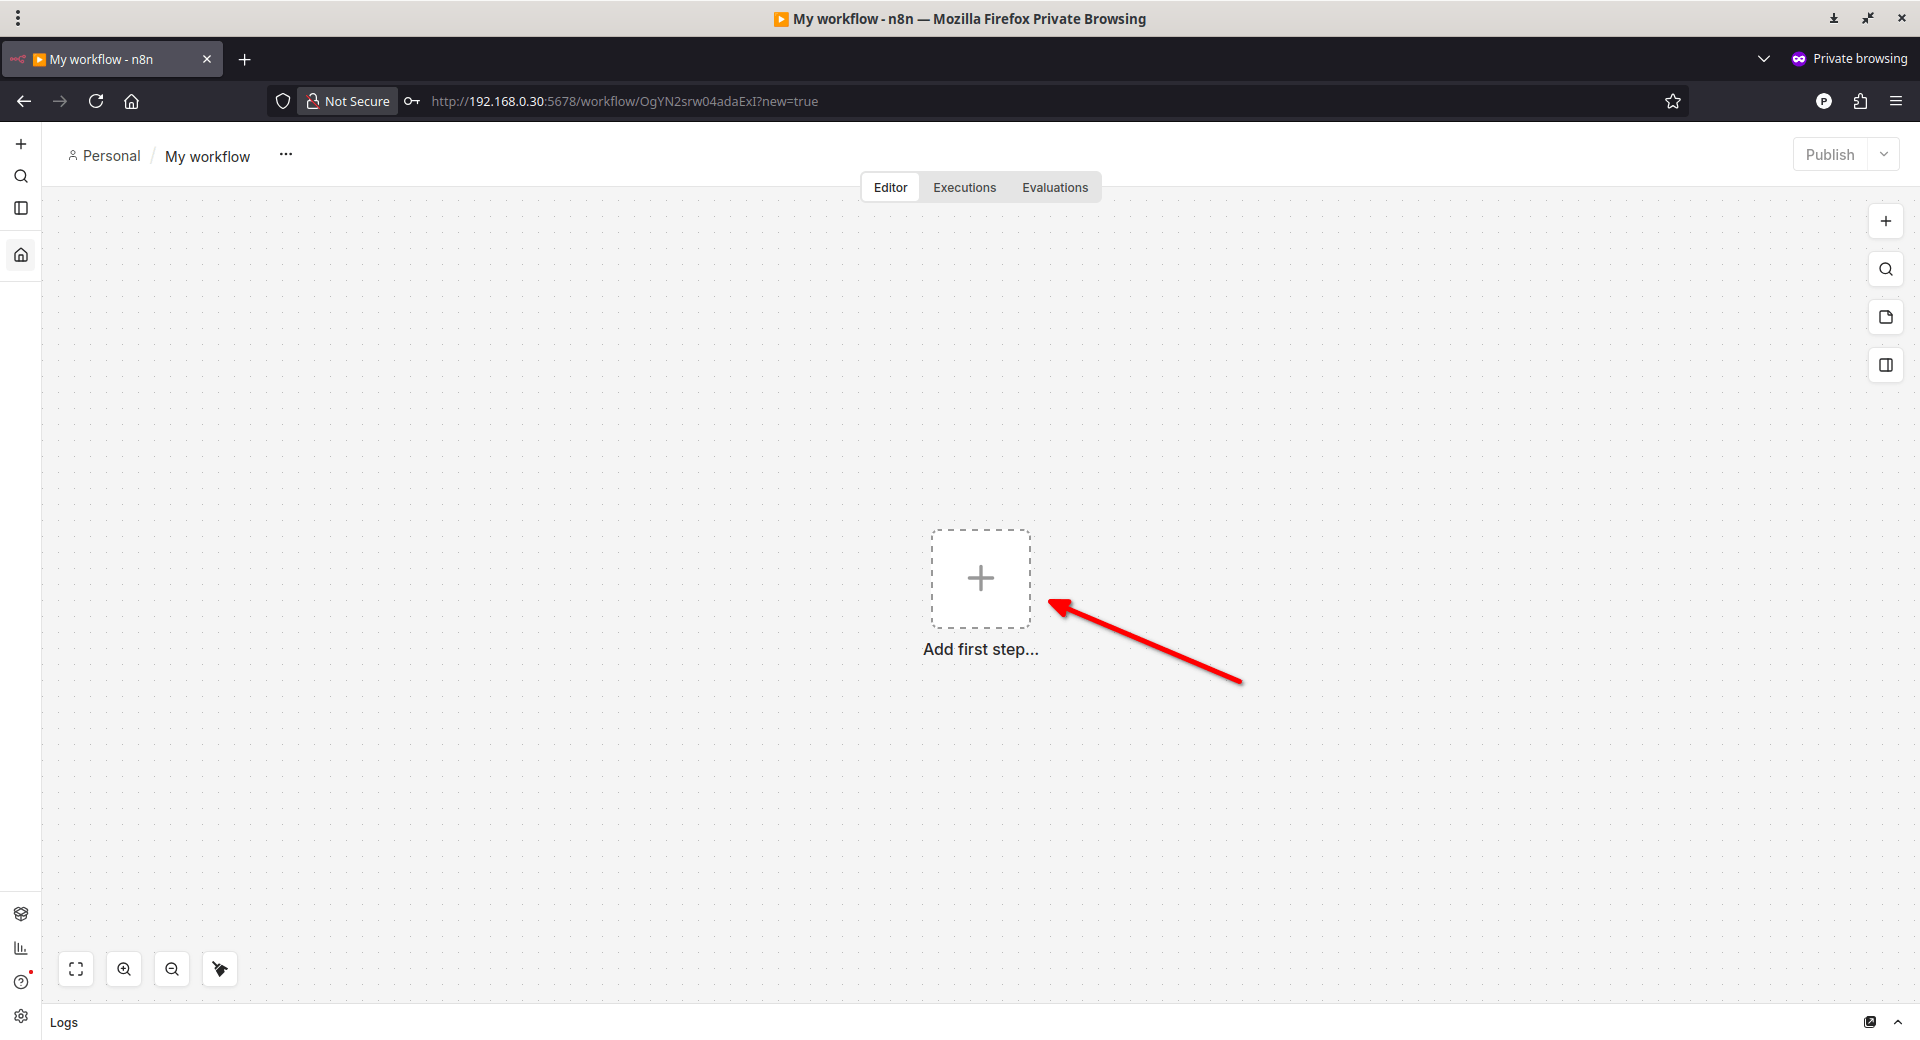
On the blank canvas, click the "+" icon or "Add first step" button.
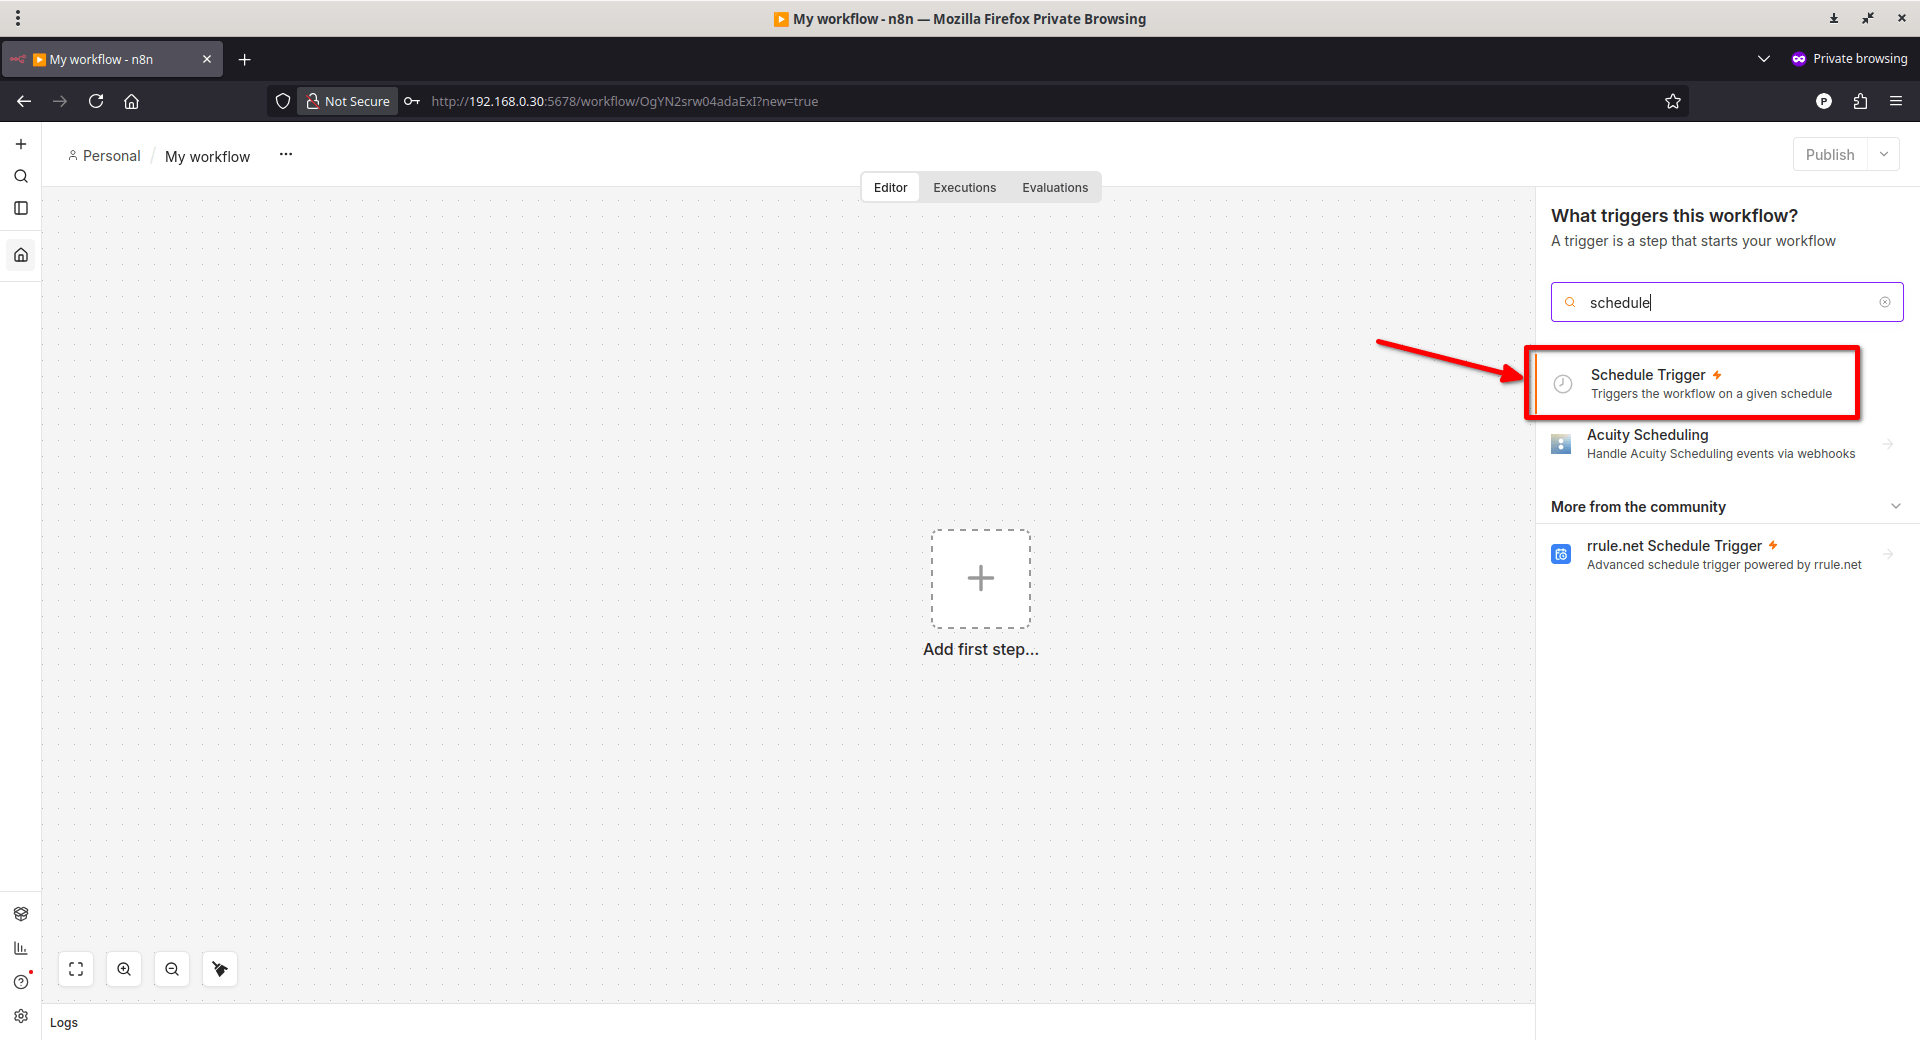
In the search bar, type "Schedule" and select the Schedule Trigger node from the list.
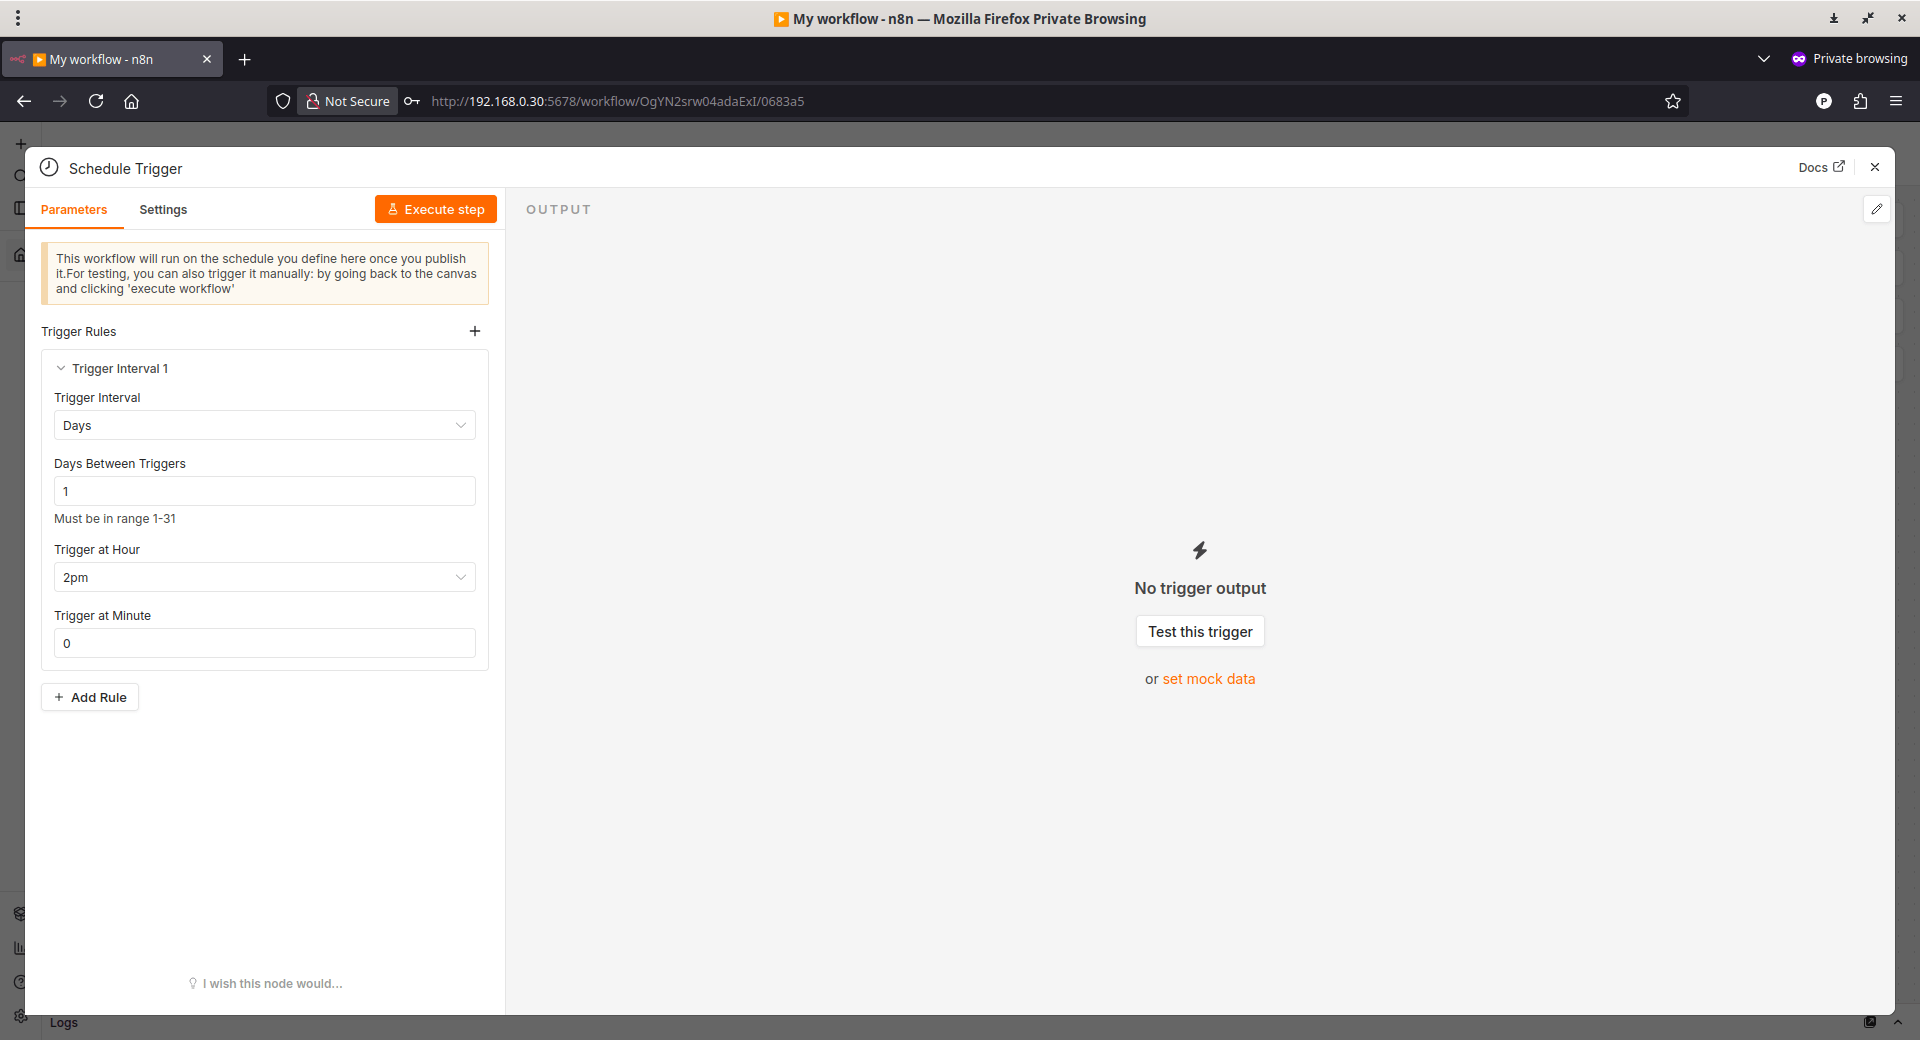
Now, configure when you want the workflow to run. You have two main options:
Option A: Simple Recurrence (Recommended for Beginners)
In the node's settings panel, you can use the Trigger Interval dropdown to choose an interval like Minutes, Hours, or Days. For example, set it to Days, 1 in Days Between Triggers, and select 2pm to run it every day at 2:00 PM.
Option B: Custom Cron (For Advanced Schedules)
If you need a more complex schedule (e.g., "every 10 seconds" or "at 9 AM every Monday"), you can set Trigger Interval to Custom (Cron) and enter a cron expression. You can use a tool like crontab guru to easily generate the correct expression for your needs.
For demo purpose, I will go with the Option A simple recurrence.
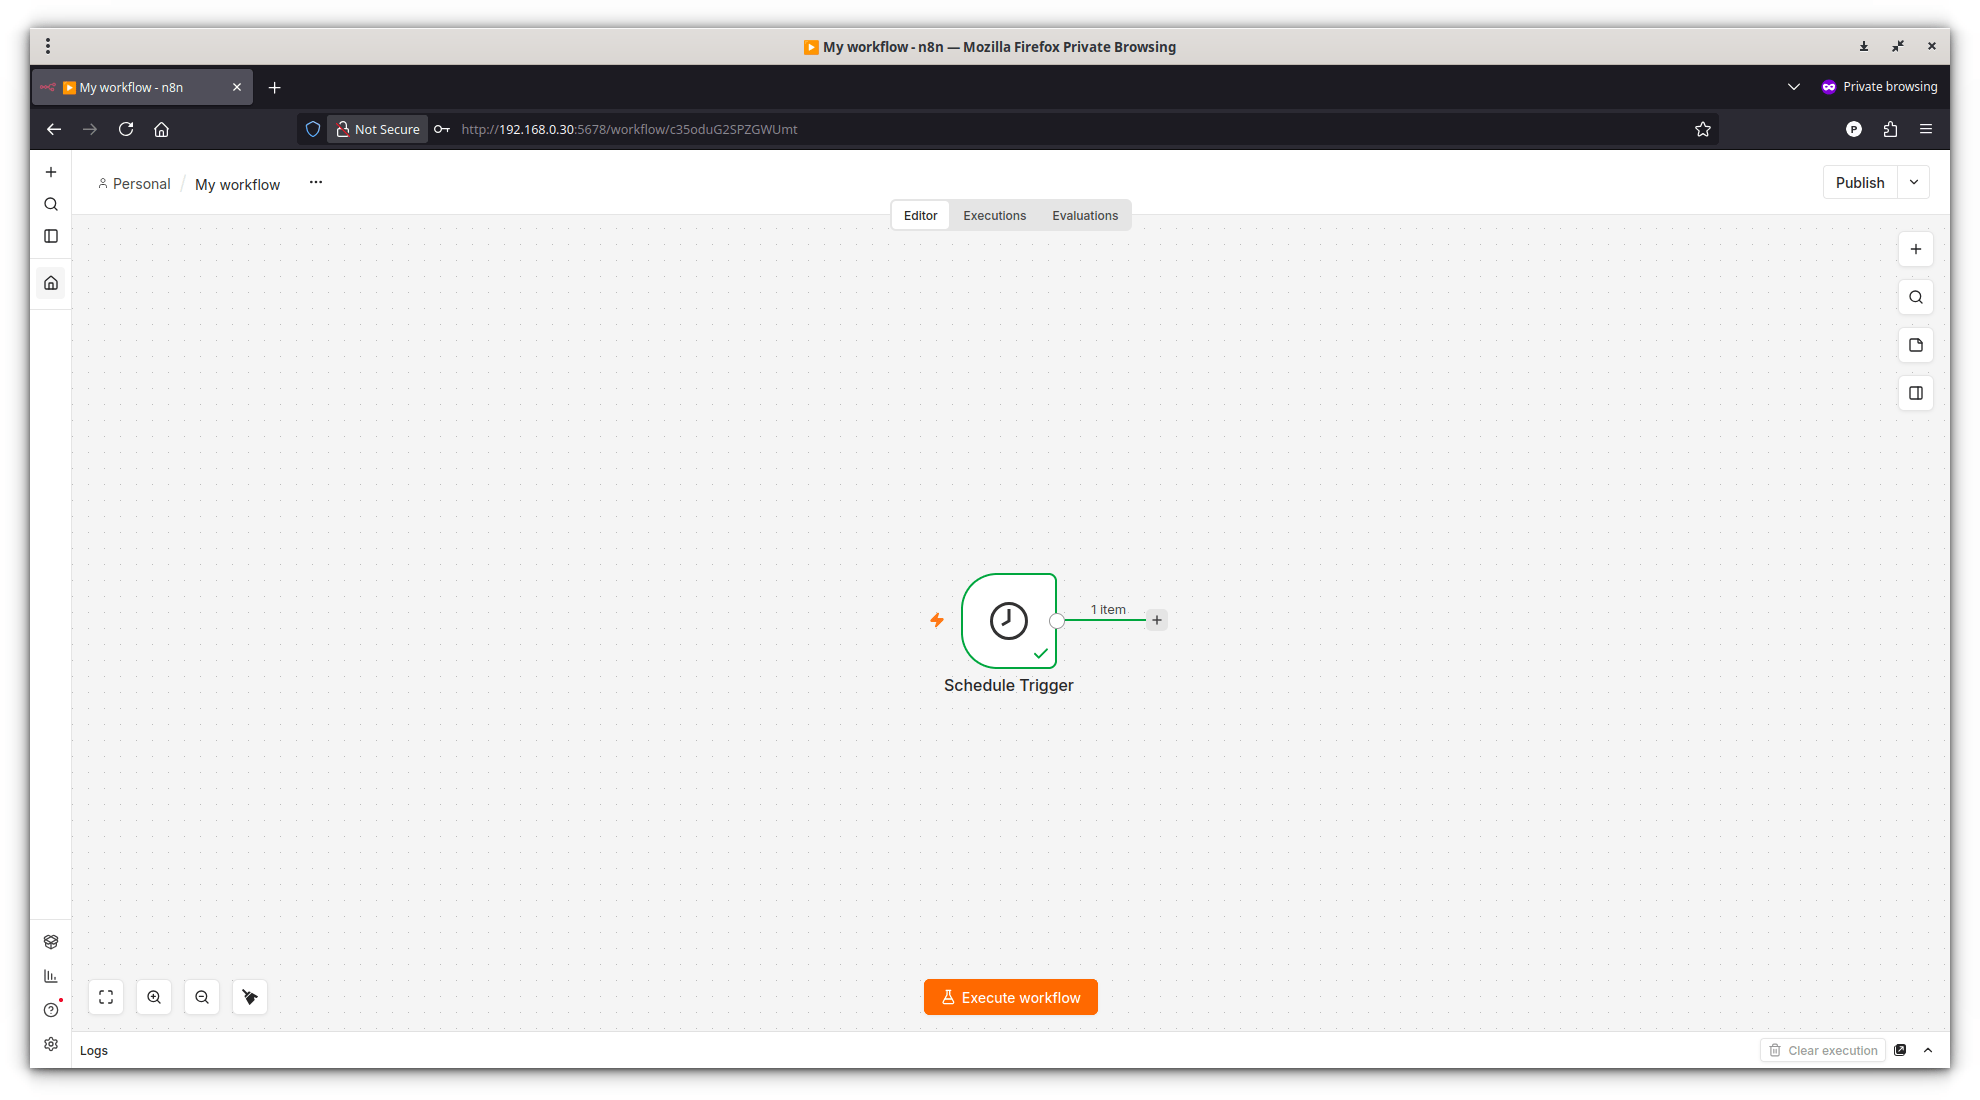
Once you configured all values, close the Trigger window. The data will be stored automatically. Do not close the n8n web interface, just close the schedule trigger window.
You will now see the newly created node in the n8n canvas.
Add Your First Action Node
Now you can define what the workflow should do when it triggers. This is done by adding "Action" nodes.
Click the "+" icon on the Schedule Trigger node to add the next step.
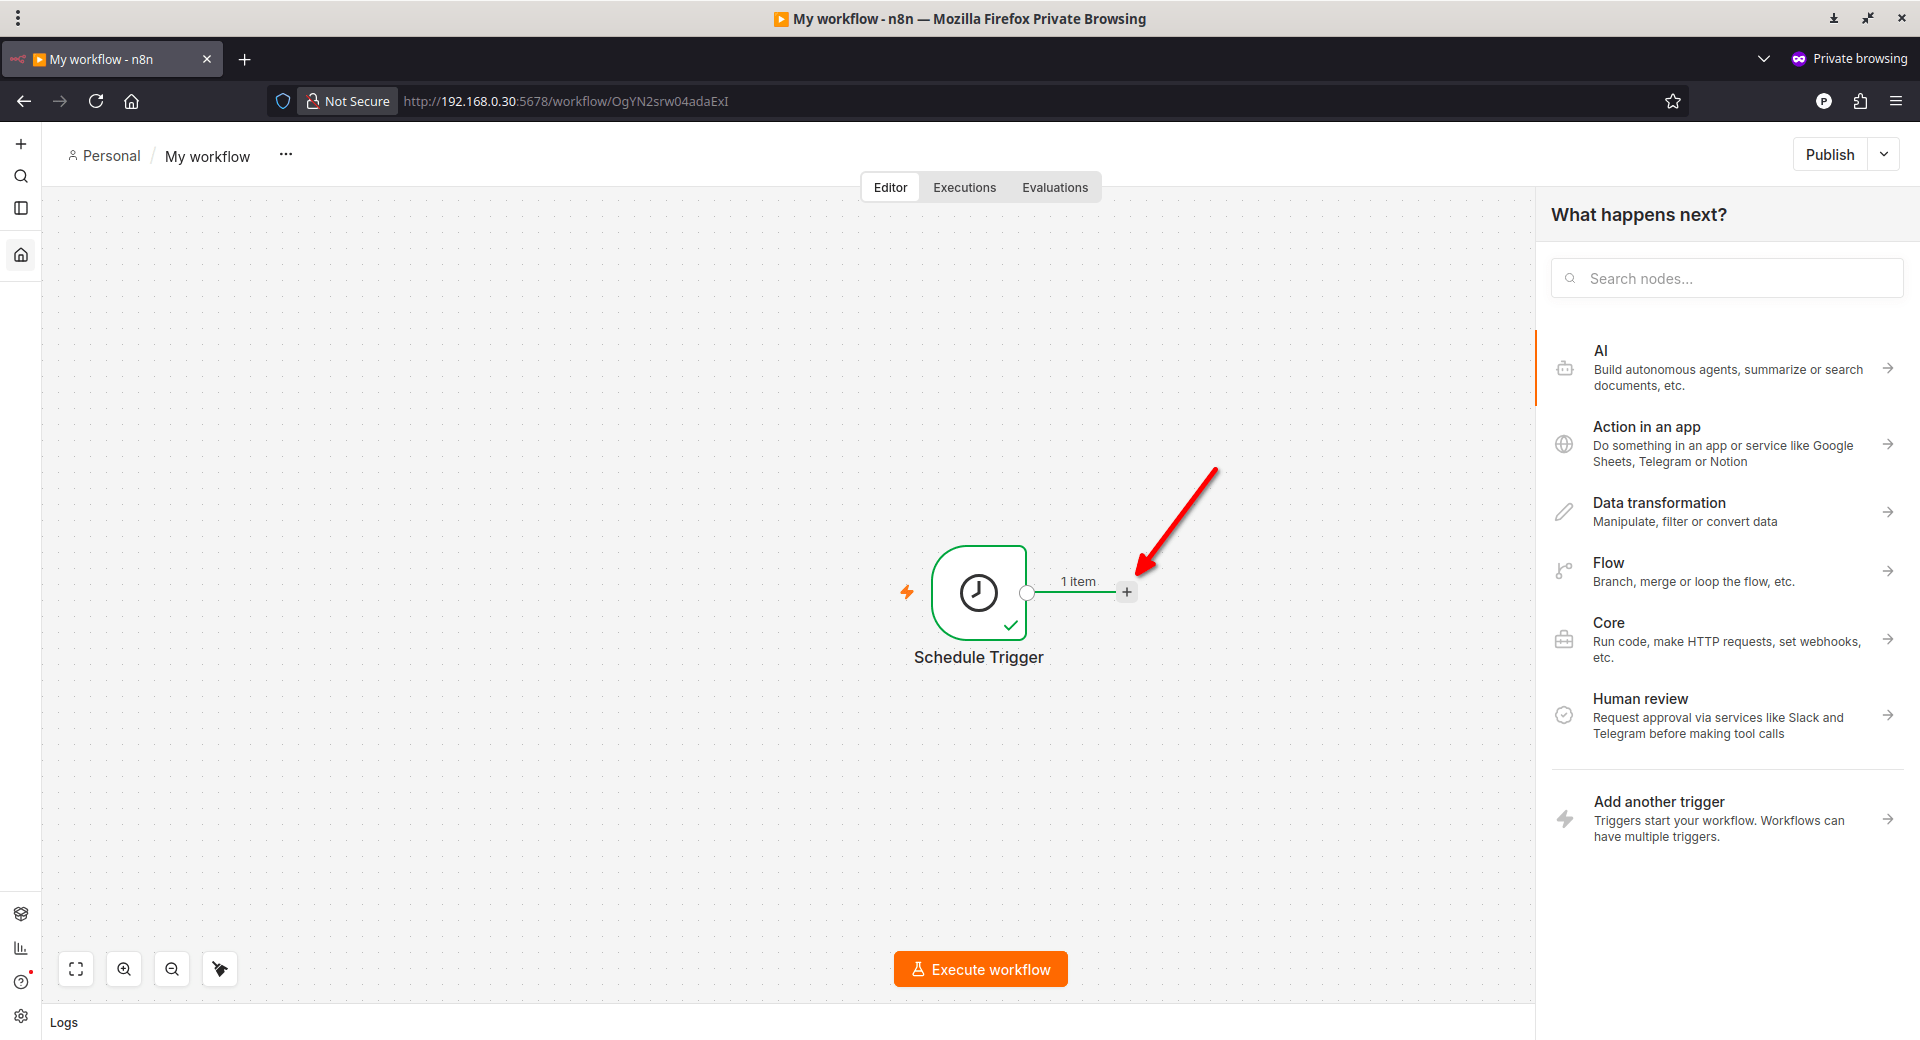
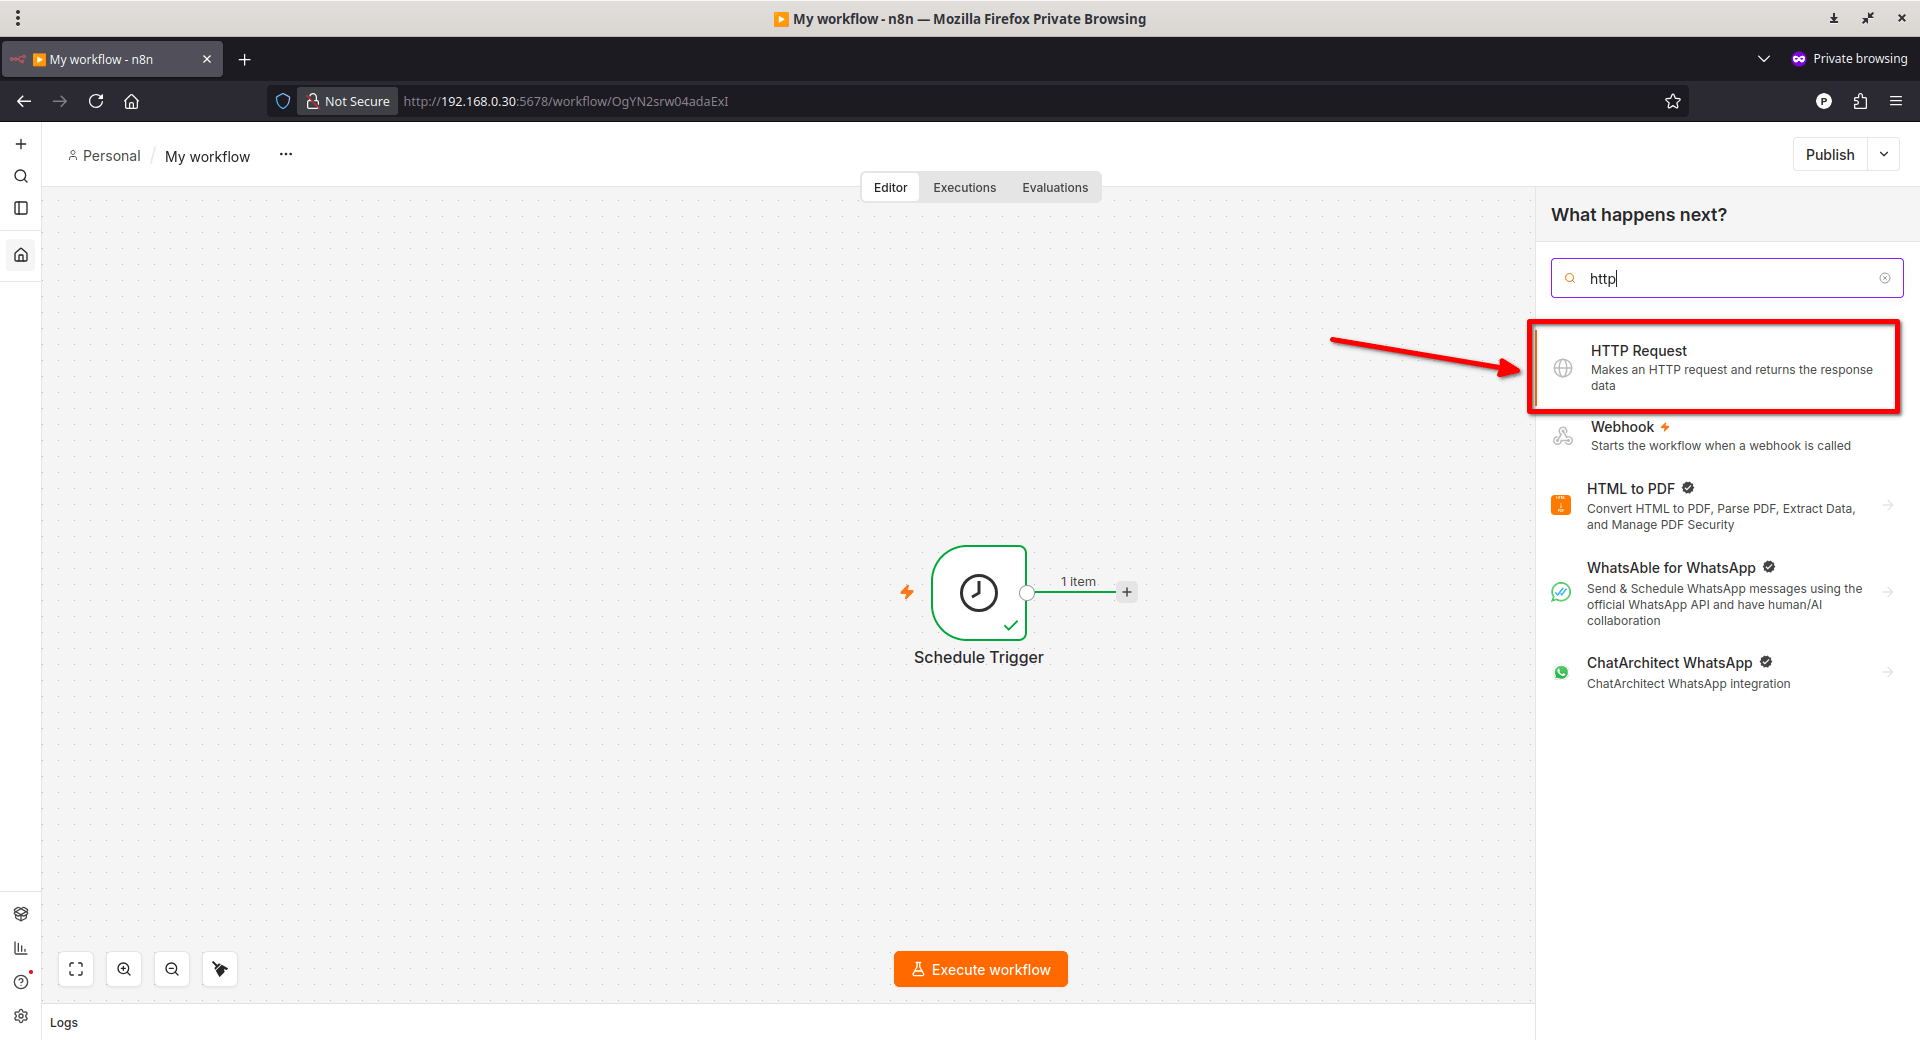
Search for and select the node for the app or service you want to use. For example, you could search for "HTTP Request" to call any public API, "Slack" to send a message, or "Google Sheets" to update a spreadsheet.
For demo purpose, I choose "HTTP Request":
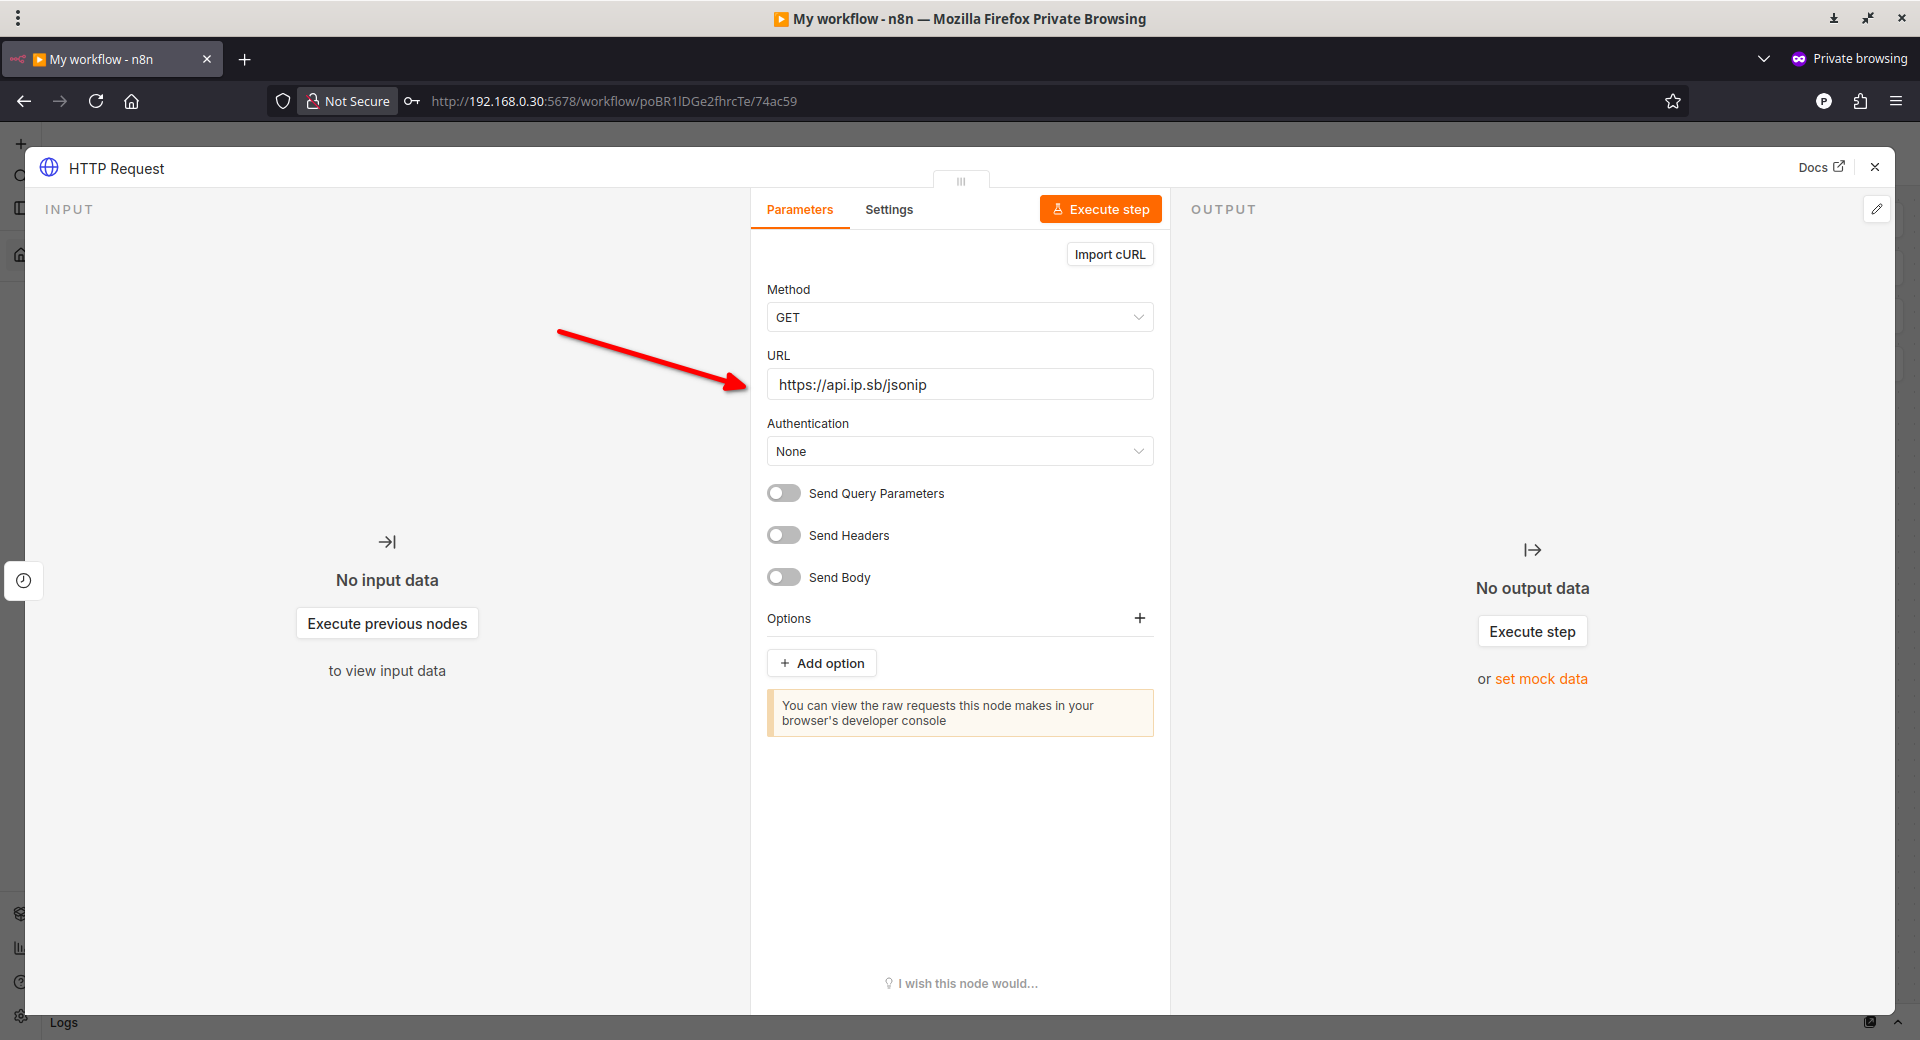
I am going to configure the HTTP Request node to call the IP Address Lookup API, which provides the public IP address:
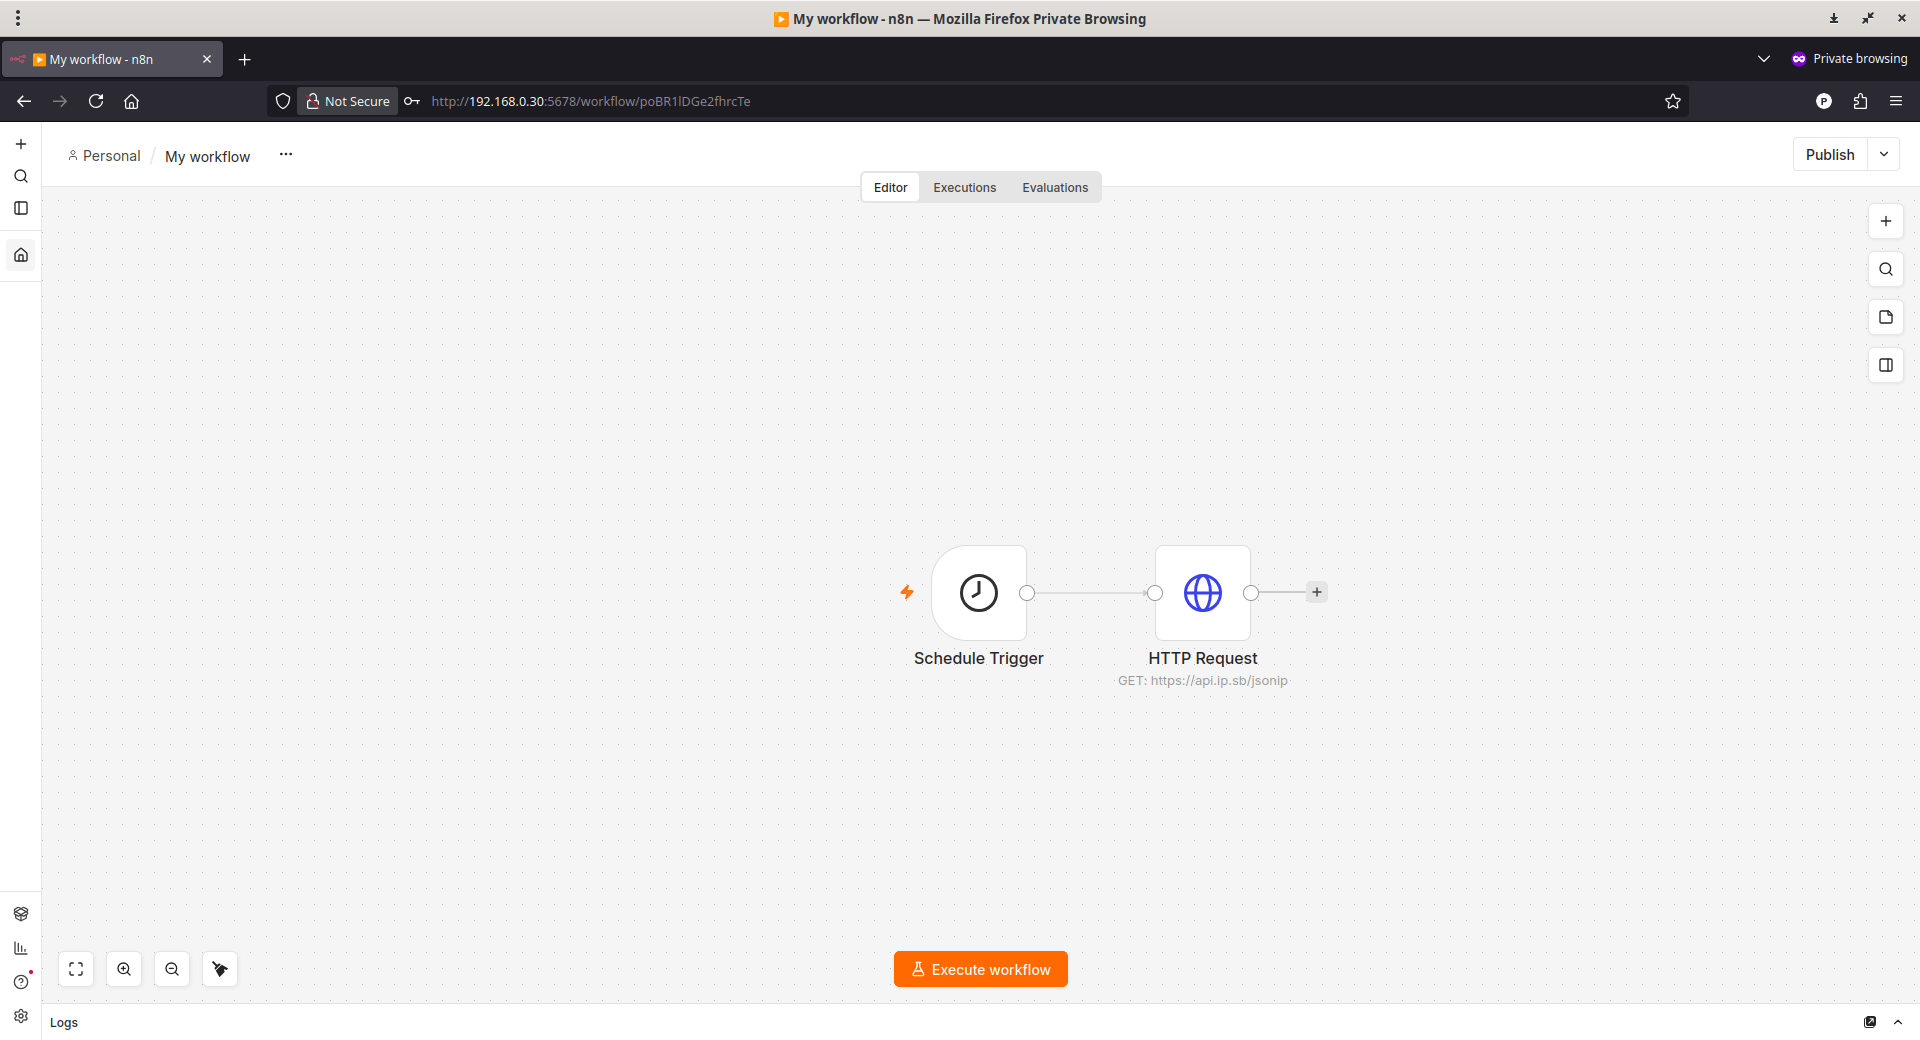
Close the configuration window and go back to the n8n canvas.
Now we have created two nodes.
Test Your Workflow
It's a good idea to test your automation before making it live.
Click the "Execute Workflow" button at the top or bottom of the canvas. n8n will run through every node in your workflow.
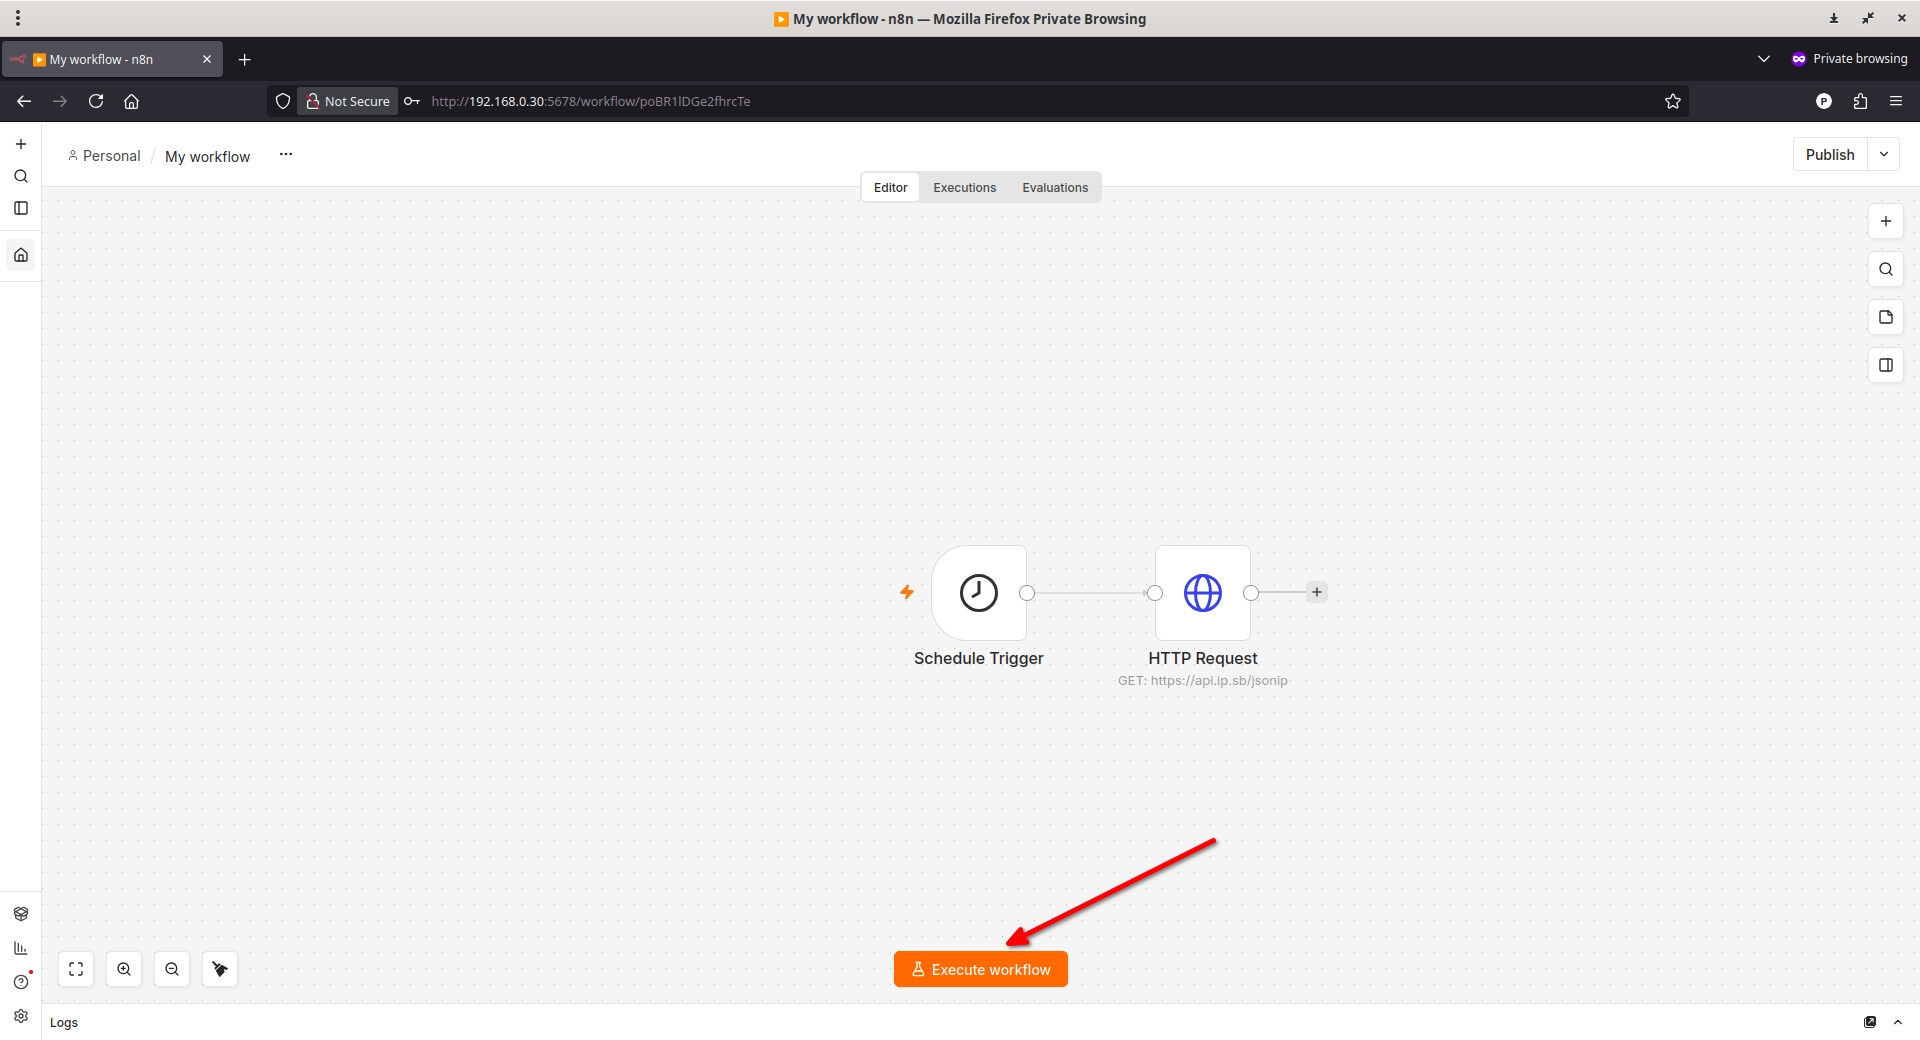
If you configured the nodes correctly, you will see the "Workflow executed successfully" message.
Click on each node to inspect the data that was passed through it. This is a great way to confirm everything is working as expected.
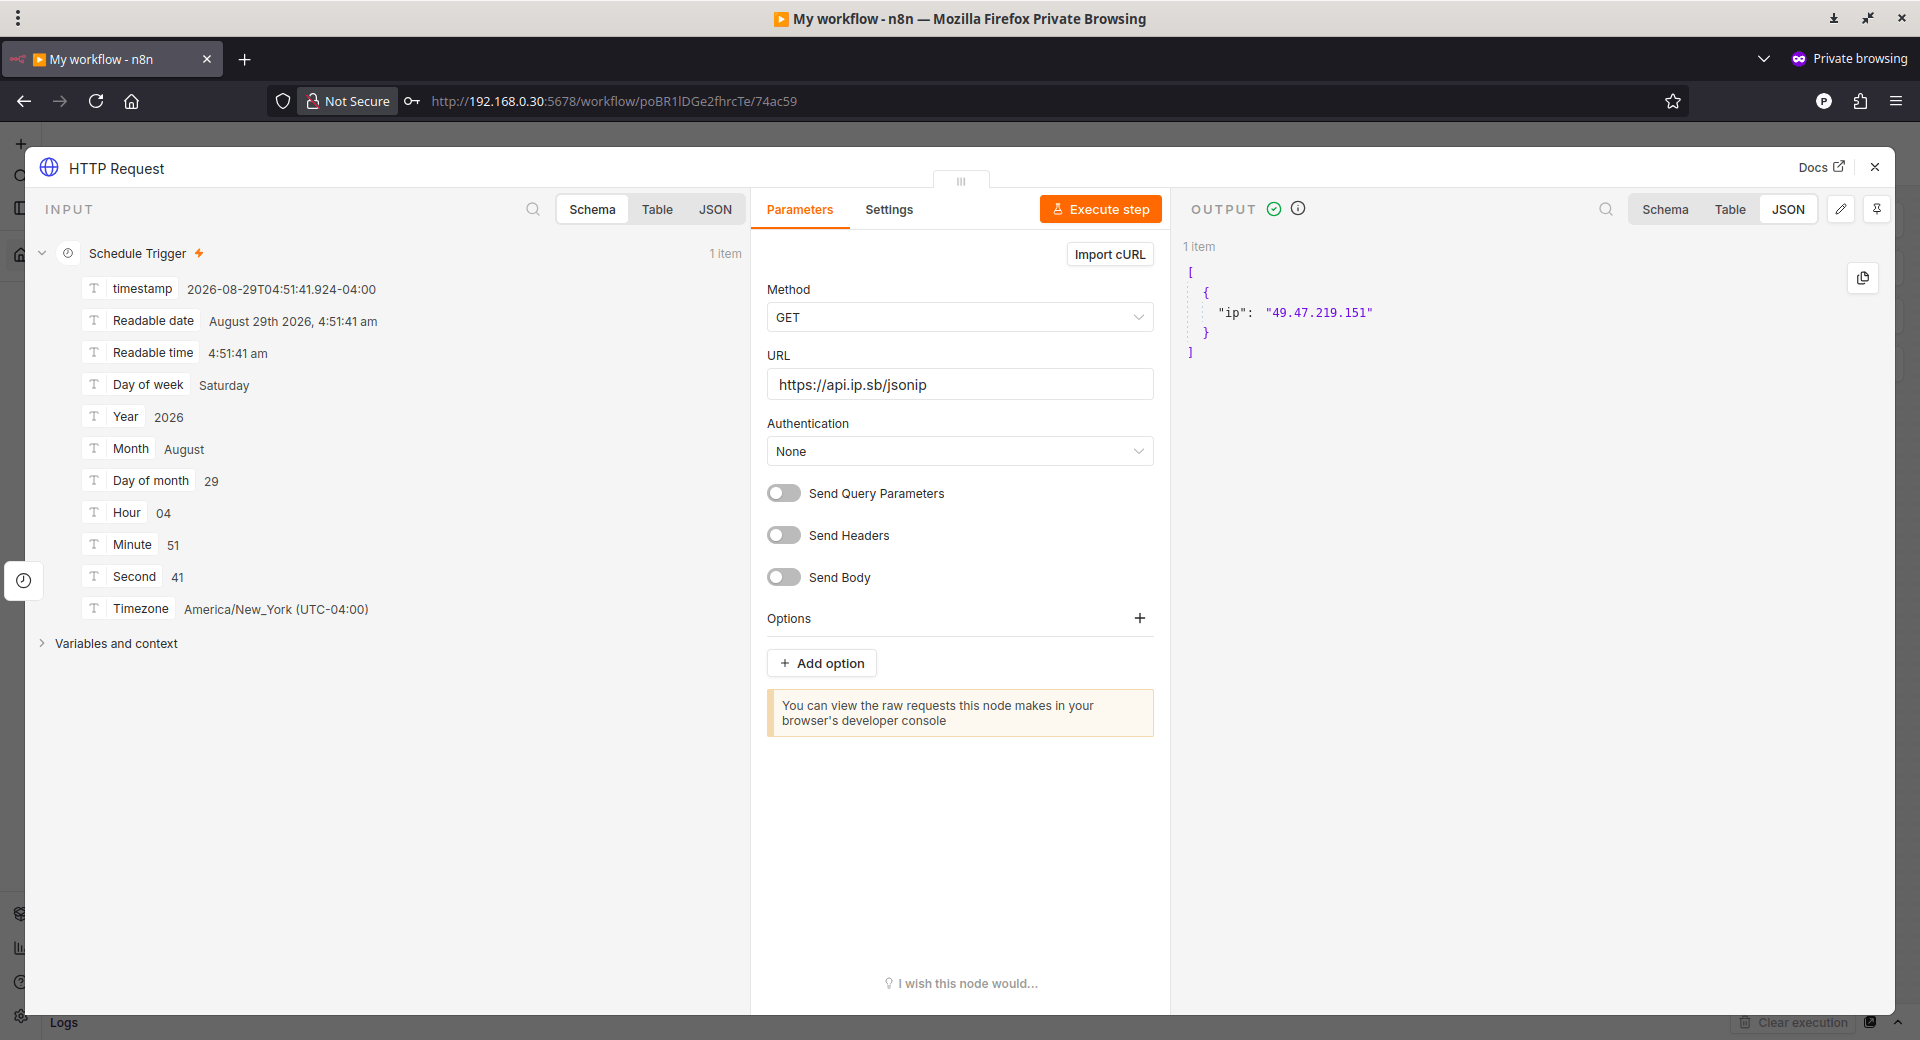
Great! The workflow is working as it displayed my public IP address in the output window.
Similarly, you can create and test different workflows.
Activate Your Workflow (Important)
Once you're happy with the test, it's time to make your workflow "live" so it runs automatically.
- Save your workflow.
- Click the "Publish" button (usually at the top right of the screen). Now it will turn into published.
- If it's inactive, it will only run when you manually click "Execute Workflow".
That's it! Your automated workflow is now live and will run on the schedule you set.
Now let us test whether the workflow survives container replacement. From /opt/n8n, stop and remove the containers:
cd /opt/n8n
docker compose down
Then recreate them:
docker compose up -d
Open n8n web interface (http://<VM-IP-Address>:5678) again and check the workflow.
If it's still there, the workflow data survived the container replacement. That's because docker compose down removes the containers but leaves the named volumes intact. If the workflow is gone, something is wrong with the persistent storage configuration.
This gives you a real n8n workflow to work with while keeping the focus on the thing you're actually testing: whether the data survives the container.
Containers Versus the Data that Outlives Them
A container is disposable, but the data behind it should not be. n8n's persistent volume is mounted at /home/node/.n8n, while PostgreSQL's is mounted at /var/lib/postgresql/.
The containers can be removed and rebuilt from the Compose file without removing these volumes. The volumes are what allow the application data to survive container replacement. The tests that follow are there to verify that this actually works.
Please note that the paths /home/node/.n8n and /var/lib/postgresql/ are inside the containers, not directories you should expect to find directly on the Ubuntu VM (host system).
If you want to check the paths inside the containers, you can use the following commands.
For n8n, run this command in your host's terminal:
docker compose exec n8n ls -la /home/node/.n8n
Sample Output:
total 48
drwxr-xr-x    4 node     node          4096 Aug 29 09:07 .
drwxr-xr-x    1 node     node          4096 Aug 29 09:06 ..
-rw-------    1 node     node            27 Aug 29 08:40 config
-rw-r--r--    1 node     node             0 Aug 29 09:06 crash.journal
-rw-r--r--    1 node     node         14630 Aug 29 09:00 n8nEventLog-1.log
-rw-r--r--    1 node     node         11104 Aug 29 09:09 n8nEventLog.log
drwxr-xr-x    2 node     node          4096 Aug 29 08:40 nodes
drwxr-xr-x    2 node     node          4096 Aug 29 08:40 storage
For PostgreSQL:
docker compose exec postgres ls -la /var/lib/postgresql
Sample Output:
total 12
drwxrwxrwt 3 postgres postgres 4096 Aug 29 08:39 .
drwxr-xr-x 1 root     root     4096 Aug 25 00:41 ..
drwxr-xr-x 3 root     root     4096 Aug 29 08:39 18
To see the Docker volumes on Ubuntu, run:
docker volume ls
You should see something similar to:
DRIVER    VOLUME NAME
local     67abc6ac5eb041b5cdfe96027730ebec32cd7a2d73ca44050f0d117e1e220e82
local     n8n_db_storage
local     n8n_n8n_storage
You can inspect a volume with:
docker volume inspect n8n_n8n_storage
and:
docker volume inspect n8n_db_storage
Docker will show you the volume's location on the VM, typically somewhere under:
/var/lib/docker/volumes/
Don't edit files directly inside those directories. Docker manages them, and PostgreSQL in particular should be treated as database storage rather than a directory of files you casually modify.
Now let us do a few experiments and see what happens to the workflow we created in the earlier step.
Experiment 1: Restart n8n
First, restart only the n8n container:
docker compose restart n8n
Once the container is running again, open the n8n web interface in your browser using the VM's IP address and port 5678:
http://<VM-IP>:5678
Check the workflow you created earlier. It should still be there because restarting the container doesn't remove the named volume where n8n's persistent data is stored.
Experiment 2: Restart the Whole Stack
This time,restart both n8n and PostgreSQL:
docker compose restart
docker compose ps
docker compose ps lets you confirm that both containers are running again. Then open the n8n web interface and check the workflow.
The application stack has restarted, but the data remains in the persistent volumes.
Experiment 3: Reboot the VM
Now test what happens when the entire Ubuntu VM goes down:
sudo reboot
After reconnecting to the VM:
cd /opt/n8n
docker compose ps
If both containers are running again without manually starting the stack, that's an important result. Docker starts with the host, and the containers' restart policy tells Docker to bring them back up.
The workflow should still be there too. The containers restarted, but the persistent volumes survived the reboot.
This is roughly where a deployment stops looking like a demo and starts behaving like a service.
Experiment 4: Delete and Recreate the Containers
This time, remove the containers themselves while leaving the volumes intact:
docker compose down
Then bring the stack back:
docker compose up -d
Docker creates new containers from the Compose file. The volumes are still there, so when you log in to n8n, the workflow should still be there too.
This is where the architecture starts to click. The containers can be thrown away and rebuilt from their definition, while the state that matters lives in persistent volumes outside those containers.
Persistent Storage is Not a Backup
At some point, it's worth understanding what happens when the volumes themselves go away. The docker compose down -v command removes Compose-managed volumes along with the containers, so it's not something to run against a deployment containing data you care about.
You should understand the failure mode. If the PostgreSQL volume is deleted, the database data stored in it is gone. If the n8n volume is deleted, the data stored there is gone too.
This is why persistent storage and backups are different things. A persistent volume protects data from container replacement, but it doesn't protect that data from the volume itself being deleted or the underlying storage being lost.
“Reproducible” and “protected” are not the same property. This experiment makes that distinction much easier to understand.
Persistent Isn't the Same as Backed Up
Which leads to the next lesson: a persistent Docker volume is not a backup. If the VM's disk fails or you accidentally delete a volume, “it was on a persistent volume” doesn't help you. The volume survives the container, but it still depends on the storage and host where it lives.
Before this goes anywhere near a VPS, you need an actual answer for:
- what data belongs to PostgreSQL,
- what belongs to n8n,
- where the volumes physically live,
- how to back them up,
- how to restore them,
- and, more importantly, how to verify that a backup is actually usable rather than just assuming it is.
The same applies to upgrades. docker compose pull && docker compose up -d may be enough to update the containers, but it isn't a complete upgrade process. The backup, verification, and recovery steps are just as important as pulling the new image.
Upgrades as their Own Experiment
Once the base installation feels stable, rehearse an upgrade here before doing it on a VPS. Back up first, note the current version, pull the new image, recreate the container, check the logs, open n8n, confirm that the existing workflows are intact, and then actually run one.
The command itself can be simple. The discipline around it shouldn't be. An upgrade isn't complete just because the new container starts. You also need to know that the data survived, n8n is working as expected, and I have a usable backup if something goes wrong.
Accessing n8n without a Domain
You don't need a domain for this local setup because you're not exposing n8n to the public internet yet. The VM has a private IP address, which is enough to access the n8n web interface from your machine:
You also don't need DNS or a TLS certificate for this private lab. That changes completely once n8n becomes internet-facing. Plain HTTP is fine for this isolated setup, but it is not an appropriate way to expose n8n on the public internet.
HTTPS Isn't Part of This Lab
A public n8n deployment is a different problem entirely. It introduces a domain, DNS, a reverse proxy, HTTPS termination, firewall rules, secure cookies, and webhook URLs that need to be reachable from outside. You don't need any of that yet.
There's a real difference between “I can reach n8n” and “I can safely expose n8n to the internet.” Getting HTTPS working doesn't automatically make the rest of the deployment secure.
Docker's documentation is worth understanding here because published container ports can interact with host firewalls such as UFW and firewalld in ways that aren't always obvious. Before making this public, you must understand which ports are open, what they're bound to, and how the firewall behaves once Docker is involved.
You should also want to understand n8n's security settings, including secure cookies and credential protection. n8n's security audit can help identify issues involving credentials, the database, filesystem access, risky nodes, and outdated versions. Those checks become much more important once the service is exposed to the internet.
Why a Disposable VM?
Part of why a disposable VM is worth having is that you can actually break it. You can stop PostgreSQL mid-run, restart n8n, restart the whole stack, reboot the host, delete and recreate containers, change configuration, dig through logs, test an upgrade, test a restore, or delete something you shouldn't have. None of that counts as a failed deployment. It's the experiment doing exactly what it's supposed to do.
The goal was never to build a machine that never breaks. It was to get comfortable with the question that actually matters later: what broke, why did it break, and how do you get it back? That's far more useful to know before paying for a VPS than having a clean uptime streak on a machine you never stressed.
From Local Lab to VPS: What Actually Changes
By this point, the deployment isn't just “n8n on Ubuntu” anymore. There's a real stack underneath it:
Ubuntu
  │
  ├── networking
  ├── storage
  └── system services
          │
          ▼
       Docker
          │
          ▼
    Docker Compose
          │
       ┌──┴───┐
       ▼      ▼
      n8n   PostgreSQL
       │      │
       ▼      ▼
    storage storage
And above all of that sits the thing we actually wanted in the first place: workflow automation. You now understand the machinery underneath it, and you can point to what's missing compared with a public deployment.
Right now, the lab is private and simple:
Private network
      │
      ▼
Ubuntu VM
      │
      ▼
Docker
      │
 ┌────┴────┐
 ▼         ▼
n8n     PostgreSQL
A public VPS deployment adds another layer around the same application:
Internet
   │
   ▼
Domain
   │
   ▼
DNS
   │
   ▼
Reverse proxy
   │
 HTTPS
   ▼
n8n
   │
   ▼
PostgreSQL
   │
   ▼
Persistent storage

       +

Backups
Monitoring
Firewall
Updates
Security
Recovery plan
The application itself hasn't changed. The infrastructure around it has. That's exactly why learning it locally first was worth the time.
When you eventually rent a VPS, you won't be starting from nothing. You'll already understand:
- what Docker and Compose are doing,
- why the volumes matter,
- where the secrets live,
- how to read the logs,
- what a reboot or upgrade does to the stack,
- why backups matter more than persistence alone,
- and why exposing a service to the public internet is a fundamentally different problem from accessing it privately.
That's a much better place to start than pointing a one-click installer at a fresh server and hoping everything holds together.
Final Thoughts
In this detailed guide, we learned how to self-host n8n locally on a Ubuntu system and how to create a simple workflow to verify if n8n is working as expected. You can use this n8n private lab for learning and testing purpose. Create and test different workflows. Try to implement simple automation tasks.
Once you're comfortable enough with n8n, you can take what you learned here and host n8n on a VPS. That's where the domain, DNS, HTTPS, firewall, backups, monitoring, and production hardening become worth the effort.
For now, the VM is doing exactly the job you built it for.
In our next tutorial, we will discuss how to self-host n8n on Ubuntu using Docker compose and Tailscale to publicly access it from anywhere in the world.
Stay tuned!
References:
