6.9K
Before install postfix, remove sendmail from the server. Because sendmail is the default MTA in Redhat/CentOS.
[root@server ~]# yum remove sendmail
Table of Contents
Prerequisites:
- The mail server should contain a valid MX record in the DNS server. Navigate to this link how to setup DNS server.
- Firewall and SELinux should be disabled.
[root@server ~]# service iptables stop
[root@server ~]# service ip6tables stop
[root@server ~]# chkconfig iptables off
[root@server ~]# chkconfig ip6tables off
[root@server ~]# vi /etc/selinux/config
# This file controls the state of SELinux on the system.
# SELINUX= can take one of these three values:
#     enforcing - SELinux security policy is enforced.
#     permissive - SELinux prints warnings instead of enforcing.
#     disabled - No SELinux policy is loaded.
SELINUX=disabled
# SELINUXTYPE= can take one of these two values:
#     targeted - Targeted processes are protected,
#     mls - Multi Level Security protection.
SELINUXTYPE=targeted
Reboot the server.
Scenario
In this tutorial my test box
- Hostname = server.ostechnix.com
- IP Address = 192.168.1.200/24
And my server is configured with proper MX record in DNS server.
Installation
Postfix is installed by default. If it is not installed, use the below command to install postfix.
[root@server ~]# yum install postfix
Configuration
Open the postfix config file /etc/postfix/main.cf. Find the below lines and edit them as shown below.
[root@server ~]# vi /etc/postfix/main.cf
myhostname = server.ostechnix.com ##line no 75 - uncomment and enter your host name
mydomain = ostechnix.com  ##line no 83 - uncomment and enter your domain name
myorigin = $mydomain  ##line no 99 - uncomment
inet_interfaces = all  ##line no 116 - change to all
mydestination = $myhostname, localhost.$mydomain, localhost, $mydomain  ##line no 164 - add $domain at the end
mynetworks = 192.168.1.0/24, 127.0.0.0/8  ##line no 264 - uncomment and add your network range
home_mailbox = Maildir/  ##line no 419 - uncomment
Start the postfix service.
[root@server ~]# service postfix start
Starting postfix:                                          [  OK  ]
[root@server ~]# chkconfig postfix on
Test Postfix
The commands shown in bold letters should be entered by the user.
Note: The dot after the test command is important.
[root@server ~]# telnet localhost smtp
Trying ::1...
Connected to localhost.
Escape character is '^]'.
220 server.ostechnix.com ESMTP Postfix
ehlo localhost
250-server.ostechnix.com
250-PIPELINING
250-SIZE 10240000
250-VRFY
250-ETRN
250-ENHANCEDSTATUSCODES
250-8BITMIME
250 DSN
mail from:<user1>
250 2.1.0 Ok
rcpt to:<user1>
250 2.1.5 Ok
data
354 End data with <CR><LF>.<CR><LF>
test
.
250 2.0.0 Ok: queued as 117113FF18
quit
221 2.0.0 Bye
Connection closed by foreign host.
Check Mail
Navigate to the user mail directory and check for the new mail.
[root@server ~]# cd /home/user1/Maildir/new/
[root@server new]# ls
1360236956.Vfd00I35afM181256.server.ostechnix.com
[root@server new]# cat 1360236956.Vfd00I35afM181256.server.ostechnix.com
Return-Path: <user1@ostechnix.com>
X-Original-To: user1
Delivered-To: user1@ostechnix.com
Received: from localhost (localhost [IPv6:::1])
 by server.ostechnix.com (Postfix) with ESMTP id 117113FF18
 for <user1>; Thu,  7 Feb 2013 17:05:32 +0530 (IST)
Message-Id: <20130207113547.117113FF18@server.ostechnix.com>
Date: Thu,  7 Feb 2013 17:05:32 +0530 (IST)
From: user1@ostechnix.com
To: undisclosed-recipients:;
test
Thats it. Postfix working now.
Install Dovecot
[root@server ~]# yum install dovecot
Configure Dovecot
Open the dovecot config file /etc/dovecot/dovecot.conf. Find and uncomment the line as shown below.
[root@server ~]# vi /etc/dovecot/dovecot.conf
protocols = imap pop3 lmtp
Open the file /etc/dovecot/conf.d/10-mail.conf and uncomment the line as shown below.
[root@server ~]# vi /etc/dovecot/conf.d/10-mail.conf
mail_location = maildir:~/Maildir  ##line no 24 - uncomment
Open the /etc/dovecot/conf.d/10-auth.conf and edit as shown below.
[root@server ~]# vi /etc/dovecot/conf.d/10-auth.conf
disable_plaintext_auth = no  ##line no 9 - uncomment and change from yes to no.
auth_mechanisms = plain login  ##line no 97 - add the text "login"
Open the /etc/dovecot/conf.d/10-master.conf and edit as shown below.
unix_listener auth-userdb {
    #mode = 0600
    user = postfix  ##line no 83 - uncomment and enter postfix
    group = postfix  ##line no 84 - uncomment and enter postfix
Start the dovecot service.
[root@server ~]# service dovecot start
Starting Dovecot Imap:                                     [  OK  ]
[root@server ~]# chkconfig dovecot on
Test Dovecot
The commands shown in bold should be entered by the user.
[root@server ~]# telnet localhost pop3
Trying ::1...
Connected to localhost.
Escape character is '^]'.
+OK Dovecot ready.
user user1
+OK
pass user1
+OK Logged in.
list
+OK 1 messages:
1 428
.
retr 1
+OK 428 octets
Return-Path: <user1@ostechnix.com>
X-Original-To: user1
Delivered-To: user1@ostechnix.com
Received: from localhost (localhost [IPv6:::1])
 by server.ostechnix.com (Postfix) with ESMTP id 117113FF18
 for <user1>; Thu,  7 Feb 2013 17:05:32 +0530 (IST)
Message-Id: <20130207113547.117113FF18@server.ostechnix.com>
Date: Thu,  7 Feb 2013 17:05:32 +0530 (IST)
From: user1@ostechnix.com
To: undisclosed-recipients:;
test
.
quit
+OK Logging out.
Connection closed by foreign host.
[root@server ~]#
Dovecot is working now.
Install Squirrelmail
Install EPEL repository first. And install SquirrelMail package from EPEL repository.
[root@server ~]# wget http://dl.fedoraproject.org/pub/epel/6/i386/epel-release-6-8.noarch.rpm
[root@server ~]# rpm -ivh epel-release-6-8.noarch.rpm
[root@server ~]# yum install squirrelmail
[root@server ~]# service httpd start
Starting httpd:                                            [  OK  ]
[root@server ~]# chkconfig httpd on
[root@server ~]#
Configure Squirrelmail
Go to the squirrelmail config directory and use the command ./conf.pl to start configure as shown below.
[root@server ~]# cd /usr/share/squirrelmail/config/
[root@server config]# ./conf.pl
SquirrelMail Configuration : Read: config.php (1.4.0)
---------------------------------------------------------
Main Menu --
1.  Organization Preferences
2.  Server Settings
3.  Folder Defaults
4.  General Options
5.  Themes
6.  Address Books
7.  Message of the Day (MOTD)
8.  Plugins
9.  Database
10. Languages
D.  Set pre-defined settings for specific IMAP servers
C   Turn color off
S   Save data
Q   Quit
Command >>1
Select option 1 and set organization details.
SquirrelMail Configuration : Read: config.php (1.4.0)
---------------------------------------------------------
Organization Preferences
1.  Organization Name      : Ostechnix
2.  Organization Logo      : ../images/sm_logo.png
3.  Org. Logo Width/Height : (308/111)
4.  Organization Title     : Welcome to Ostechnix webmail
5.  Signout Page           :
6.  Top Frame              : _top
7.  Provider link          : https://ostechnix.com
8.  Provider name          : Ostechnix
R   Return to Main Menu
C   Turn color off
S   Save data
Q   Quit
Command >>R
Press R to return main menu and select option 2. Enter your domain name and select dovecot in the Sendmail or SMTP parameter.
SquirrelMail Configuration : Read: config.php (1.4.0)
---------------------------------------------------------
Server Settings
General
-------
1.  Domain                 : ostechnix.com
2.  Invert Time            : false
3.  Sendmail or SMTP       : SMTP
A.  Update IMAP Settings   : localhost:143 (uw)
B.  Update SMTP Settings   : localhost:25
R   Return to Main Menu
C   Turn color off
S   Save data
Q   Quit
Command >> S
Once you done, press S to save datas and press Q to exit.
Add the following lines in the httpd.conf file at the end.
[root@server ~]# vi /etc/httpd/conf/httpd.conf
Alias /squirrelmail /usr/share/squirrelmail
<Directory /usr/share/squirrelmail>
    Options Indexes FollowSymLinks
    RewriteEngine On
    AllowOverride All
    DirectoryIndex index.php
    Order allow,deny
    Allow from all
</Directory>
Restart the httpd service.
[root@server ~]# service httpd restart
Stopping httpd:                                            [  OK  ]
Starting httpd:                                            [  OK  ]
[root@server ~]#
Create Users
[root@server ~]# useradd user1
[root@server ~]# useradd user2
[root@server ~]# passwd user1
[root@server ~]# passwd user2
Open the browser from any clients. Type the following in the address bar.
http://serveripaddress/webmail
or
http://yourdomainname/webmail

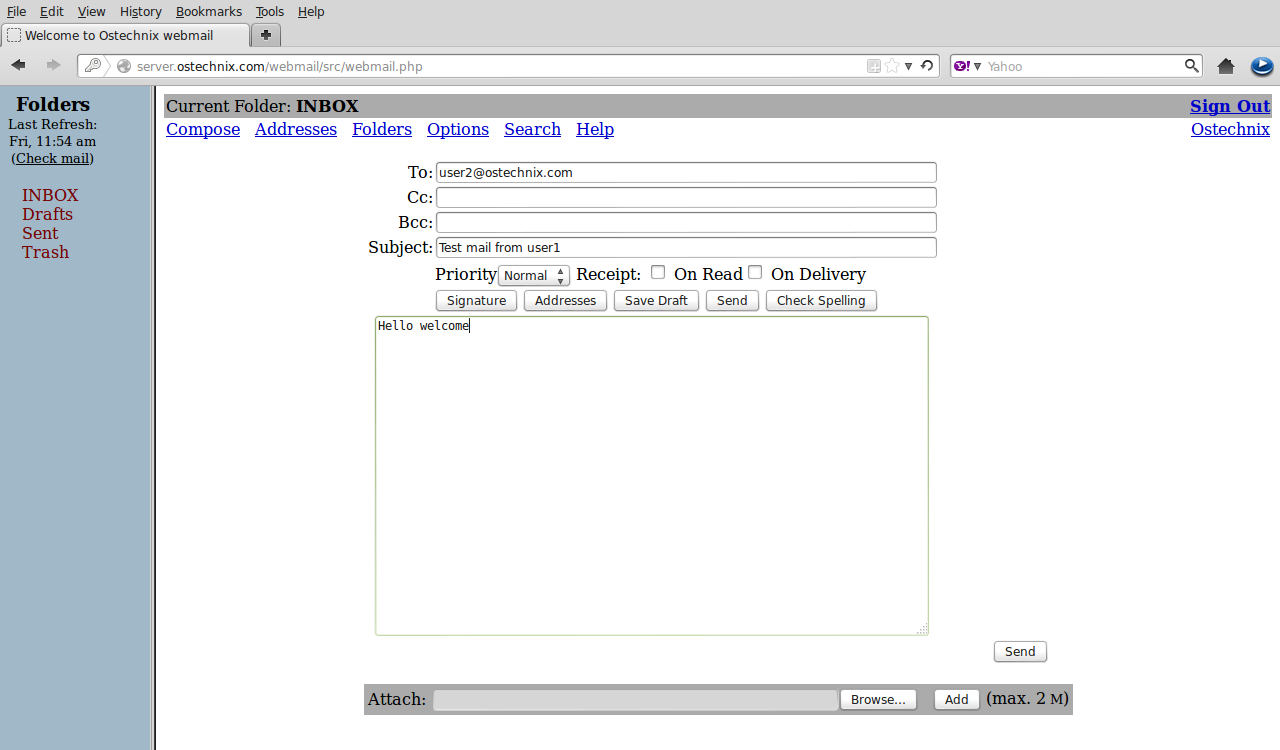
Now let us compose a mail from user1 to user2. Refer a below screenshot.
Then sign-out and sign-in back from user2.


Thats it. We have got a mail from user1. If you have any issues in the configuration, post them in the comment section.
Have a good day.
35 comments
this tuto is gr8. But can you help on Virtual Domain , with multiple emails ids,,
The best tutorial I have ever found! Thank you so much 🙂
Hi,
Thanks for that tutorial.
I’ve the trouble that I can only send emails to the address on the server, when I send to an email outside my server like to gmail, hotmail,… I don’t receive anyone.
An other problem is that when I send to user1@mydomain.com from user0@mydomain.com the user1 receive duplicate the email.
What I do wrong in the configuration?
If I set up again the iptables it doesn’t work so the iptables is always disable, so How can I do to turn on again the iptables and selinux to have protect my server and continue going on the mail server?
Thanks
Best regards 😉
Hi Dasanro
You need a static(Real) IP and the IP Address should be point to your mail domain. Also you need to add the valid MX records of Mail server in your DNS server. Get help from your ISP(Internet service provider). They will point your IP Address to your Mail domain.
This should work. Hope this help you.
Excelent tutorial. Followed to the letter and got the result expected. Problem being the newbie:
when I attempt to send mail to external domains using the SquirrelMail Web interface this is what I get:
Transaction failed
554 5.7.1 : Relay access denied
I do have a statice IP. I configured DNS at godaddy; A Record mail2 70.x.x.x; MX Record pri 0 mail2.mydomain.com
localhost.localdomain at install is: server1.mydomain.com
I believe my problem is with my understanding/execution of DNS. I used this great tutorial to set that up:
http://ostechnix.wordpress.com/2013/01/25/setup-dns-server-step-by-step-in-centos-6-3-rhel-6-3-scientific-linux-6-3-3/
with that as the basis, what changes do I make to get this working externally? The follow on will be: my intent is to further use this as a secondary mail server to spool mail when my failing exchange server goes down.
Help! Thanks
Todd Have you seen this thread? Somebody had same problem and its solved.
[SOLVED] A review of my logfiles revealed the “relay access denied” referrenced an IPv6 address. So, in the /etc/postfix/main.cf file I changed line 116 to read: inet_interfaces = ipv4
Viola! We have outgoinjg mail. With that fixed I had a primary mail server for that domain and setup/tested for use as a secondary mail server for four other domains I service MS Exchange Server for. GREAT setup – thanks again!
Hi SK. Thanks for posting your tutorial. I’m very appreciative and have gotten further due to your tutorials since I’m a newbie. I followed all steps and now I’m getting the same result as Todd Tolson. I did look at the thread you referenced and the parameters posted did not resolve the issue. Do you have any more insight to share? Thanks in advance.
[SOLVED] A review of my logfiles revealed the “relay access denied” referrenced an IPv6 address. So, in the /etc/postfix/main.cf file I changed line 116 to read: inet_interfaces = ipv4
Viola! We have outgoinjg mail.
Also, assuming you have a static external IP address, once you can send yourself mail to an external address you’ll need to contact your ISP so they cant create a PTR at their DNS servers so reverse DNS points to your mail server. Many exchanges check reverse DNS to validate your mail server is legitimate and if the banner doesn’t match they reject your mail.
Great find Todd!! Glad it worked for you.
This is very usful tutorial for me. And one more thing can u please say how to send from this mail server to other domain for Ex: my mailserver to other mail server like gmail or yahoo.can u please say the configuration details for me
You need a external static ip and ask your ISP to point your mail server IP address to your mail domain.
i have 2 static ip address am using a airtel lease line they have proved me two external static ip address. now what i want to know is how to configure this process in my mail server.
Assumption: You followed SK’s two tutorial’s exactly modifying only your domain information.
First, can you send mail internally using SquirellMail? (eg. server.yourdomain.com/webmail) If yes, when you use SquirllMail to send mail to an external domain (gmail, yahoo) what error(s) do you get?
Have you gone to your host provider and setup the DNS MX recorder to reflect your external address?
Have you contacted your ISP to create a PTR record to resolve reverse DNS for your external IP to your MX domain?
@Saravanan follow Mr.Todd Tolson advice. His mail server is now up and running. All you need to do is contact your ISP provider and ask them to add a MX record of your mail server in their DNS servers. Then you will be able to send/receive mails to external domains. Good luck.
great tutorial mate! thank’s!
Nothing about spam protection. Maybe you could modify the tutorial to include something about that. Thanks alot for the great tutorial.
I am so grateful for that tutorial. But what i want to know is that is it a must for me to have a DNS server configured on my LAN for the mail server to work, Do i also need to configure iptables on my mail server and if yes what commands must i configure.
Thanks
Thanks a lot for the tutorial it helped me out a lot! I have configured everything on the Ubuntu server, and have setup a client Ubuntu system all within virtualbox. Now i am a rather confused as to what network settings the server and client machine should have (either NAT or Internal ?) because at the moment with both using NAT they cannot see/connect to one another. Also to note the Ubuntu server is set to dhcp instead of static within /etc/network/interfaces . Thanks a lot for the replies
Hi
Use SMTP. It should work.
Thanks sir
Hi Sir,
Thanks for tutorial. and pls share many tips for Linux Configuration.
Hello Sk really great doc… thanks a lot friend
Great tutorial! Thanks!
Great guide good sir. It worked!
Excellent tutorial!
I am interesting how to run two mail domain on one linux instance. Is there any way to do this?
Excellent tutorial!
This tutorial is very excellent.
Hi,
I would like to ask how to create group mail and add user to that group mail.
I am looking forward to hearing from you soon.
Thanks in advance!
hi
i follow your tutorial after i configure i have a problem “Transaction failed
554 5.7.1 : Relay access denied” how can i fix this issue kindly help thanks
i have installed all the things as mentioned in this tutorial. I am facing error when check the dovecot, below i mentioned the error. please, someone help me here to sort out this issue.
[root@mail user1]# telnet localhost pop3
Trying ::1…
Connected to localhost.
Escape character is ‘^]’.
+OK Dovecot ready.
user user1
+OK
pass user1
-ERR [AUTH] Authentication failed.
Forbidden
You don’t have permission to access this resource.
Above error coming when i search to the squirremail logging page on Linux browser
Why is that. plz help me
ERROR
You must be logged in to access this page.
Go to the login page
Hi, I already have deleted the setup. This article is too old. I am not sure this will still work. I will update this guide to latest version in couple days or weeks. Until then, please search on web or post your questions in Squirrelmail forum. Regards.