
AI coding agents like Claude Code, GitHub Copilot CLI, Codex, Gemini, and Cursor can now run in "autonomous" mode. This means they run commands, edit files, and install packages on their own, without asking you first. Claude Code even has a flag for this called --dangerously-skip-permissions. This makes agents fast. But it also makes them risky. An agent that can run rm -rf, read your secret keys, or break a service is only as safe as the space it runs in. If you run an agent directly on your laptop, it can touch anything your user account can touch.
Docker's point is simple: an AI model should not decide its own safety limits. That decision needs to come from the system around it, not from the model being careful. So Docker team has introduced a new tool called Docker Sandboxes.
Docker sandboxes gives each AI agent its own small, disposable computer. The agent can do whatever it wants inside that space. When you're done, you throw the whole thing away.
Table of Contents
1. What Docker Sandboxes Actually Is
First of all, let's be clear about what this tool is and isn't.
- It is not a container. Yes, it uses the Docker name, and it runs containers inside it. But each sandbox session runs inside its own microVM with its own kernel. This is real, hardware-level isolation, like a full virtual machine. It is not the lighter kind of isolation that normal containers use.
- It does not need Docker Desktop. It comes as its own small command-line tool called
sbx. You can use it on a computer that has never had Docker Desktop installed. - Each sandbox gets its own private Docker daemon. This is what makes it different from other agent sandboxing tools. Your agent can run
docker build,docker run, anddocker composefully inside the sandbox. It doesn't need to share your host's Docker setup at all. - The isolation boundary is the hypervisor, not just a process. So if an agent process misbehaves or gets compromised, it still can't reach your host files, your host's Docker daemon, other sandboxes, or your network. It can only reach what you explicitly allow.
To make this work on every platform, Docker built its own Virtual Machine Monitor (VMM). It didn't reuse Firecracker, because Firecracker only works on Linux with KVM. Instead, Docker's VMM runs natively using:
- macOS: Apple's
Hypervisor.framework - Windows: Windows Hypervisor Platform (WHP)
- Linux: KVM
This is why sandboxes start almost instantly, even though they use VM-level isolation. Normally VMs are much slower to start than containers, but Docker built around that problem.
2. How It's Built (Architecture)
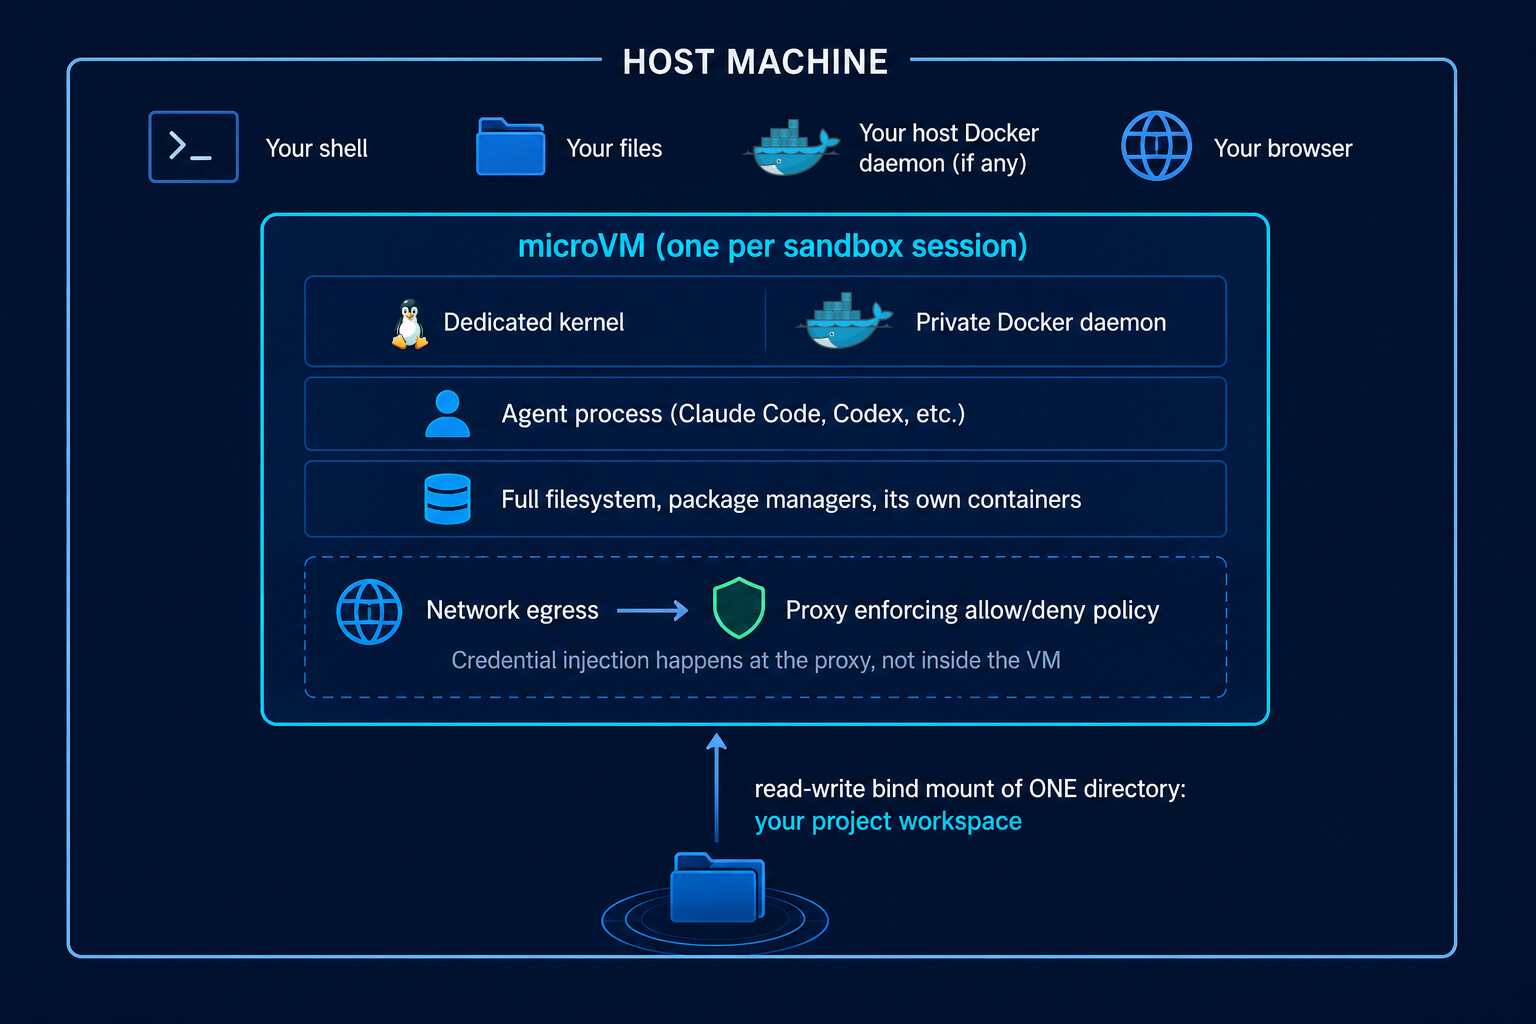
Here are the key facts about how this works, based on Docker's own security documentation:
- Your project folder is the only default bridge to your host. By default, Docker shares your project folder with the sandbox as read-write. That's the one part of your computer the agent can see. Everything else, like your other files, your host's Docker daemon, and your network, stays completely outside the sandbox.
- Network traffic goes through a proxy. This proxy checks every outgoing request against an allow/deny list. It also injects credentials, like your GitHub token or your model API key, at this proxy layer. So the agent process itself may never even see your real secret. It just gets to use it against approved destinations.
- Everything inside a sandbox can be thrown away. Installed packages, downloaded images, running containers, and shell history all live inside the sandbox's own filesystem. When you remove the sandbox, all of that disappears. Your host stays untouched.
Disclaimer:
Docker Sandboxes is new. Docker first showed it in December 2025 and launched it around March 2026. The tool is changing fast. The current stable version, as of this writing, is v0.38.0 (released August 6, 2026). Some features, like custom "kits," are still labeled Early Access. So commands may change. Always runsbx versionto check what you have, and check the official docs too.
3. Installing Docker Sandboxes in Linux, macOS and Windows
3.1 What you need, by platform
| Platform | Requirements |
|---|---|
| Linux | Ubuntu 24.04 or later, x86_64 or aarch64, KVM hardware virtualization turned on |
| macOS | Sonoma (14) or later, Apple silicon (Intel Macs don't work yet) |
| Windows | Windows 11, 64-bit Intel/AMD, Windows Hypervisor Platform turned on |
3.2 Linux: Check that KVM is available
Before you try anything else, check if KVM module is enabled or not. It saves you time later.
lsmod | grep kvm
You should see kvm_intel, kvm_amd, or kvm in the output.
kvm_intel             552960  0
kvm                  1527808  1 kvm_intel
irqbypass              16384  1 kvm
If you see nothing, run kvm-ok to find out why. Without KVM, sbx won't start. You also need to add your user to the kvm group:
sudo usermod -aG kvm $USER
Then log out and back in (or run newgrp kvm) so the change takes effect.
One more thing: if you're running this setup inside a VM or a VDI environment, you need to turn on nested virtualization. Docker Sandboxes is itself a hypervisor tool, so the outer VM needs to allow virtualization inside it.
- How To Enable Nested Virtualization In Proxmox VE
- How To Enable Nested Virtualization In KVM In Linux
- How To Enable Nested Virtualization In VirtualBox
3.3 Windows: Turn on the hypervisor first
Open PowerShell as an administrator and run:
Enable-WindowsOptionalFeature -Online -FeatureName HypervisorPlatform -All
3.4 Install commands
Linux (Ubuntu):
curl -fsSL https://get.docker.com | sudo REPO_ONLY=1 sh
sudo apt install docker-sbx
sbx login
macOS:
brew trust docker/tap
brew install docker/tap/sbx
sbx login
Windows:
winget install -h Docker.sbx
sbx login
Running sbx login will print the following message in your terminal:
Your one-time device confirmation code is: XXXX-XXXX
Open this URL to sign in: https://login.docker.com/activate?user_code=XXXX-XXXX

By logging in, you agree to our Subscription Service Agreement. For more details, see https://www.docker.com/legal/docker-subscription-service-agreement/

Waiting for authentication...
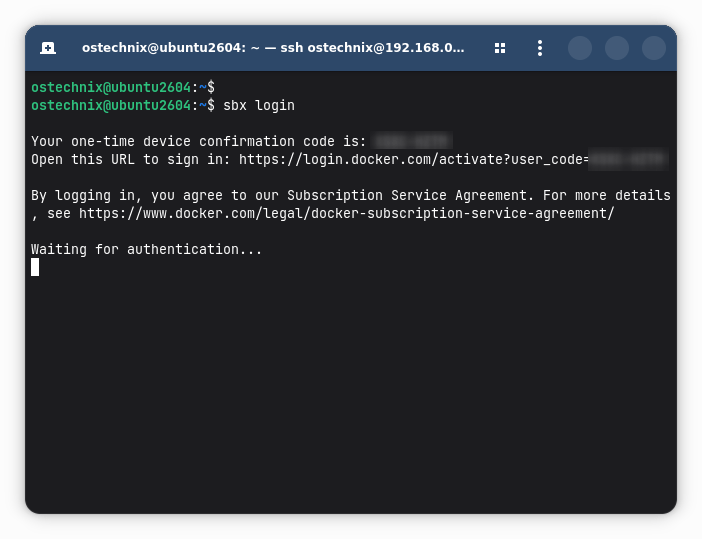
Open a browser window, paste the given URL and complete Docker's login process.
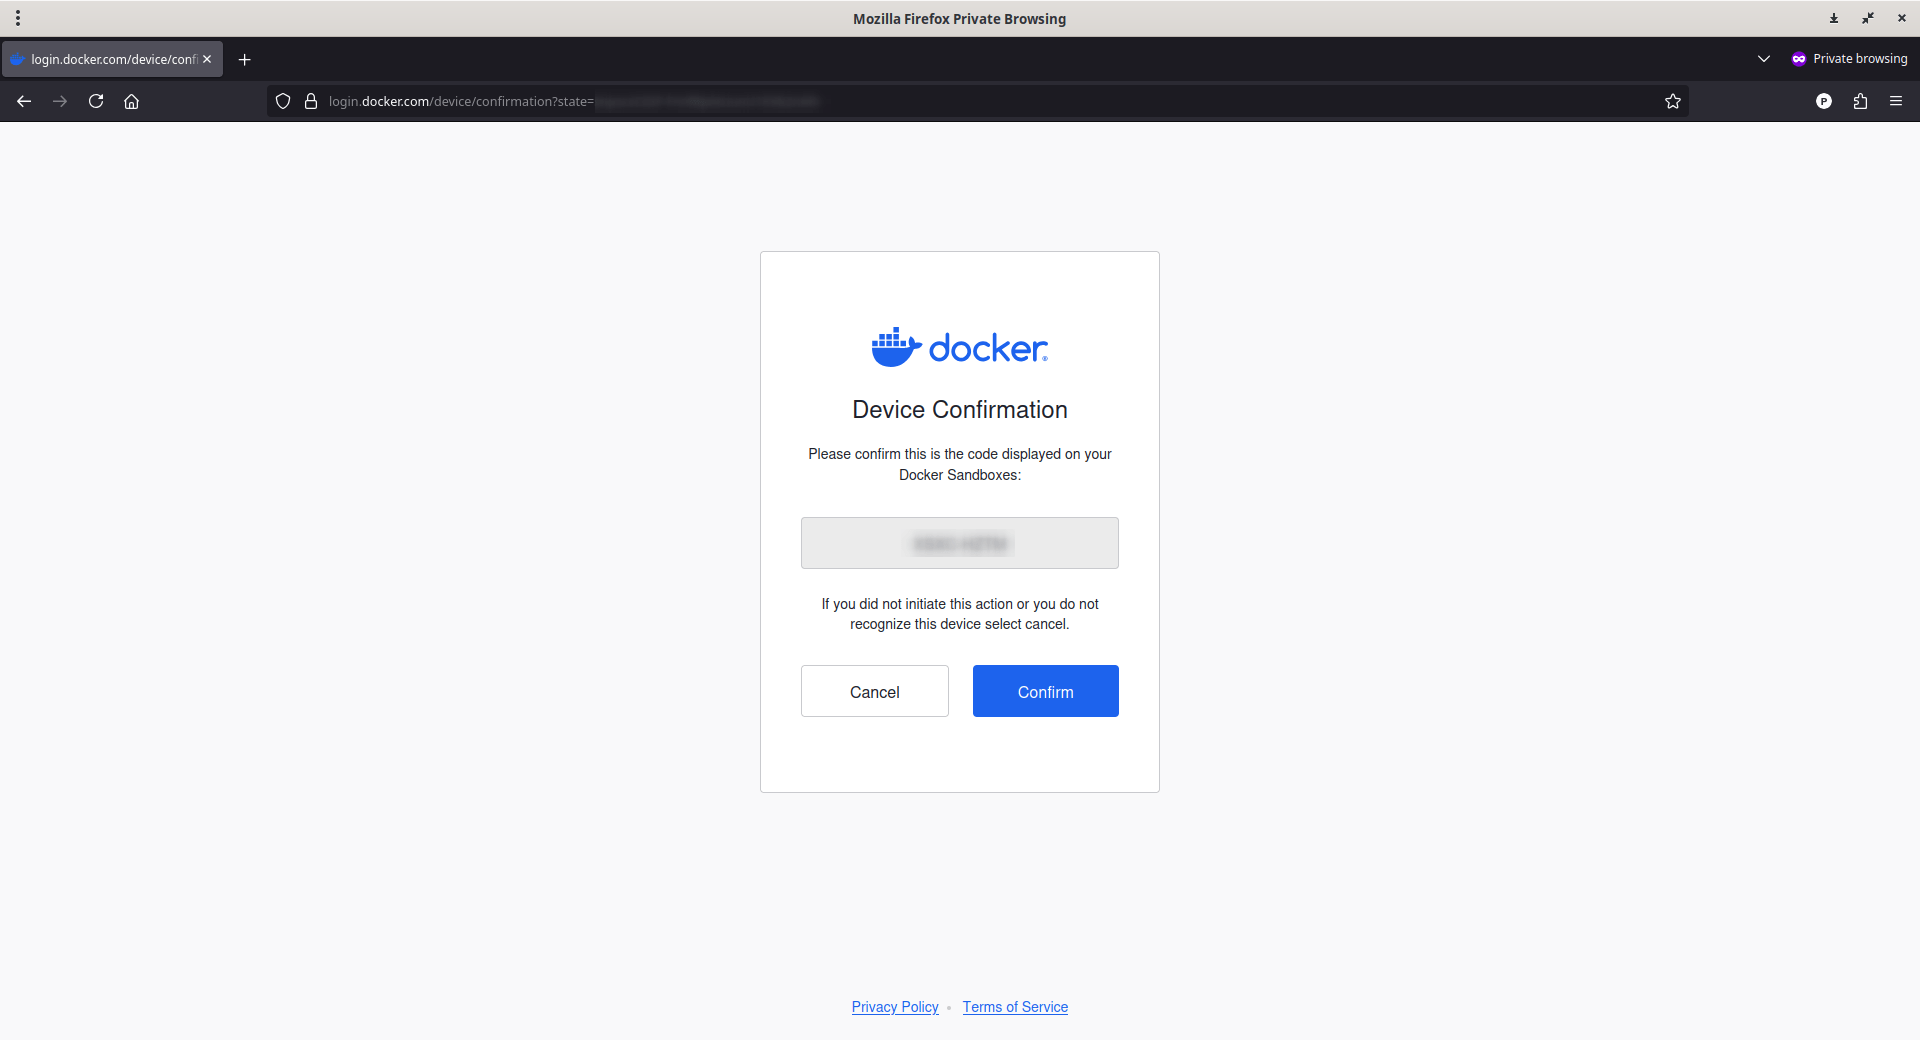
Click Confirm to register your device.
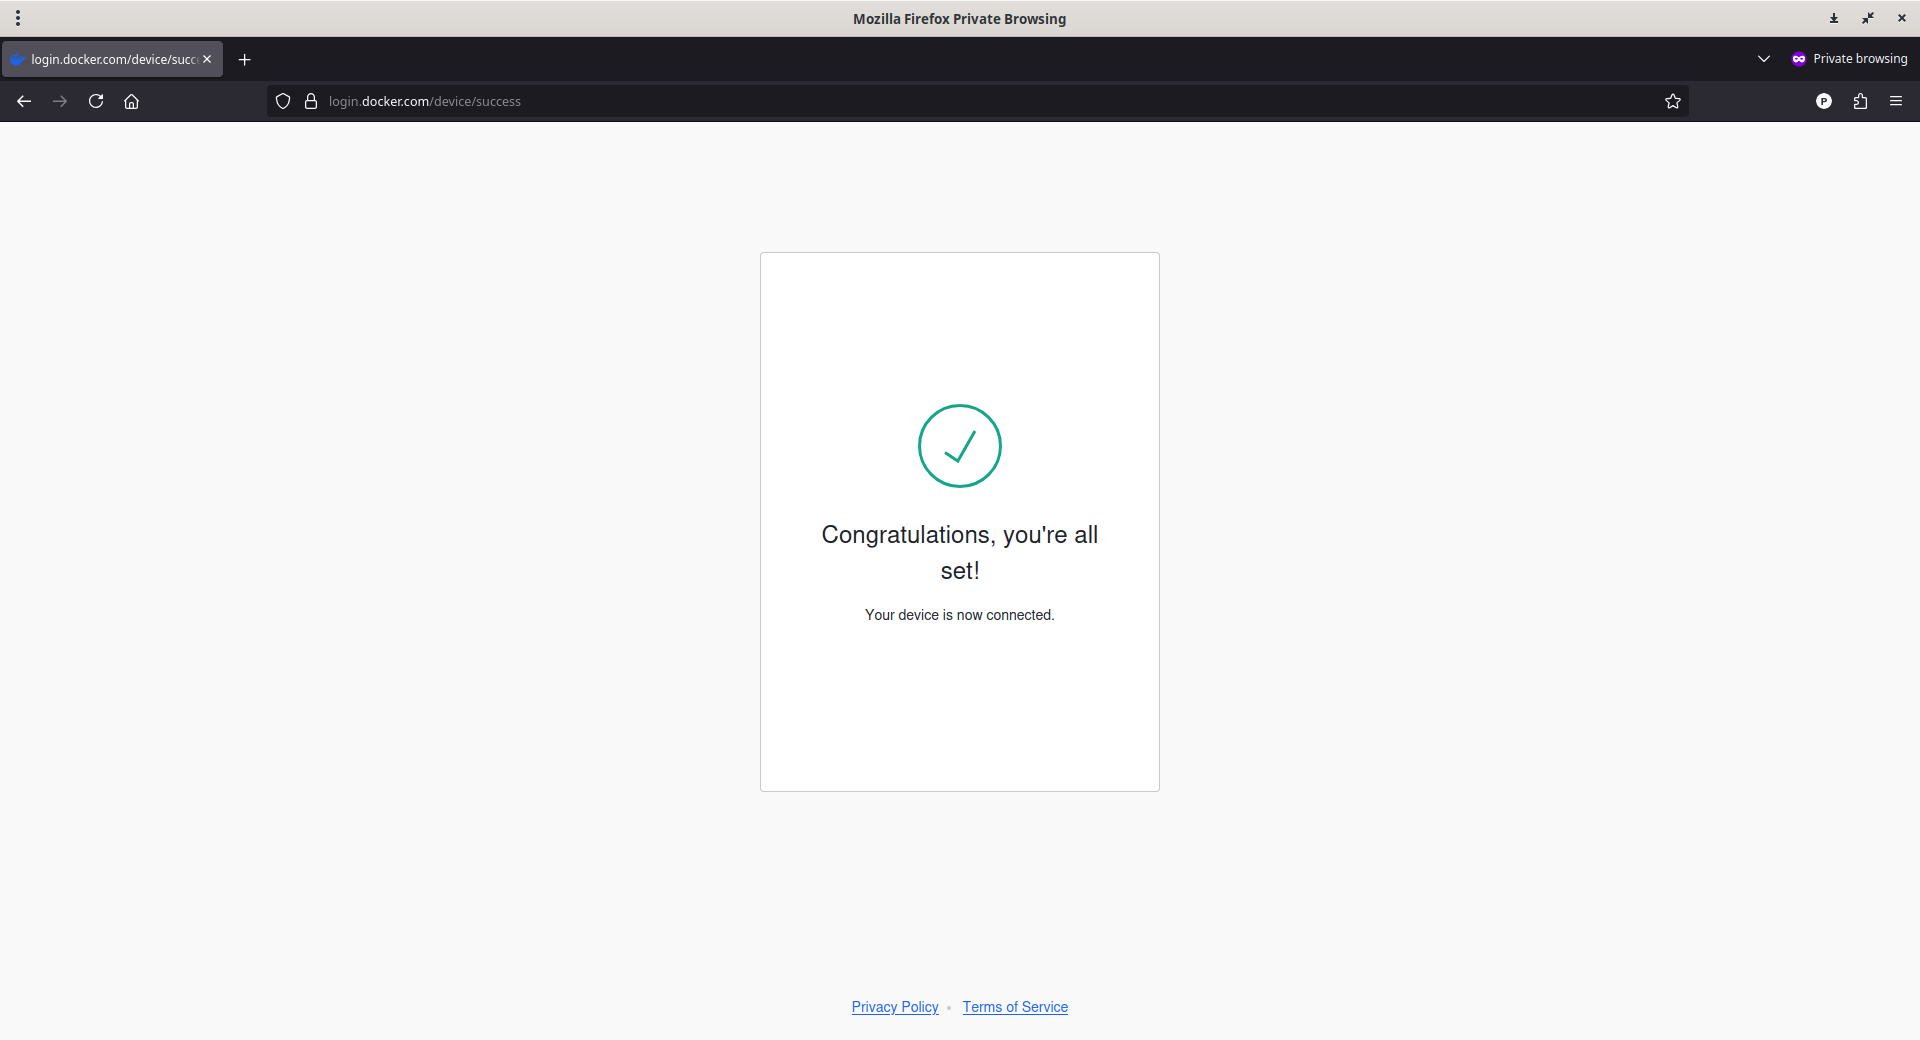
Signing in to your Docker account is required, not optional. Section 9 explains why.
If you don't have access to a package manager, you can also download a raw binary from Docker's sbx-releases page on GitHub.
If you want the newest fixes before they reach a stable release, you can also install a nightly build, for example brew install docker/tap/sbx@nightly.
3.5 Check sandbox your version, and keep it updated
$ sbx version
sbx version: v0.38.0 c022b14634c4bea846ca12870d1d5e97d5868b54
To upgrade:
# Linux (Ubuntu)
sudo apt-get update && sudo apt-get install --only-upgrade docker-sbx

# macOS
brew upgrade docker/tap/sbx

# Windows
winget upgrade Docker.sbx
When you upgrade on Windows or through Homebrew, it automatically restarts the background daemon (sandboxd) for you. So you don't need to do that step yourself.
3.6 A few Windows-specific tips
These issues show up mostly on Windows, based on real setup reports from users:
- After
winget install, thesbx.exefile may end up under%LOCALAPPDATA%\DockerSandboxes\bin\, and yourPATHmight not update right away. Ifsbxisn't found right after install, sign out and back in, or just open a new terminal window. - If you just turned on
HypervisorPlatform, restart your computer before runningsbx createfor the first time. Skipping the restart usually causes a hang or a confusing hypervisor error, instead of a clear message telling you to restart. sbxstores your login and starts its daemon inside your normal desktop session. So setting it up purely over SSH, without an interactive desktop, doesn't work well on Windows.
4. Your First Sandbox, Step by Step
4.1 Sign in your agent
If you use Claude Code with a Claude subscription (Max, Team, or Enterprise), there's no extra setup. You just run /login inside the sandbox the first time you use it, and it logs you in through the browser. Docker team says clearly that this login token stays on your host machine. It's never stored inside the sandbox.
If you'd rather use an API key instead, save it with sbx secret set (see Section 8 below for more details).
To let your agent open pull requests or do other things on GitHub, run this:
sbx secret set github -t "$(gh auth token)"
4.2 Start your first sandbox
cd ~/my-project
sbx run --name my-sandbox claude
The first time you run any sandbox, sbx asks you to pick a default network policy:
Initialize the global network policy for your sandboxes:

     1. Open         — All network traffic allowed, no restrictions.
  ❯  2. Balanced     — Default deny, with common dev sites allowed.
     2. Locked Down  — All network traffic blocked unless you allow it.
If you're just starting out, pick Balanced. It allows common developer traffic, like the npm registry, PyPI, and GitHub, while blocking everything else by default. You can always change this setting later, so don't worry too much about it now.
You can swap claude for any other agent you use. Right now, Docker supports Claude Code, Codex, GitHub Copilot CLI, Cursor, Droid, Gemini, Kiro, OpenCode, Docker's own Docker Agent, and a plain Shell mode with no agent at all.
The first time you run a sandbox, it takes a little longer because Docker needs to download the agent's base image. After that, it reuses the same image, so later runs start in just a few seconds.
4.3 See what the sandbox can touch
Open a second terminal and run:
$ sbx ls
SANDBOX       AGENT    STATUS    PORTS   WORKSPACE
my-sandbox    claude   running           ~/my-project
The WORKSPACE column shows the only thing the sandbox and your machine share. When the agent changes a file there, you'll see the change in your working folder right away. You can then review it with a normal git diff, just like you'd review a change from a human teammate.
4.4 Check and adjust what it can reach online
sbx policy ls
sbx policy allow network registry.npmjs.org
If you chose Locked Down, even your model's own API is blocked until you allow it yourself. This is a good setting to use for repos that hold sensitive data.
4.5 Clean up when you're done
sbx stop my-sandbox     # pause it; everything stays saved
sbx rm my-sandbox        # delete it for good; packages and images go away too
A sandbox stays saved between stop and restart. So installed packages, pulled Docker images, and shell history all survive a pause. But rm deletes everything inside the sandbox, including any in-sandbox git clone if you used clone mode. Your actual project folder on your host is never touched by rm.
5. Core sbx Commands You'll Use Every Day
Here are the core sbx commands you'll use most often:
$ sbx run claude                         # start or reconnect to an agent
$ sbx ls                                 # list your sandboxes and their status
$ sbx stop <name>                        # pause a sandbox
$ sbx rm <name>                          # delete a sandbox for good
$ sbx rm --force <name>                  # force-delete, even mid-session
$ sbx exec -it <name> bash               # open a shell inside a running sandbox
$ sbx cp ./file.json <name>:/home/user/  # copy a file from host to sandbox
$ sbx cp <name>:/home/user/out.log ./    # copy a file from sandbox to host
$ sbx ports <name> --publish 8080:3000   # forward a port for a running sandbox
$ sbx daemon restart                     # restart the background daemon
$ sbx                                     # open the interactive dashboard
Every sbx command talks to a background daemon called sandboxd. If a sandbox starts behaving oddly after a config change, like a proxy setting, try sbx daemon restart first before you delete anything.
A security note about
sbx cp:
Copying files out of a sandbox (from sandbox to host) was the target of a real, public security bug called CVE-2026-17106, nicknamed "CopyEscape." See Section 14 for more details. Before you rely onsbx cpto pull files from a sandbox you don't fully trust, make sure you're runningsbxversion 0.38.0 or later.
If sbx tells you that the "default network policy has not been configured," set one yourself:
sbx policy set-default <allow-all|balanced|deny-all>
Please note that the command uses different words than the menu you saw earlier. It's Open → allow-all, Balanced → balanced, and Locked Down → deny-all:
5.1 Reconnecting to a sandbox, and naming it
If you run sbx run twice against the same folder, it just reconnects you to the same sandbox instead of making a new one:
sbx run claude ~/my-project   # creates the sandbox
sbx run claude ~/my-project   # reconnects to it
If you give it a name, you can reconnect from anywhere, no matter which folder you're currently in:
sbx run claude --name my-project
sbx run --name my-project        # reconnect later, from any folder
You can also run several agents on the same repo at once, as long as each one gets its own name:
sbx run claude --name feature ~/my-project
sbx run claude --name spike   ~/my-project
5.2 Creating a sandbox without opening it right away
sbx create --name my-project claude .
sbx run --name my-project        # attach whenever you're ready
5.3 Two ways to work with git
This part matters more than it looks. There are two very different ways an agent can touch your repo.
- Direct mode (the default): The agent has full read-write access to your real working folder. Changes show up on your host right away, like a coworker editing files live in front of you.
- Clone mode (
--clone): The agent works on a separate git clone inside the sandbox instead. Nothing touches your real working folder until you fetch it yourself or the agent pushes it. Your host repo stays visible inside the sandbox, but only as read-only.
sbx run --clone claude
Clone mode is a good choice when you run several agents on one repo at once and don't want them stepping on each other's changes. It's also useful if you simply don't trust an agent enough yet to let it edit your working folder directly.
A few things to know about clone mode:
- You set it when you create the sandbox. You can't turn it on later. You'd need to delete the sandbox and make a new one instead.
- The clone follows whatever branch your host repo has checked out at the moment you create the sandbox. It doesn't create a new branch for you.
- It only works with a real git repository. It also won't work from inside a non-main git worktree, because the read-only mount can't follow the worktree's
.gitpointer file. - If you remove a clone-mode sandbox, the in-sandbox clone is gone too. So fetch or push anything important first.
5.4 Sharing more than one folder
You can mount more than one folder from your host into a sandbox. This is handy for shared libraries or reference docs you don't want the agent to edit:
sbx run claude ~/project-a ~/shared-libs:ro ~/docs:ro
The first path you list becomes the main workspace, and it's the one clone mode uses. Anything you list after it is just an extra mount. Add :ro to make a folder read-only.
5.5 Opening a port from inside the sandbox
Sandboxes are isolated on the network in both directions. So your host tools can't reach a dev server running inside a sandbox unless you publish the port, the same way you would with a normal Docker container:
sbx run --publish 8080:3000 --name my-sandbox claude
Or, for a sandbox that's already running:
sbx ports my-sandbox --publish 8080:3000
From your web browser, open http://localhost:8080.
If you only publish the sandbox-side port, the system picks a free host port for you. You can then look it up:
sbx ports my-sandbox --publish 3000
sbx ports my-sandbox
6. The Interactive Dashboard
If you just type sbx with no arguments, it opens a full-screen dashboard in your terminal.
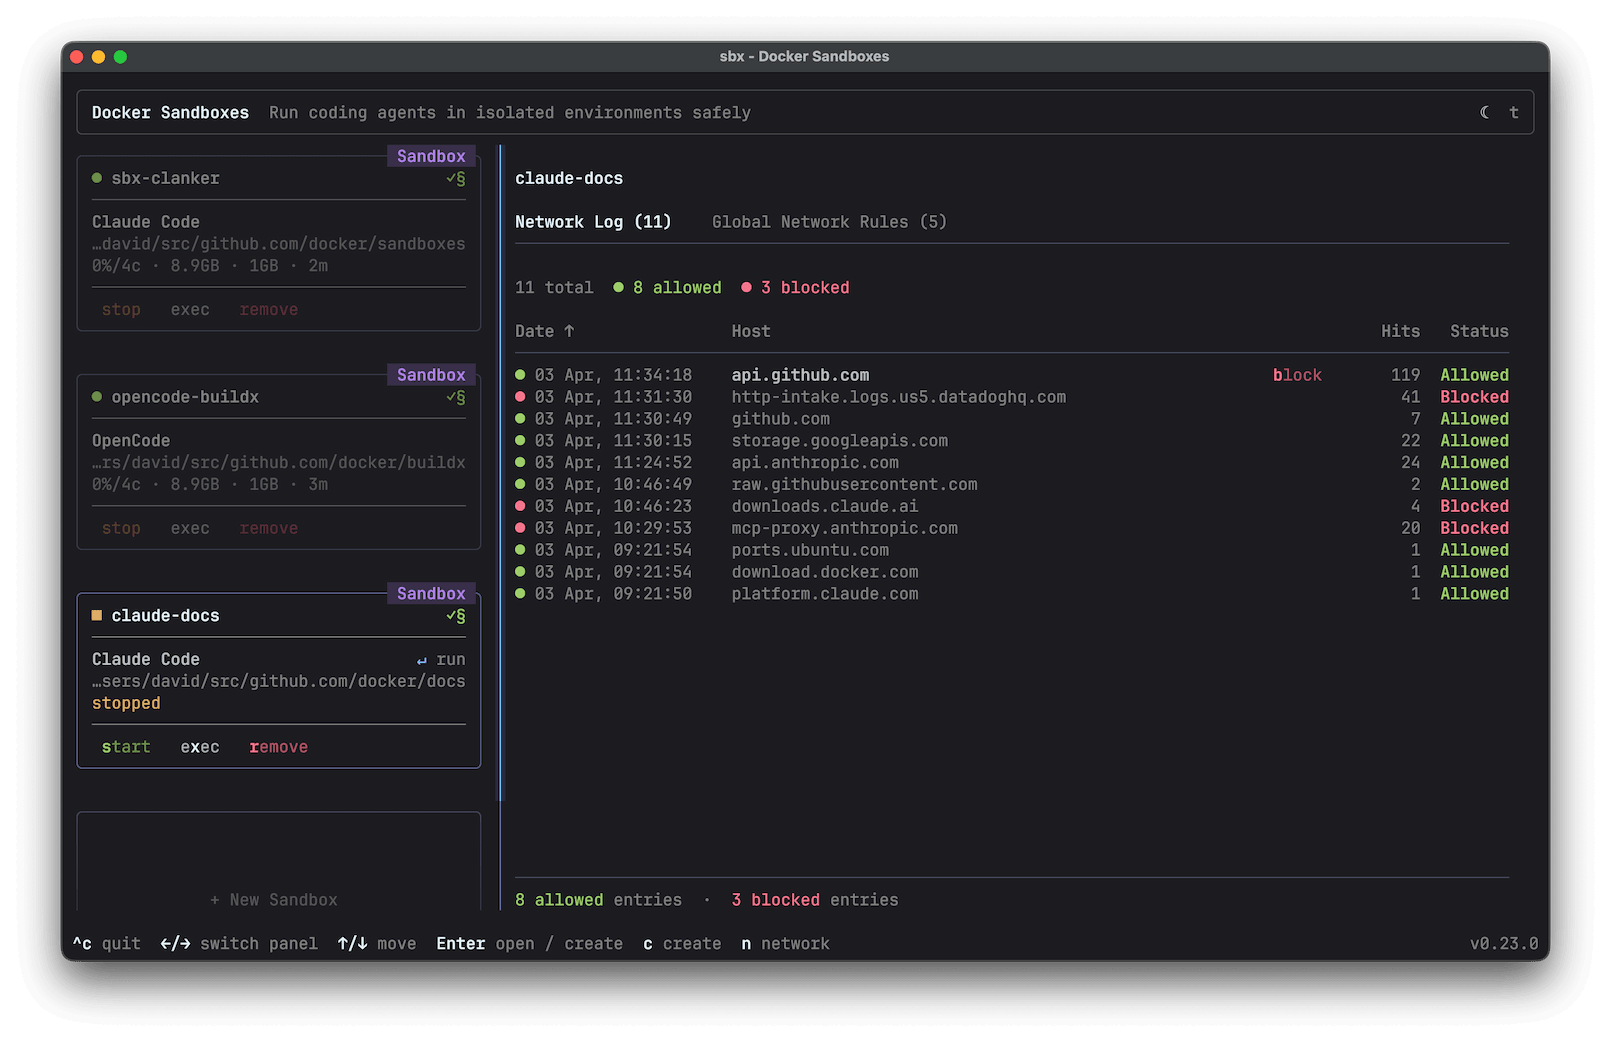
Each sandbox shows up as a live card with its status, CPU, and memory. From here you can create a sandbox (c), start or stop one (s), attach to one (Enter), open a shell (x), or remove one (r).
There's also a network panel, which you can open with tab, where you can watch outgoing connections in real time and change your allow/deny rules on the fly. Press ? any time to see the full list of shortcuts.
This is honestly the easiest way to start if you're new. You don't need to memorize every command just to get a feel for what's running.
7. Credentials and Secrets
Docker Sandboxes tries hard to keep raw secrets out of the sandbox itself, so a compromised agent process can't steal them. There are two ways to give an agent access to a secret.
Built-in services are handled through a proxy on your host, so the agent never reads the secret directly:
sbx secret set github -t "$(gh auth token)"
Other environment variables, like BRAVE_API_KEY or an internal company token, don't have a built-in service. So you need to write them directly into the sandbox's persistent environment file instead. This means the agent process can read them, unlike proxy-based secrets. Only use this method when the proxy option isn't available:
sbx exec -d <sandbox-name> bash -c "echo 'export BRAVE_API_KEY=your_key' >> /etc/sandbox-persistent.sh"
This file loads automatically every time a shell starts inside the sandbox, so the value stays there for the sandbox's whole life. Notice the bash -c part. By default, sbx exec <name> <command> runs your command without a shell, so the >> redirect and the environment file won't work unless you wrap the command like this.
If you're on headless Linux, meaning there's no desktop keyring running, sbx automatically falls back to an encrypted file stored under ~/.config/com.docker.sandboxes. It protects that file with strict 0700 permissions. This is weaker than a real OS keychain, but it still works, and sbx always tells you clearly when it's using this fallback.
8. Why You Must Sign In
Unlike a plain docker run command, you can't use sbx without an account. Signing in with sbx login is required. Here's Docker's reasoning:
- Every sandbox gets a verified identity. This matters because an autonomous agent can build containers, install packages, and push code on your behalf, so you want a clear record of who's responsible.
- Team features, like organization-wide governance, shared environments, and audit logs, all need a concept of "who" built in from the start.
- Sandboxes also need to authenticate with Docker's own servers to pull images and run daemons.
Docker team say your account email is used only for login, never for marketing. The CLI itself only collects a small amount of usage data: which command you ran, whether it worked, how long it took, and your username if you're signed in. It explicitly does not collect your prompts or your code. If you'd rather turn this off completely, you can:
export SBX_NO_TELEMETRY=1
9. What's Free and What Costs Money
This confuses a lot of people, so here's the simple version:
- Free, even for commercial use, no per-seat fee: the
sbxCLI itself, and everything else covered in this guide so far. - Paid, with a separate subscription (you'd contact Docker Sales): organization governance. This covers centrally managed network, filesystem, and MCP policies across your whole team, required sign-in enforcement, and audit log delivery.
So in short: one developer can use the full isolation and safety model for free. You only pay if you want to enforce policy centrally across a whole company.
9.1 Agents Still Cost Money
Docker Sandboxes gives you a free box to run an agent in, but the agent itself is a separate product from a separate company, and it usually isn't free.
Claude Code needs a Claude subscription (Pro, Max, Team, or Enterprise) or API billing through Anthropic. GitHub Copilot CLI needs a Copilot subscription. Codex, Gemini, Cursor, and the other supported agents each have their own pricing too.
So you'll still pay for whichever agent you choose, exactly as you would if you ran it directly on your desktop/laptop without a sandbox.
The sandbox itself doesn't add a cost, and it doesn't remove one either.
10. Why Agents Skip Approval Prompts (and How to Bring Them Back)
This is probably the biggest mindset shift for someone new to this tool.
Normally, running an agent with a flag like Claude Code's --dangerously-skip-permissions is genuinely risky on a bare computer. That's exactly why the flag has "dangerously" in its name.
But Docker's argument is different once you're inside a sandbox. There, the sandbox itself becomes your safety boundary. So the usual reasons for approval prompts, like stopping destructive commands, blocking network access, or catching unreviewed file changes, are already handled by the VM boundary, the network policy, and the credential isolation instead.
If you want approval prompts back for one session, most agents let you switch modes mid-session. In Claude Code, you'd type /permissions.
If you'd rather make cautious mode the default for every session, you can build a custom kit that removes the permission-skipping flag from the agent's startup command:
# claude-safe/spec.yaml
schemaVersion: "1"
kind: sandbox
name: claude-safe
sandbox:
  image: "docker/sandbox-templates:claude-code-docker"
  entrypoint:
    run: [claude]
sbx run claude-safe --kit ./claude-safe/
Keep in mind that kits and templates are still labeled Early Access in Docker's docs, and the format has already changed once.
As of v0.38.0, new kits default to a v2 schema. This new version reorganizes fields into clearer blocks, like permissions.network.allow/deny and setup.install, replacing the older, flatter style like network.allowedDomains and commands.install.
Older v1 kits still load fine through a legacy path, but the loader is strict about mixing the two formats. A v2 spec with leftover v1 fields will fail instead of quietly working. So run sbx kit validate ./your-kit before you ship one, and check the current kit reference for the full list of fields. You can distribute kits as local folders, ZIP files, OCI artifacts, or Git URLs.
10.1 Other experimental features worth knowing about
As of v0.38.0, three features sit behind feature flags. Treat them as genuinely experimental, not something to rely on yet:
- GPU passthrough (Linux only):
sbx run --gpulets a sandbox use NVIDIA VFIO GPU passthrough. First turn it on withsbx settings set feature.sandbox-gpu true. - Local models:
sbx run --model <name> clauderuns Claude Code against a local GGUF model instead of a hosted API. Add the prefixollama/if you want to pull a model from an existing Ollama install. - Enterprise networking: you can set up separate upstream proxy settings for sandbox and daemon traffic, along with NTLM/Kerberos proxy login on Windows. This matters if your company sits behind a proxy that inspects and authenticates traffic.
10.2 Thinking about local models to cut costs?
Going local removes subscription and API fees, but it isn't automatically "free" overall. You still need a GPU with enough memory to run a capable model at a usable speed, and buying one can cost more than years of a hosted subscription if you don't already own it.
Local open-weight models also still tend to lag behind hosted models like Claude for the kind of multi-step, autonomous coding work this guide covers, though that gap keeps narrowing.
And note that sbx run --model still runs inside Claude Code's own harness, it just swaps out which model powers it. It's useful for local testing or for keeping code off an external API.
11. The MCP Gateway (New in v0.38.0)
Starting in v0.38.0, sbx added proper support for managing Model Context Protocol (MCP) servers.
This is different from setting up an MCP server directly inside an agent, like Claude Code's own MCP config. Instead, it solves a different problem: you register a server once on your host, and then you can reuse it across every sandbox and every agent, without ever putting the credentials inside the sandbox itself.
sbx mcp add notion --url https://mcp.notion.com/mcp
sbx mcp add playwright --command npx --args @playwright/mcp@latest
sbx mcp ls
sbx mcp inspect notion
If a remote server needs OAuth, sbx mcp add runs that login flow once, when you register it, and then stores the token in your host's credential store. After that, the gateway attaches the token to outgoing requests for the sandbox, but the token itself never enters the VM.
When you create a sandbox, you choose one of two modes for connecting it to registered servers:
- Static mode (
--static-mcp server1,server2) preloads a fixed list and hides discovery tools from the agent. This is the tighter, safer option. - Dynamic mode (the default) lets the agent search for and connect to registered servers on its own, mid-session, using built-in
mcp-findandmcp-addtools.
Important Note:
local stdio-based MCP servers run on your host, outside the sandbox's protection, using your own host user's permissions. Docker team warn you to only register trusted commands and images this way. Remote HTTP-based servers don't have this issue, since the gateway proxies them instead.
12. Known Security Issues, and Why You Should Stay Updated
Please read this section very carefully before you trust a sandbox with anything sensitive.
Docker Sandboxes is still young software. And since it handles untrusted code by design, it's already had a few real, publicly disclosed security bugs. Two of them were gaps in network isolation. The most recent one, though, was a real escape into the host's filesystem through the file-copy feature:
| CVE | Issue | Fixed in |
|---|---|---|
| CVE-2026-12039 | The DNS resolver inside each sandbox forwarded any domain name it was asked to look up, without checking it against your network policy first. This meant a sandboxed process could sneak data out by hiding it inside DNS lookup names sent to an attacker's own domain, completely bypassing the normal HTTP/S allowlist. After the fix, loopback names like localhost are still allowed, so local login flows keep working. | v0.33.0 |
| CVE-2026-12539 | The system only blocked outgoing ICMP traffic when a sandbox's network was first created. It never reapplied that block after the daemon restarted and rebuilt the network from disk. So a sandbox that survived a daemon restart could send ICMP packets to any host it wanted, either to scan your network or to quietly leak data out. | v0.33.0 |
| CVE-2026-17106 ("CopyEscape") | This one is more serious, and it's very recent. It was only made public in the last day or two, as of this writing. Imperva's Red Team found it. It's mainly a bug in Docker's core docker cp system, which affects Docker Engine and the CLI broadly, not just Sandboxes. A malicious container could break out of the folder you chose as the copy destination and write or overwrite files anywhere on your host. This could lead to it running code as you, and on Linux, in some setups, it could even get root access. Docker confirmed that the exact same bug affects sbx cp's copy-out direction too. That means pulling a file out of a compromised or malicious sandbox onto your computer carried this risk. | v0.38.0 for Sandboxes. If you also use Docker Engine and CLI separately, you'll need version 29.7.2 or later, and Docker Desktop 4.86.0 or later. |
Here's the takeaway. The network allowlist doesn't give you a perfect boundary by itself. It only works as well as the current release, and each release has to close every possible side channel, like DNS or ICMP, one at a time.
And the file-copy path between your host and your sandbox has been a real target too, not just the network layer. So if you're running sandboxes with sensitive credentials or data, treat your version number as an active safety question, not just a one-time install detail:
sbx version
Check your version against the release notes or the sbx-releases page, and upgrade using the commands from Section 4 if you're behind.
As of writing this guide, version 0.38.0 or later includes fixes for all three bugs above. Because CVE-2026-17106 is so new, be extra careful with sbx cp's copy-out direction until you've confirmed you're on 0.38.0 or later. When you can, prefer reviewing changes through git diff in a shared read-write workspace (Section 5.3) instead of copying arbitrary files out of a sandbox you don't fully trust yet.
None of this means you shouldn't trust the overall design. VM-level isolation for files and processes is a genuinely solid approach. And Docker has been shipping fixes quickly.
Both June 2026 bugs were patched within about two weeks of being reported, and the CopyEscape fix shipped in the same release where it was disclosed.
Always keep this in mind: don't install this once and forget about it. Check your version regularly, especially before you use sbx cp to pull files from a sandbox you don't fully trust, or before you rely on the network allowlist as a perfect wall.
13. A Few Practical Tips Worth Knowing
sbx runignores--publishwhen you reconnect. If you're reattaching to an existing sandbox and need a new port forwarded, usesbx ports <name> --publish ...instead. The--publishflag onrunonly works when you first create the sandbox.- Sandboxes don't copy your full agent settings from your user account. Hooks and settings under folders like
~/.claudestay on your host. Only project-level config inside your working folder gets shared. The one exception is shared agent skills, which you turn on yourself withsbx skills import. Also, don't rely on symlinks pointing to host paths. A sandboxed agent can't follow those links outside its own VM. - Clipboard image paste is off by default, because turning it on lets a sandboxed process read your host clipboard through the proxy. You can turn it on yourself if you need it:
sbx settings set clipboard.imagePaste true - Not sure if you're sandboxed? Just ask the agent. In Claude Code, try
/btw are you running in a sandbox?It's a quick rationality check before you paste anything sensitive. - If your company blocks outbound traffic with a firewall, you'll need to allow Docker's own infrastructure domains just so
sbxitself can work:login.docker.com,hub.docker.com,api.docker.com,registry-1.docker.io,auth.docker.io, plus a couple of telemetry and diagnostics endpoints. This is separate from whatever you allow inside the sandbox's own network policy.
Resources and Further Reading:
