
Fake accounts cost businesses money. Bots sign up for free trials. They abuse referral programs. They flood platforms with spam. Some businesses pay for fraud prevention software to stop this. Others cannot afford it yet, or want to test the problem first with free tools.
This guide shows a free, open-source path to bot protection and fake account protection for your websites. It uses two tools: CrowdSec and ALTCHA. Both are open source. Both run on your own server. Neither costs money at a basic level.
We built and tested this setup on an Ubuntu 26.04 LTS server. Every command in this guide comes from that test.
Table of Contents
What Is Fraud Prevention Software?
Fraud prevention software detects and blocks harmful activity before it causes damage. For account creation, that means stopping fake signups, bot registrations, and stolen-identity accounts.
Paid fraud prevention platforms score each visitor in real time. They check signals like device fingerprints, mouse movement, typing speed, and network reputation. Vendors update these models often. They pool data across many customers to do this.
Free, open-source tools can cover part of this job. They do not match the full scope of a paid platform. This guide shows what the free tools can do, and where they stop.
Why This is Important for E-Commerce Stores
Fake accounts hit online stores in ways that cost real money. A bot can create dozens of accounts to claim a first-order discount code, again and again. Fake accounts can leave fake reviews, which damage buyer trust. They can also farm referral bonuses, signing up under fake referral links to collect rewards that were meant for real customers.
Promo code abuse prevention and referral fraud prevention matter most where the financial loss is direct and easy to measure. If your store runs a signup discount, a referral program, or a review system, fake account protection is not optional.
The setup in this guide works the same way for an online store's signup or checkout account form as it does for any other website.
Two Layers of Bot and Fake Account Protection
Fake account protection works best in layers. No single tool catches everything. This guide builds two layers.
- CrowdSec watches network traffic. It blocks known bad IP addresses, brute-force login attempts, and automated scanning.
- ALTCHA watches the signup form. It uses a proof-of-work challenge to filter out simple bots.
Together, these layers stop a large share of low-effort bot traffic. They do not stop attackers who use real browsers and human-like behavior. We explain that gap later in this guide.
Prerequisites
This guide was built and tested on the following setup.
| Requirement | Details |
|---|---|
| OS | Ubuntu 26.04 LTS (cloud image). Debian and other recent Ubuntu versions also work. |
| Access | A user account with sudo privileges |
| Hardware | 2 vCPU, 2 GB RAM, 20 GB disk (1 vCPU / 1 GB RAM / 10 GB disk also works) |
| Network | SSH access, with a known server IP address |
| Software | CrowdSec, Nginx, Python 3 with venv, ALTCHA |
We will guide you how to install and configure each tool at the point it's needed.
Part 1: Setting Up CrowdSec
CrowdSec is an open-source intrusion prevention system. It reads system logs, such as SSH logs and web server logs. It looks for attack patterns in those logs. When it finds one, it creates a decision to block that IP address. A separate program, called a bouncer, enforces the block through the server's firewall.
CrowdSec also shares threat data across its user community. If another CrowdSec user blocks an attacking IP address, your server can benefit from that same block. This requires enrolling in the CrowdSec Console, a free step covered below.
Check Your System First
Confirm your OS version and a few settings before installing anything:
lsb_release -a
sudo systemctl status ufw
timedatectl
Confirm three things: your OS version, whether the UFW firewall is active, and that your system clock is synced. CrowdSec needs accurate timestamps to work correctly.
Firewall Rules If UFW Is Active
CrowdSec and UFW do different jobs. UFW controls which ports are open at all. CrowdSec's bouncer blocks specific IP addresses it flags as malicious. One does not replace the other. Keep UFW active, and let CrowdSec's bouncer run alongside it.
If UFW is active, open only what this setup needs.
| Port | Purpose | Action |
|---|---|---|
| 22 (SSH) | Remote server access | Allow |
| 80 (HTTP) | Redirects to HTTPS | Allow |
| 443 (HTTPS) | Signup page traffic | Allow |
| 5000 (Flask) | Internal app port | Do not open |
| 8080 (CrowdSec Local API) | Agent-bouncer communication | Do not open |
Allow SSH before you enable UFW, not after. If you enable UFW without an SSH rule first, you lock yourself out of a remote server immediately, with no way back in except your cloud provider's console.
sudo ufw allow OpenSSH
sudo ufw allow 80/tcp
sudo ufw allow 443/tcp
sudo ufw enable
sudo ufw status verbose
Ports 5000 and 8080 stay closed on purpose. Flask only needs to be reachable by Nginx, on the same machine, over 127.0.0.1. Opening port 5000 to the public would let visitors bypass Nginx and TLS entirely, hitting Flask directly. CrowdSec's agent and bouncer also talk to each other over 127.0.0.1, and only need a public port if you're running CrowdSec across multiple servers, which this guide does not cover.
UFW and the CrowdSec bouncer create separate firewall rules and do not conflict in normal use.
One caveat: On some setups, UFW's own rules can make the bouncer's metrics counters less accurate. Blocking itself still works correctly. Only the metrics display is affected.
Install the CrowdSec Agent
Open your terminal and run the following commands to add CrowdSec repository and install CrowdSec agent on Ubuntu:
curl -s https://install.crowdsec.net | sudo sh
sudo apt install -y crowdsec
This installs the core detection engine, called the agent. The agent reads logs. It does not block traffic on its own.
Check the install:
sudo systemctl status crowdsec --no-pager
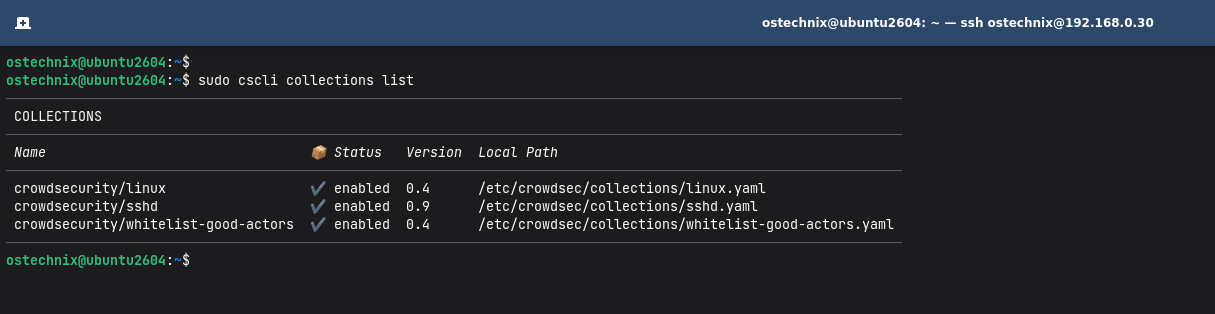
sudo cscli collections list
A collection is a bundle of detection rules for one service type. On a fresh server, CrowdSec installs collections for SSH and general Linux security by default.
Sample Output:
────────────────────────────────────────────────────────────────────────────────────────────────────────────────
 COLLECTIONS
────────────────────────────────────────────────────────────────────────────────────────────────────────────────
 Name                                 📦 Status   Version  Local Path
────────────────────────────────────────────────────────────────────────────────────────────────────────────────
 crowdsecurity/linux                  ✔️  enabled  0.4      /etc/crowdsec/collections/linux.yaml
 crowdsecurity/sshd                   ✔️  enabled  0.9      /etc/crowdsec/collections/sshd.yaml
 crowdsecurity/whitelist-good-actors  ✔️  enabled  0.4      /etc/crowdsec/collections/whitelist-good-actors.yaml
────────────────────────────────────────────────────────────────────────────────────────────────────────────────
Install Nginx and Connect It to CrowdSec
Most fake account creation happens through a website's signup form. To protect that form, CrowdSec needs to read your web server's logs.
Install Nginx:
sudo apt install -y nginx
Add the Nginx collection:
sudo cscli collections install crowdsecurity/nginx
Please note that installing a collection only adds detection rules. It does not tell CrowdSec where the log files are. You must add that separately:
sudo tee /etc/crowdsec/acquis.d/nginx.yaml > /dev/null <<EOF
filenames:
  - /var/log/nginx/access.log
  - /var/log/nginx/error.log
labels:
  type: nginx
EOF
Restart CrowdSec service to take effect the changes:
sudo systemctl restart crowdsec
Test that CrowdSec now reads these logs:
curl http://localhost/
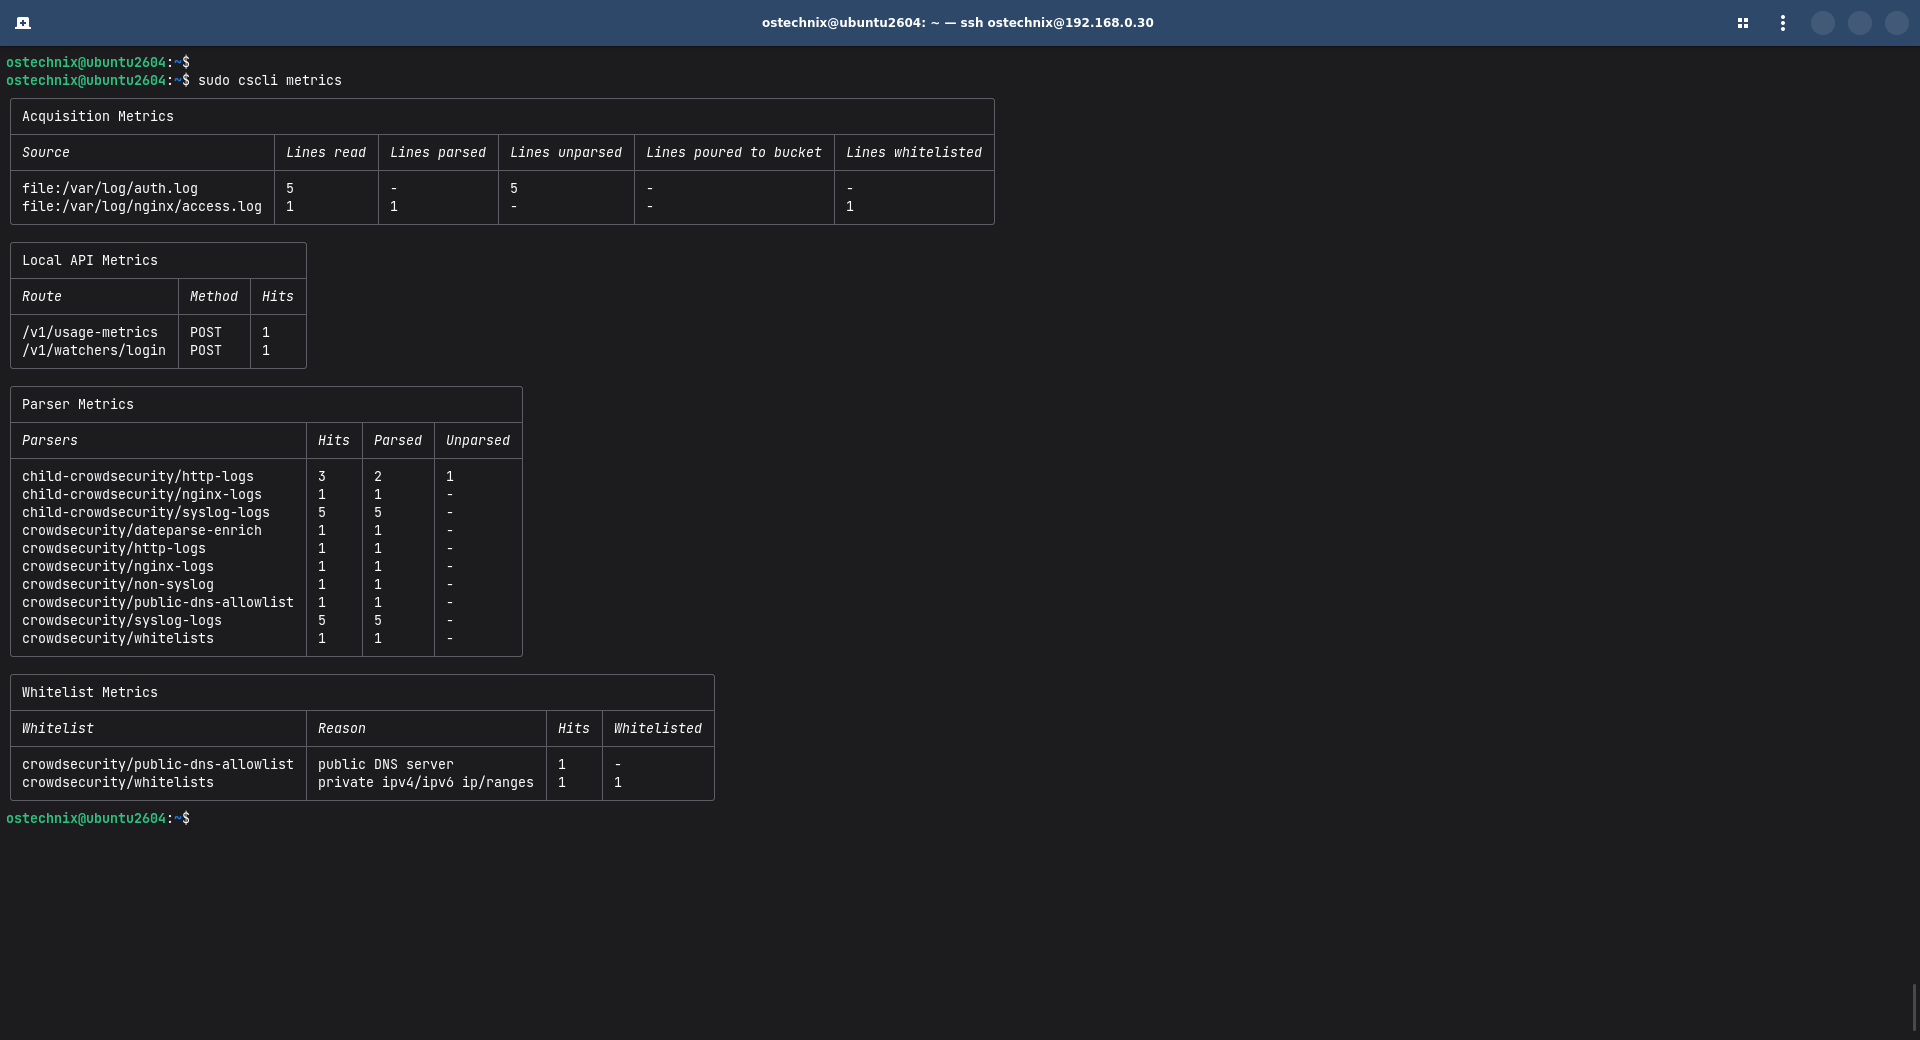
sudo cscli metrics
Look for /var/log/nginx/access.log in the Acquisition Metrics table. The lines-read count should be above zero.
Install the Bouncer
The agent detects. The bouncer blocks. We need both.
Ubuntu 26.04 uses nftables as its firewall backend. This replaced the older iptables system. Install the matching bouncer:
sudo apt install -y crowdsec-firewall-bouncer-nftables
sudo cscli bouncers list
The bouncer list should show your bouncer as valid. It should also show a recent connection timestamp.
Sample Output:
────────────────────────────────────────────────────────────────────────────────────────────────────────────────────────────────────────────────────────────────────────────────────────
 Name                            IP Address  Valid  Last API pull         Type                       Version                                                                  Auth Type
────────────────────────────────────────────────────────────────────────────────────────────────────────────────────────────────────────────────────────────────────────────────────────
 cs-firewall-bouncer-1786521275  127.0.0.1   ✔️      2026-08-12T07:54:36Z  crowdsec-firewall-bouncer  v0.0.36-debian-pragmatic-amd64-4c315193cd4f19e3937cdee2f15183ec4d602f56  api-key
────────────────────────────────────────────────────────────────────────────────────────────────────────────────────────────────────────────────────────────────────────────────────────
Confirm the Full Pipeline Works
Test with a manual block. Use a reserved test IP address that will never carry real traffic:
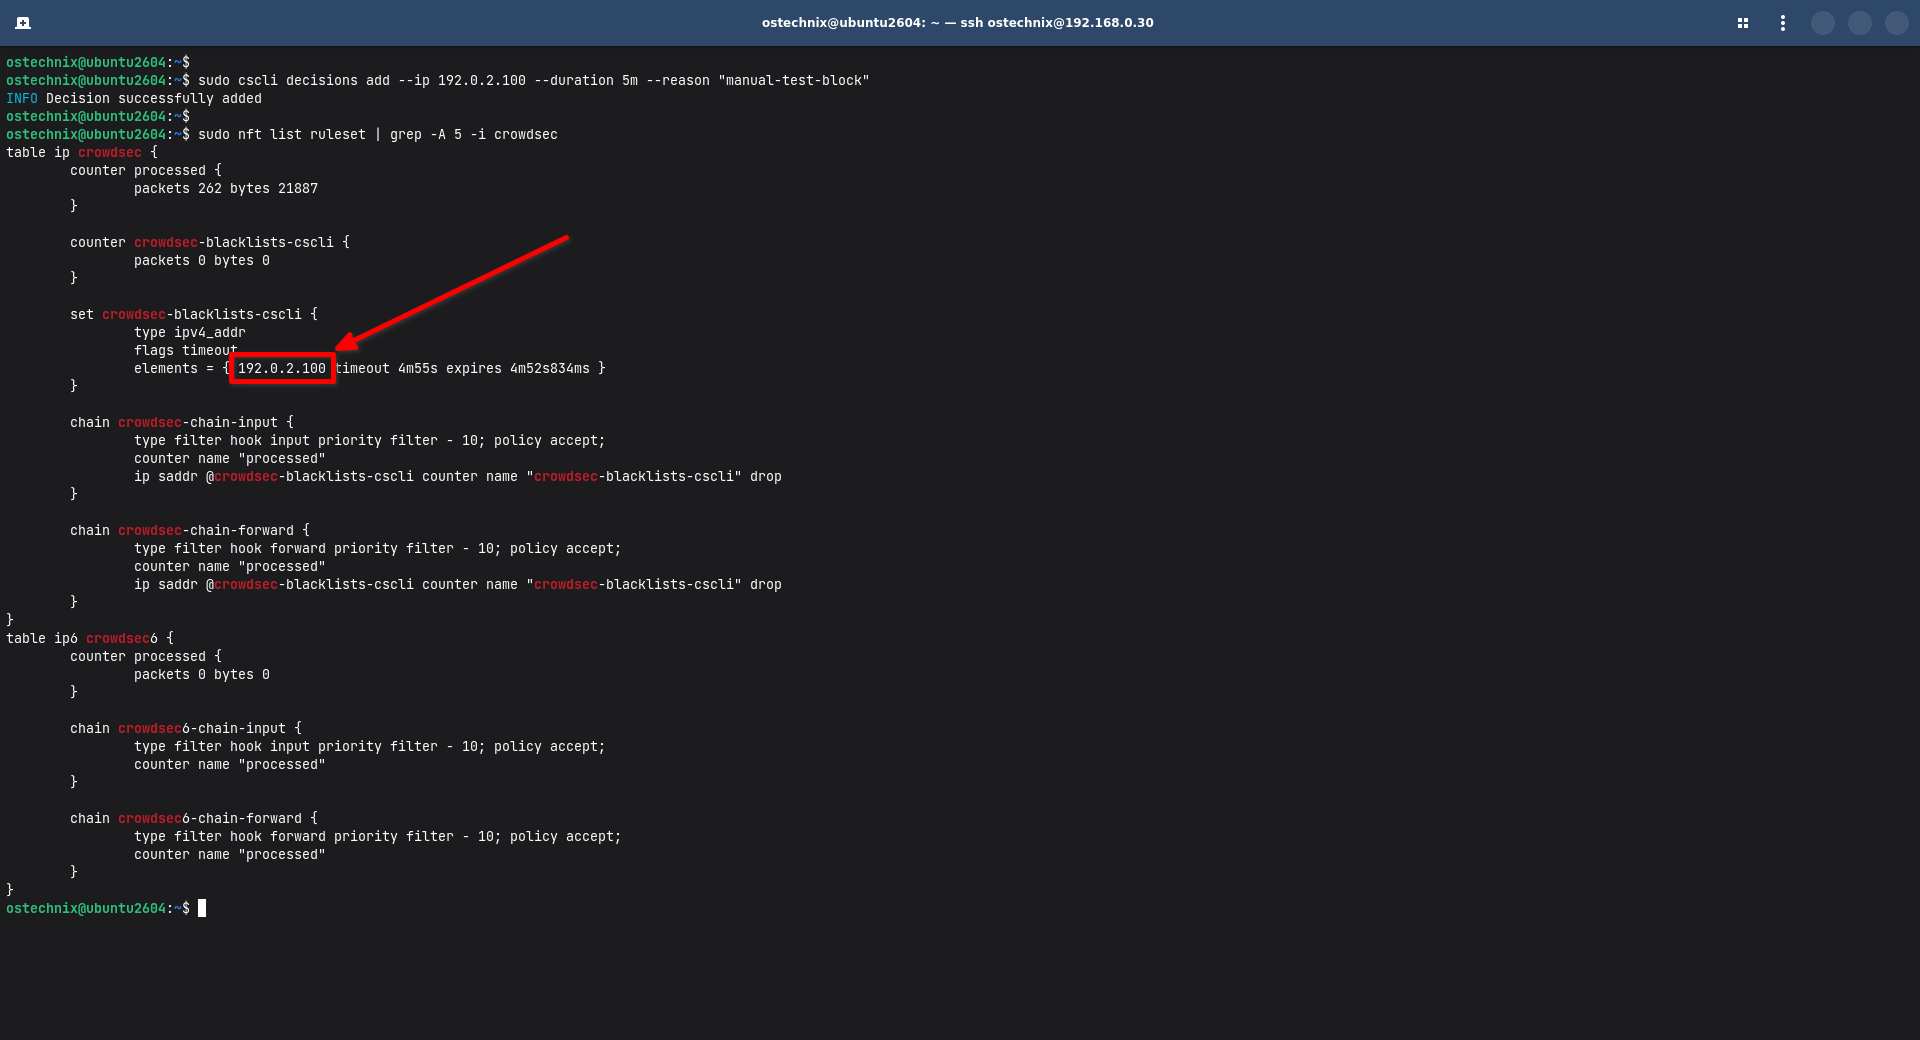
sudo cscli decisions add --ip 192.0.2.100 --duration 5m --reason "manual-test-block"
sudo nft list ruleset | grep -A 5 -i crowdsec
Check the result. If the IP address (i.e. 192.0.2.100 in our case) appears in the nftables rule set with a drop rule, the full chain works: detection, decision, and enforcement.
Join the Community Threat Intelligence Network
We installed the CrowdSec agent on our machine. Next we need to add the machine to CrowdSec network.
To do so, run:
sudo cscli console enroll --quick
This command prints a link.
INFO Please visit the following URL to enroll your instance: https://app.crowdsec.net/quick-enroll?token=xxxxxxxxx-xxxx-xxxx-xxxx-xxxxxxxxxxxx
INFO This link is valid for the next 15m0s.
INFO Please restart crowdsec after accepting the enrollment.
INFO manual set to true
INFO context set to true
INFO Enabled manual : Forward manual decisions to the console
INFO Enabled tainted : Forward alerts from tainted scenarios to the console
INFO Enabled context : Forward context with alerts to the console
Open it in a browser. Sign in to a free CrowdSec account and click Enroll engine. Please note that the link is valid for 15 mins only, so please complete this step as soon as possible.
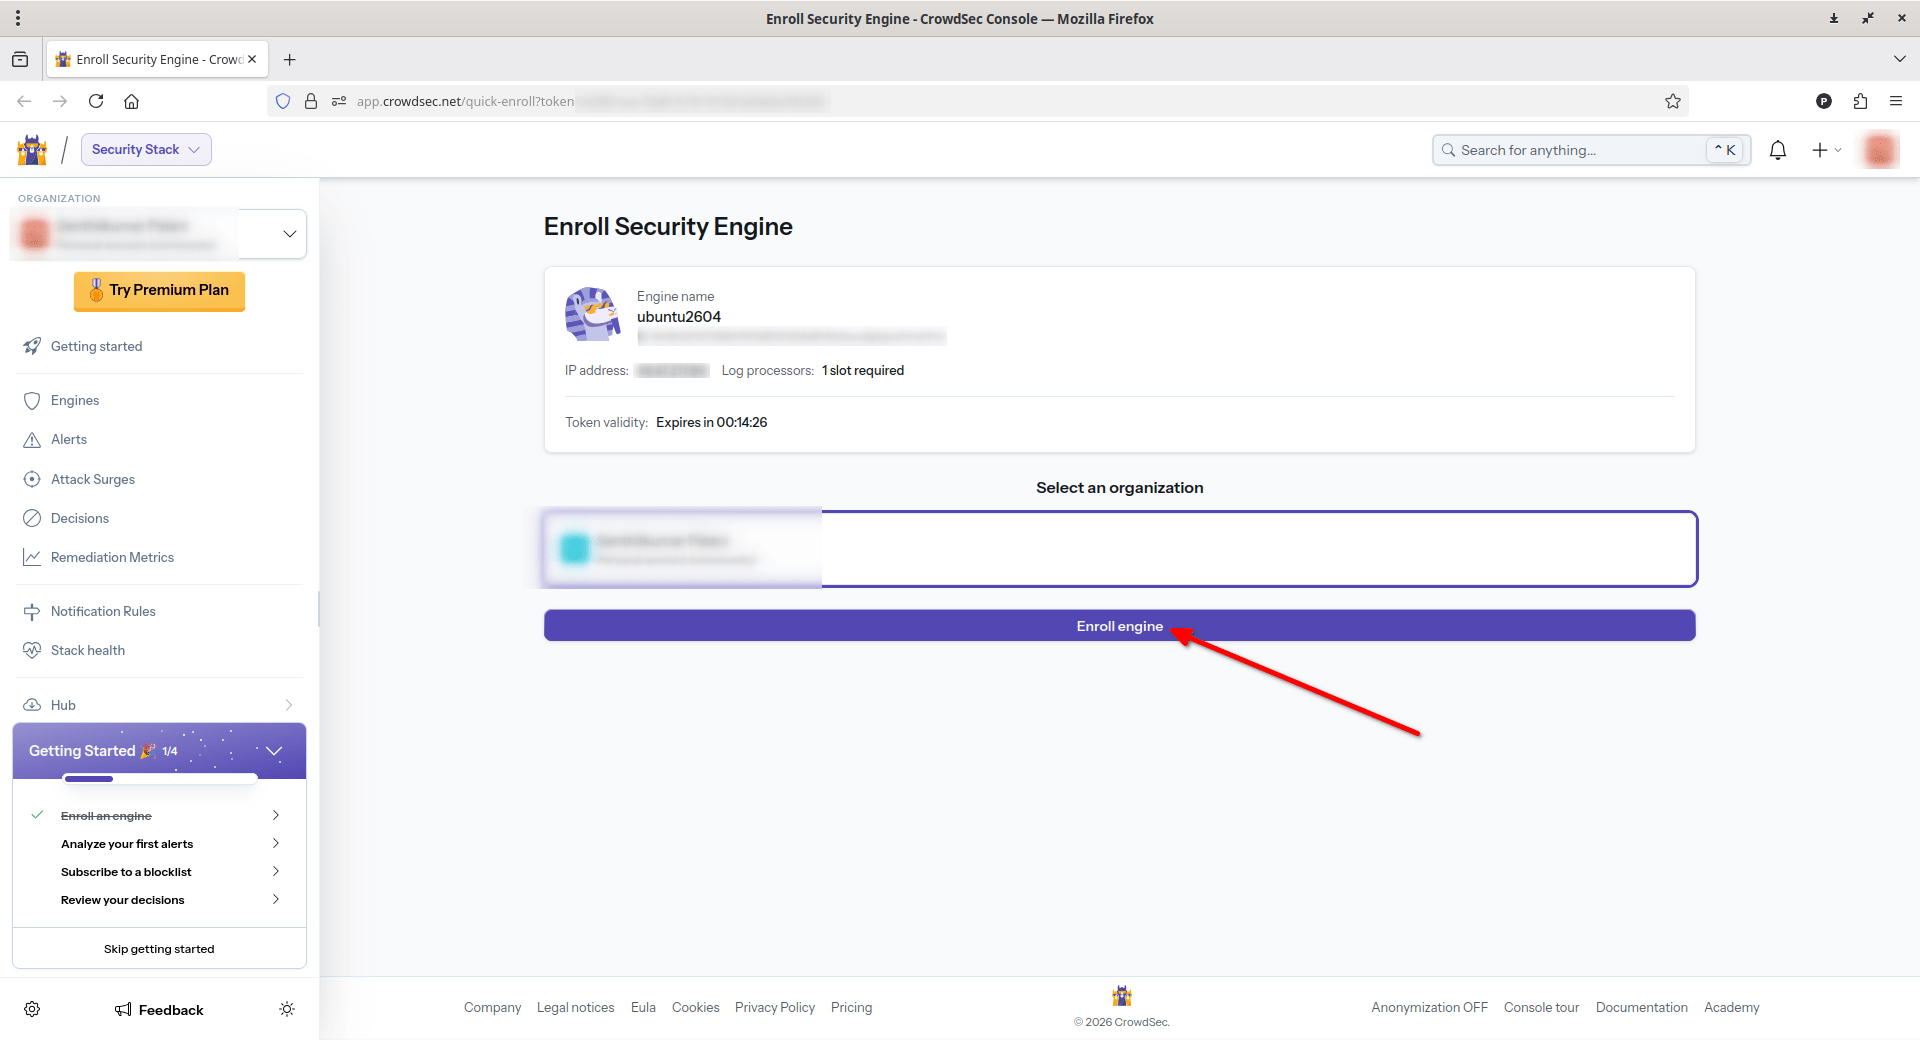
This step connects your server to CrowdSec's shared blocklist, built from data across many users.
What CrowdSec Catches, and What It Misses
CrowdSec is strong at network-level fraud prevention. It stops:
- SSH brute-force attempts
- Known malicious IP addresses
- Automated scanning and common exploit attempts
CrowdSec does not watch what happens inside your signup form. It cannot tell a real person from a bot, if both send a normal request from a clean IP address. This is why fake account protection needs a second layer.
Part 2: Adding ALTCHA for Fake Account Protection
ALTCHA is an open-source alternative to CAPTCHA. It does not ask users to solve a puzzle. Instead, it asks their browser to solve a small math problem, called a proof-of-work challenge. Real browsers solve this in under a second. Simple bots skip this step, and get blocked.
ALTCHA comes in two parts:
- The open-source widget. Free and self-hosted. This is what we use in this guide.
- ALTCHA Sentinel. A separate, paid product. It adds machine learning and behavior analysis. We cover this later.
Build a Test Signup App
We used Flask, a small Python web framework, to build a test signup form. This mirrors a real account-creation page. It collects an email and username, then checks for a valid ALTCHA solution before saving the account.
Install pip if it is not already installed:
sudo apt install -y python3.14-venv python3-pip
Set up the environment:
mkdir -p ~/testapp && cd ~/testapp
python3 -m venv venv
source venv/bin/activate
pip install flask altcha
The full application code is available as a GitHub Gist in our GitHub repository. Download it using command:
curl -O https://gist.githubusercontent.com/ostechnix/679974866de0cc00f0de57a8b14ccd12/raw/d917c3c79c358f70105801e40d2559235e54f570/altcha-signup-demo.py
The file includes the signup form, the challenge endpoint, and an admin page. The admin page logs both accepted and rejected signups. The key parts are:
- A
GET /altcha-challengeroute. It creates a new proof-of-work challenge for each page load. - A
POST /signuproute. It rejects any request missing a valid, solved ALTCHA payload. - A database table for rejected attempts. It records the reason and the source IP address. This log gives you real evidence of what the tool catches.
Rename and run it:
mv altcha-signup-demo.py app.py
python app.py &
Now the app will run in the background.
Connect Nginx as a Reverse Proxy
A reverse proxy sits between the internet and your application. It forwards requests to Flask. It also handles encryption and logging.
sudo tee /etc/nginx/sites-available/testapp > /dev/null <<'EOF'
server {
    listen 80;
    server_name _;
    return 301 https://$host$request_uri;
}

server {
    listen 443 ssl;
    server_name _;

    ssl_certificate     /etc/nginx/ssl/testapp.crt;
    ssl_certificate_key /etc/nginx/ssl/testapp.key;

    location / {
        proxy_pass http://127.0.0.1:5000;
        proxy_set_header Host $host;
        proxy_set_header X-Real-IP $remote_addr;
        proxy_set_header X-Forwarded-For $proxy_add_x_forwarded_for;
        proxy_set_header X-Forwarded-Proto $scheme;
    }
}
EOF
This file alone does nothing until Nginx is told to use it. Enable the site, remove the default one, and check the config before reloading:
sudo rm -f /etc/nginx/sites-enabled/default
sudo ln -s /etc/nginx/sites-available/testapp /etc/nginx/sites-enabled/testapp
Configure HTTPS (Important)
This point surprises many first-time ALTCHA users. The proof-of-work challenge relies on a browser feature called the Web Crypto API. Browsers only allow this feature over HTTPS, or on localhost. A plain HTTP connection over a local network address will fail. The browser will report: "Secure context (HTTPS) required."
For a test lab, a self-signed certificate is enough:
sudo mkdir -p /etc/nginx/ssl
sudo openssl req -x509 -nodes -days 365 -newkey rsa:2048 \
  -keyout /etc/nginx/ssl/testapp.key \
  -out /etc/nginx/ssl/testapp.crt \
  -subj "/CN=192.168.0.30"
For a live website, use a certificate from a trusted authority instead, such as Let's Encrypt. Replace 192.168.0.30 in the above command with your server's IP address.
Check nginx configuration for any errors:
sudo nginx -t
You should see:
nginx: the configuration file /etc/nginx/nginx.conf syntax is ok
nginx: configuration file /etc/nginx/nginx.conf test is successful
If there are no errors, go ahead and restart the nginx service:
sudo systemctl reload nginx
nginx -t only checks syntax. It will not warn you if no site is actually enabled, so do not skip the ln -s step in the previous section.
Match Your Widget Version to Your Library Version
During testing, the ALTCHA widget failed with "Verification failed," almost instantly. That speed was the clue: a real proof-of-work check takes a moment to run. The cause was a version mismatch. The Python library on the server builds one challenge format. Older versions of the JavaScript widget expect a different, older format.
The fix is simple: match the major versions. At the time of this guide, the current widget is version 3. It uses a challenge attribute in the HTML, and it pairs correctly with the current Python altcha library. Check your versions before assuming your setup is broken.
Test the Result
First, find your server's address and open the signup page. Run this on the server to find its LAN IP:
ip -4 addr show | grep inet
Look for the address under your main network interface, such as 192.168.0.30. This example uses that address; substitute your own server's IP throughout.
From a browser on another device on the same network, go to https://192.168.0.30/.
You will see a certificate warning first. This is expected, since the certificate is self-signed for this lab. Click through it: in Firefox, choose "Advanced," then "Accept the Risk and Continue." In Chrome, choose "Advanced," then "Proceed."
The signup page should load, with an email field, a username field, and the ALTCHA checkbox below them.
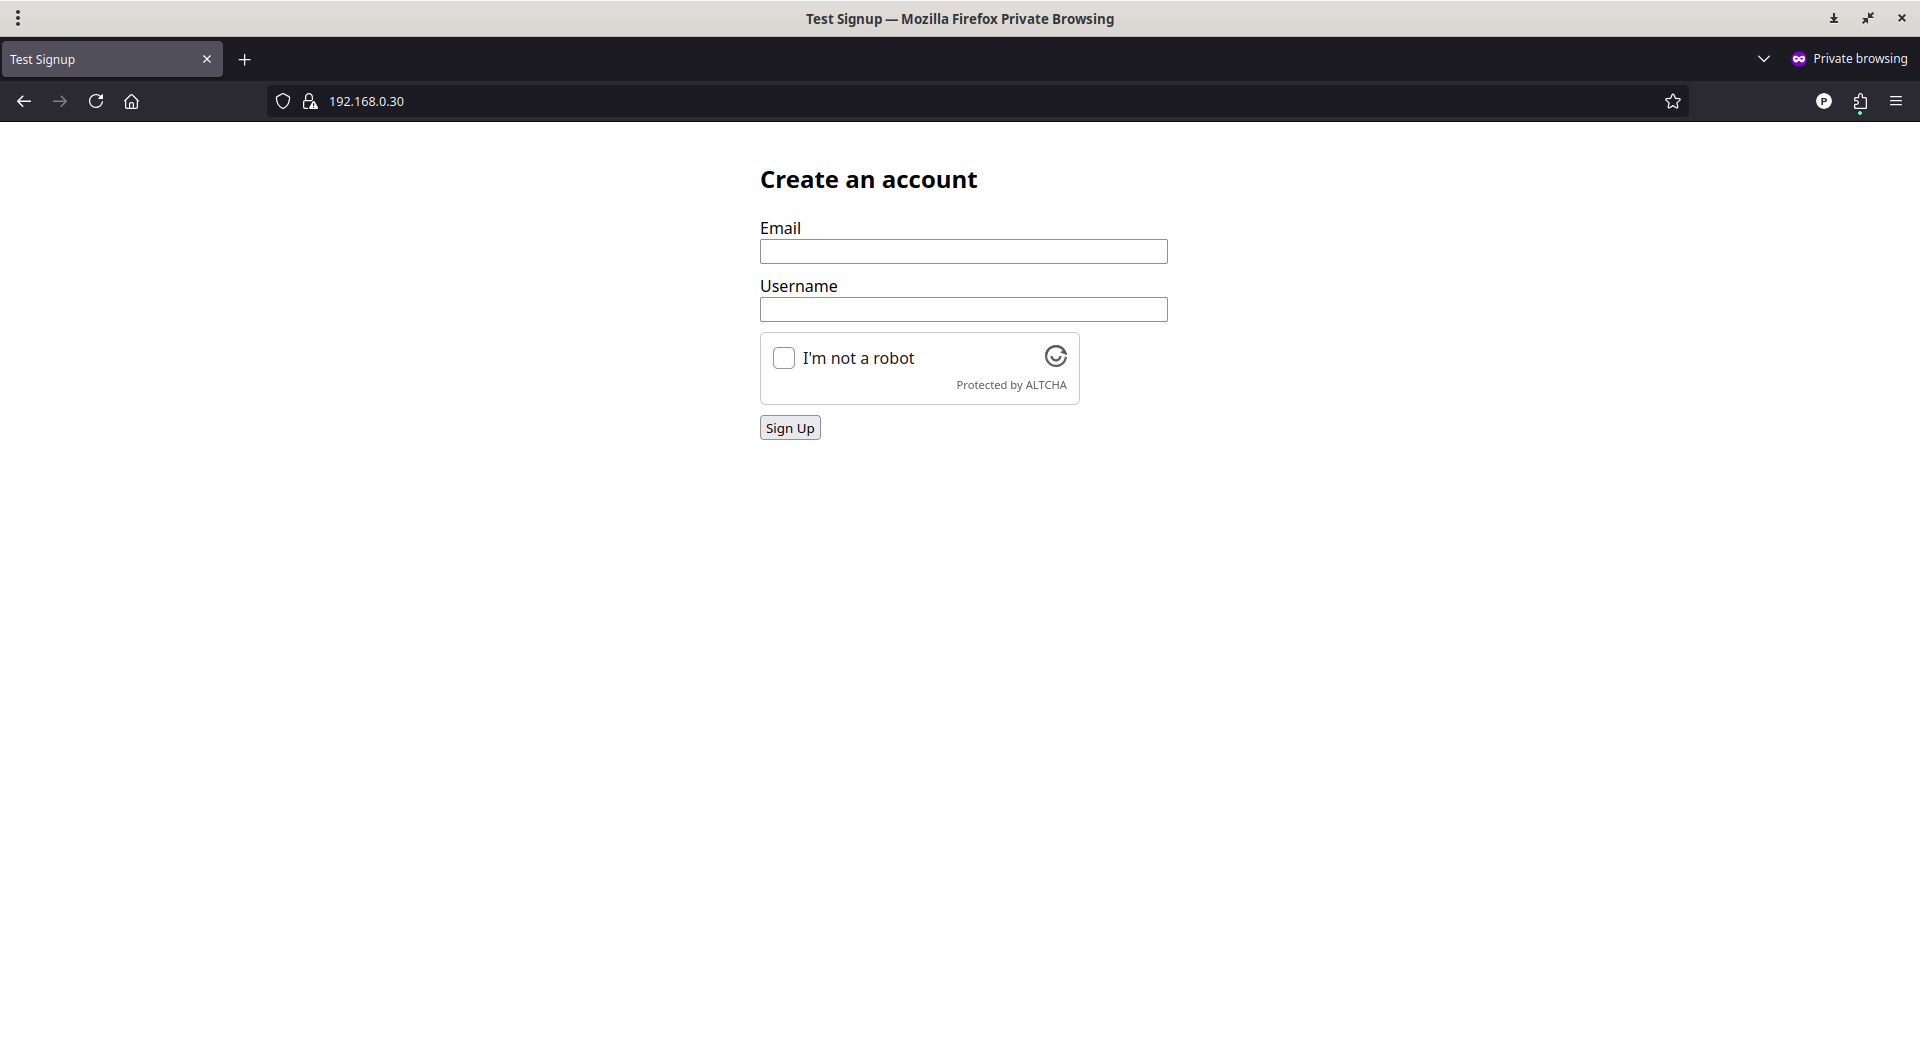
A working setup shows two outcomes.
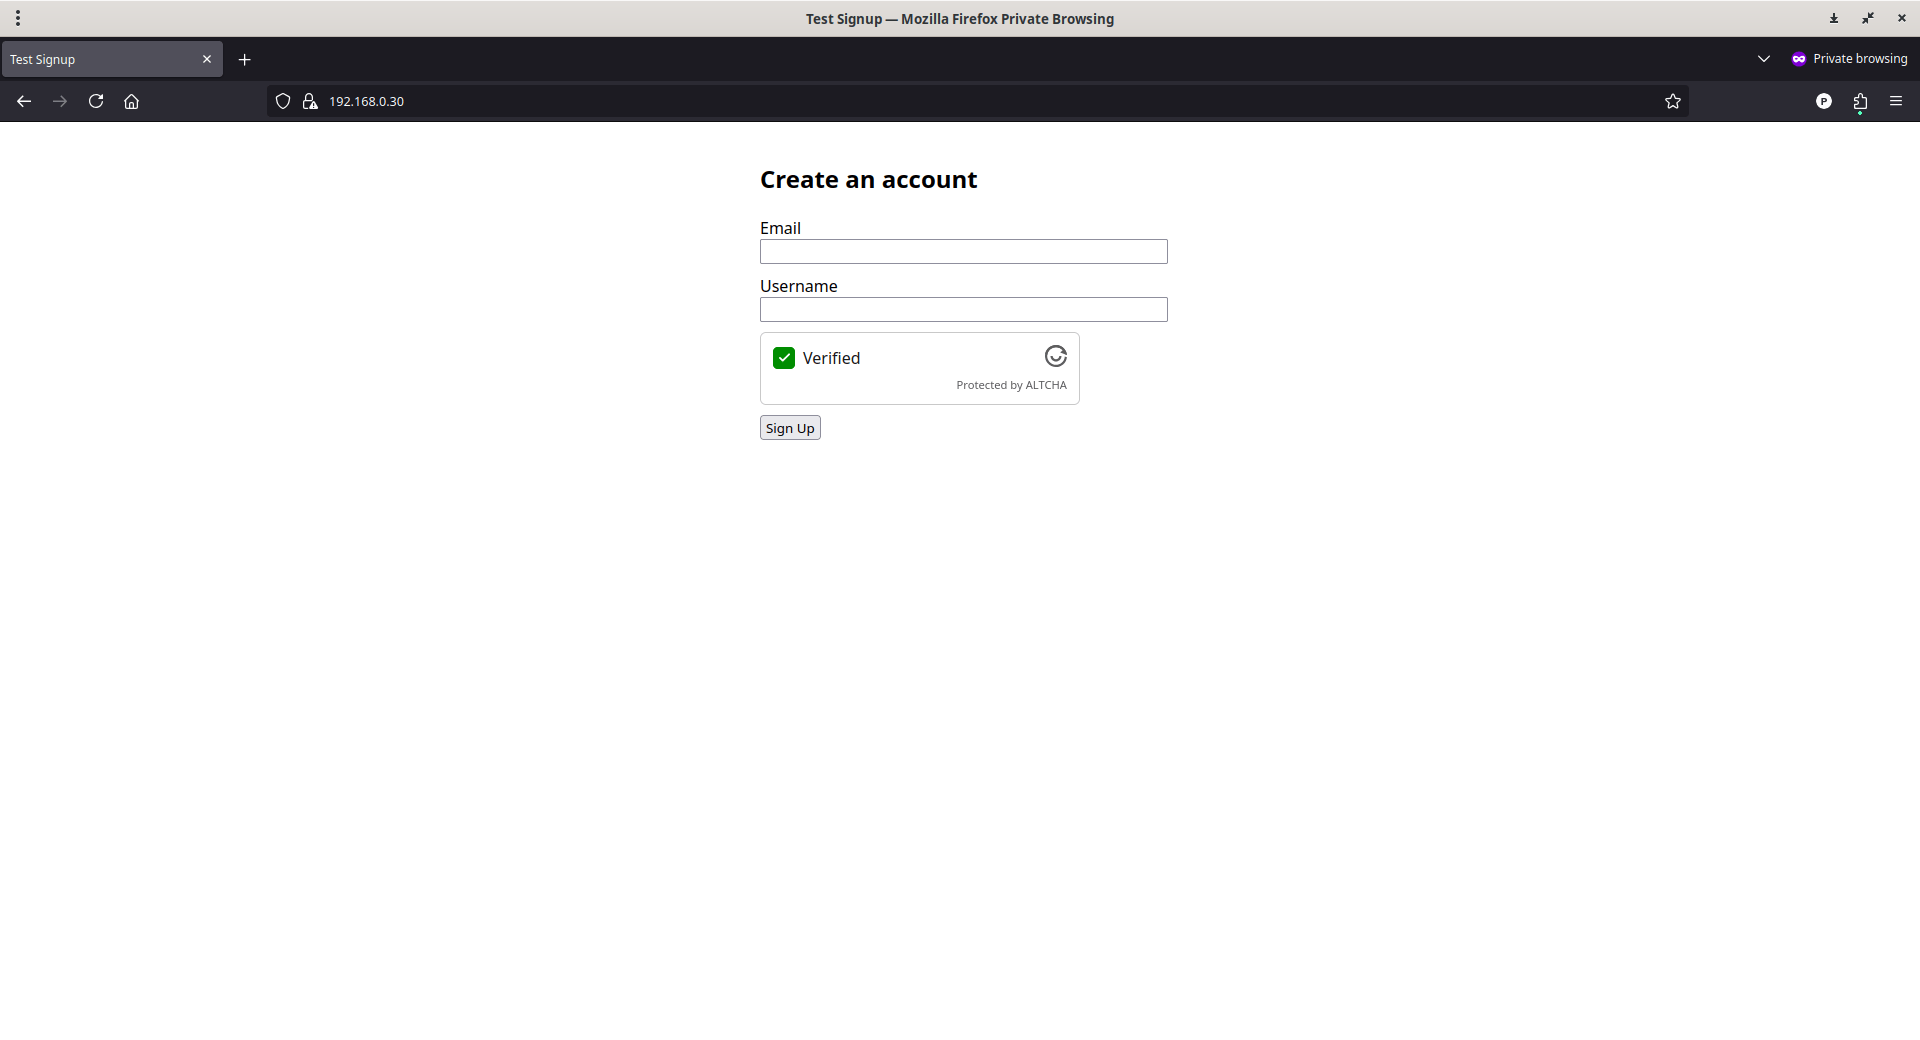
A real browser, solving the challenge, succeeds. Click the checkbox. The widget solves the proof-of-work challenge and shows a green checkmark, labeled "Verified." This takes a moment. It is not instant, since real computation is happening in your browser.
Fill in the form and click "Sign Up." The page should show "Account created."
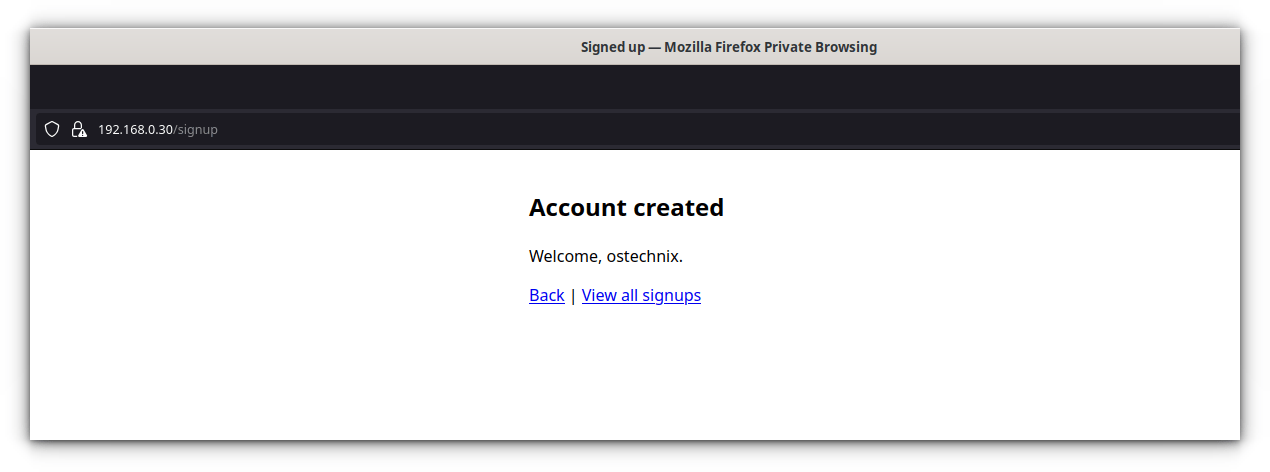
Use any values in the sign up form. It should work.
A bot script, skipping the challenge, fails.
curl -sk -X POST https://localhost/signup -d "email=bot@example.com&username=botuser"
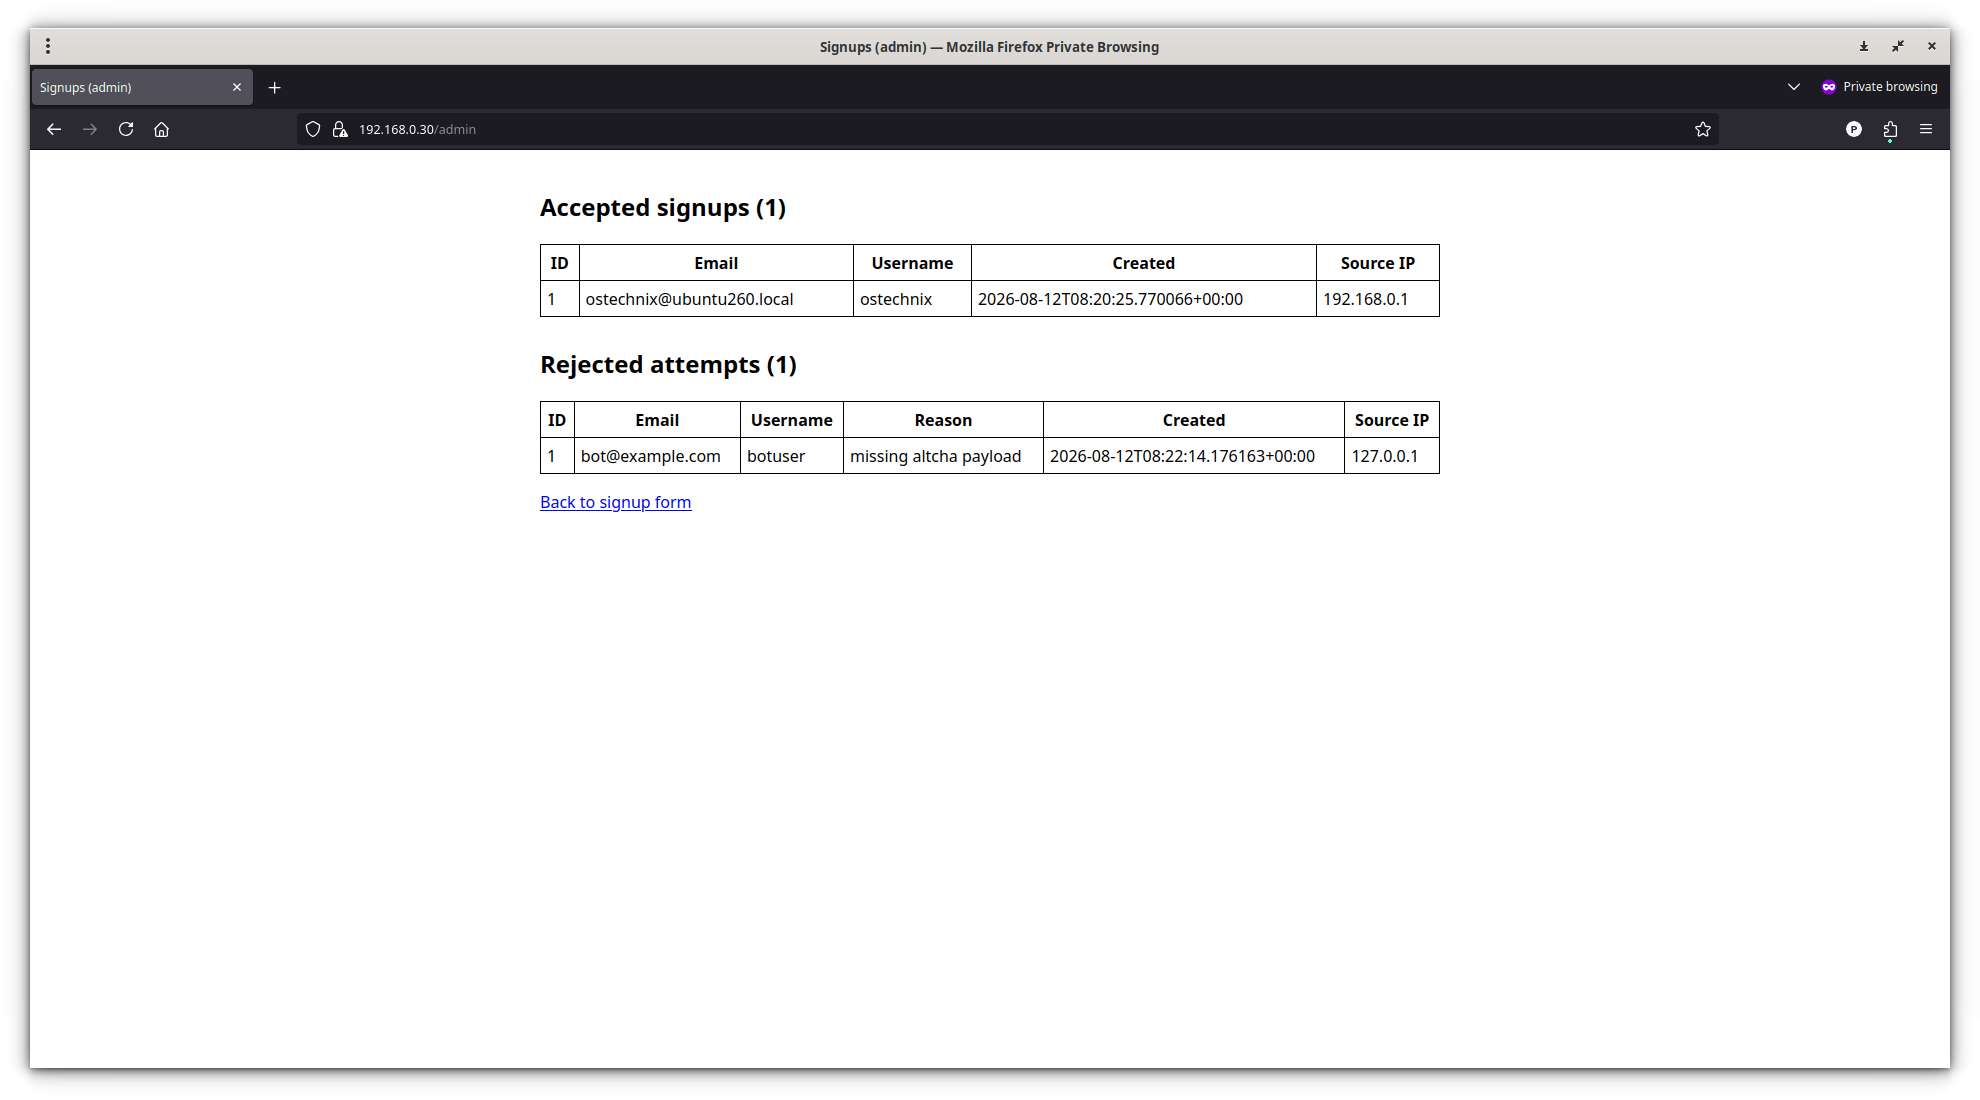
This request carries no ALTCHA payload. The server rejects it, and logs the reason. A script that skips real browser code cannot pass this check.
127.0.0.1 - - [12/Aug/2026 08:22:14] "POST /signup HTTP/1.0" 400 -

<!DOCTYPE html>
<html>
<head><title>Blocked</title></head>
<body style="font-family: sans-serif; max-width: 400px; margin: 40px auto;">
  <h2>Signup rejected</h2>
  <p>Reason: Missing verification payload (bot-like request)</p>
  <a href="/">Try again</a>
</body>
Visit https://192.168.0.30/admin (using your own server's address) to see both outcomes side by side: real signups accepted, and the bot attempt logged as rejected, with a reason and source IP address.
Congratulations! You just built a fake account protection setup for your website using CrowdSec and ALTCHA on Ubuntu.
As you can see, this is very basic setup but it works! Go and explore ALTCHA documentation for more advanced configuration.
Limitation
CrowdSec and the open-source ALTCHA widget stop simple, low-effort bots. They do not stop every kind of fake account. This is the honest limit of the setup in this guide.
A more capable attacker can use a real, automated browser, controlled by tools like Playwright or Selenium. This kind of bot runs actual JavaScript. It can solve the ALTCHA proof-of-work challenge, the same way a human's browser does. Against this kind of attacker, the free stack in this guide gives no protection.
This is the gap that paid bot protection and fraud prevention platforms aim to close. They add signals beyond proof-of-work. These include mouse movement, typing rhythm, and device fingerprinting. They also use models trained on traffic from many customers. How well a platform closes this gap depends on the vendor. It also depends on your own traffic. Do your own research and find a best commercial solution for your production websites.
Frequently Asked Questions (FAQ)
A: Yes. The core CrowdSec agent and bouncers are open source and free to self-host. A paid console tier exists for larger organizations, but it is not required for the setup in this guide.
A: The ALTCHA widget is free and open source. ALTCHA Sentinel is a separate product with machine learning features. It is paid, after a 30-day trial.
A: A simple script that submits a form directly, without loading the page or running JavaScript, cannot pass ALTCHA. A bot using a full, automated browser can solve the challenge, since it behaves like a real browser. This is the main limit of the free, open-source widget.
A: Yes. The proof-of-work challenge depends on a browser feature that only works over HTTPS, or on localhost. A plain HTTP site will not work, even on a local network.
A: Consider a paid platform once fake accounts cause real financial harm. Also consider it once you have evidence that bots are bypassing your free defenses, such as automated browsers solving your proof-of-work challenges at scale.
Summary
Fake account and bot protection does not require a large budget to start. CrowdSec, an open-source intrusion prevention system, stops network-level threats like brute-force attacks and known bad IP addresses. ALTCHA, an open-source proof-of-work widget, stops simple bots at the signup form.
Together, these two tools give you a real, working, free defense. They stop a large share of fake account creation. They will not catch an attacker using a real, automated browser. For that level of threat, paid fraud prevention software adds behavioral analysis to close the gap. How well it does so varies by vendor. You should do your own evaluation before buying any commercial option.
Start with the free layer. Measure what gets through, using the rejection log this guide builds. Decide on a paid platform once you have real data showing where the free layer falls short.
