This guide explains what is Multipass and how to instantly create and launch Ubuntu VMs with Multipass in a matter of seconds in Linux.
Table of Contents
What is Multipass?
There are multitude of programs and tools available to deploy Ubuntu VMs for testing and learning purposes. Some of them are Docker, KVM, LXD, LXC, Proxmox, Vagrant, VirtualBox and Vmware etc.
I use KVM, Vagrant and Virtualbox often for testing various applications on multiple Linux distributions. Today, we are going to learn about yet another Virtualization utility named Multipass.
Whether you are a regular user or developer or system admin, you can instantly create and launch Ubuntu VMs with Multipass in Linux.
Multipass is a lightweight, commandline VM manager developed by Canonical team, for quickly deploying Ubuntu instances on your local machine.
Since Multipass get you the up-to-date instances, you don't have to waste time on updates on launch! Using Multipass, you can quickly launch fresh Ubuntu VMs and use them for testing your code or application.
It uses KVM on Linux, Hyper-V on Windows and HyperKit on macOS to run the virtual machine with minimal overhead. It can also use VirtualBox on Windows and macOS.
You can run commands in VMs directly from your local host or log into the VM's shell and run from there. It is also possible to mount a directory of your host system into the instances and share files and folders between the host system and VMs.
Multipass is a cross platform application that supports GNU/Linux, macOS and Windows.
Install Multipass On Linux
Multipass is available as snap package, so it can be installed on any Linux operating systems that supports snapd.
Snap comes pre-installed in all Ubuntu releases starting from version 16.04 LTS, Ubuntu flavours, Solus 3 and above, Zorin OS etc. On other Linux systems, you can install Snapd as described in this link.
After installing Snapd, install Multipass using command:
$ sudo snap install multipass
If it doesn't work for any reason, try the following command:
$ sudo snap install multipass --classic
Upon successful Multipass installation, you will see the following output:
multipass 1.0.2 from Canonical* installed
Now let us go ahead and deploy Ubuntu instances in our local system.
Create and launch Ubuntu VMs with Multipass on Linux
Running Ubuntu VMs with Multipass is incredibly easy and straight-forward.
1. Launch Ubuntu VMs
To download and launch a fresh Ubuntu VM, simply run:
$ multipass launch --name ostechnix-instance
Or,
$ multipass launch -n ostechnix-instance
Here ostechnix-instance is the name of my Ubuntu VM. You can name the VMs as per your liking.
The above command will download a fresh and minimal Ubuntu instance and start it automatically.
By default, Multipass will download the current Ubuntu LTS version.
2. List VMs
To list the currently downloaded VMs on your system, run:
$ multipass list
Sample output:
Name                    State             IPv4             Image
ostechnix-instance      Running           10.39.86.203     Ubuntu 18.04 LTS
As you can see in the above output, a new Ubuntu instance named "ostechnix-instance" is launched and is running with Ubuntu 18.04 LTS version. And the IP address of the instance is 10.39.86.203.
3. Execute commands in VMs from local system
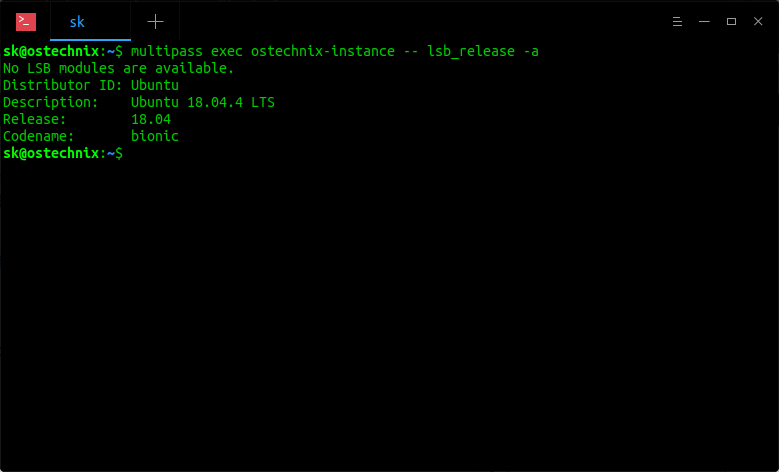
Multipass allows you to run commands inside your Ubuntu instances. For example, we can find the system details of a running VM using command:
$ multipass exec ostechnix-instance -- lsb_release -a
4. Launch Ubuntu VM's shell
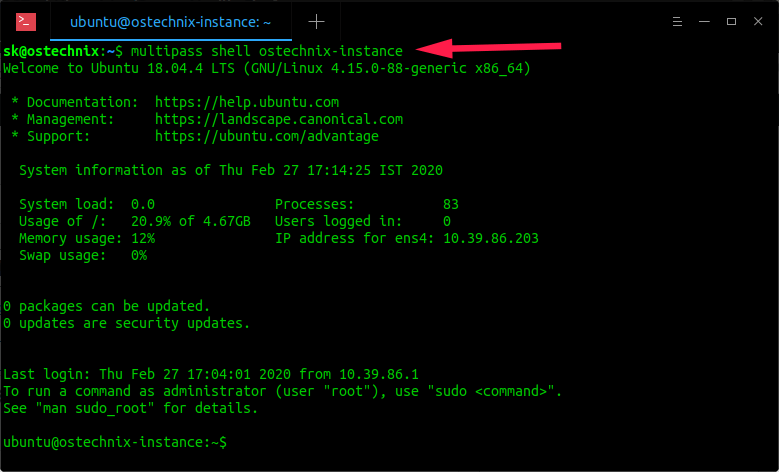
Instead of running commands from your local system to Ubuntu VM, you can directly launch its SHELL and run the commands or do any testing as you please.
$ multipass shell ostechnix-instance
Type "exit" to log out from the instance.
5. Find available instances to launch
As I already said, Multipass will get you the current LTS version, which is Ubuntu 18.04. You can, however, launch other available VMs if you want to.
To list all available VMs, run:
$ multipass find
Sample output:
Image                   Aliases           Version          Description
snapcraft:core          core16            20200221         Snapcraft builder for Core 16
snapcraft:core18                          20200221         Snapcraft builder for Core 18
core                    core16            20200213         Ubuntu Core 16
core18                                    20200210         Ubuntu Core 18
16.04                   xenial            20200218.1       Ubuntu 16.04 LTS
18.04                   bionic,lts        20200218         Ubuntu 18.04 LTS
19.10                   eoan              20200129         Ubuntu 19.10
daily:20.04             devel,focal       20200226         Ubuntu 20.04 LTS
As you see, Snapcraft core, Ubuntu core, Ubuntu 16.04, 18.04, 19.10 and 20.04 daily build are available.
To launch any other instances, specify the image name like below.
$ multipass launch --name ostechnix-instance 19.10
This command will launch an instance running with Ubuntu 19.10.
6. Create instances with custom specifications (Number of CPUs, hard disk size, and memory size)
By default, Multipass will create Ubuntu VMs with 1 CPU, 5GB hard disk and 1GB RAM. This is enough for basic testing.
However, some times you might want to create a VM with lower or higher configuration than the default. It is also possible!
The following command will spin up a VM with 2 CPUs, 2 GB RAM and 20 GB hard disk size.
$ multipass launch -c 2 -m 2G -d 20G -n ostechnix-instance
The size can be specified with suffix K (for KB), M (for MB), G (for GB).
- Minimum number of allowed CPUs: 1
- Minimum allowed Hard disk size: 512 MB
- Minimum allowed Memory size: 128 MB
7. Find information of the running instances
The information about the running instances can be viewed by the following command:
$ multipass info ostechnix-instance
Sample output:
Name:           ostechnix-instance
State:          Running
IPv4:           10.39.86.203
Release:        Ubuntu 18.04.4 LTS
Image hash:     3c3a67a14257 (Ubuntu 18.04 LTS)
Load:           0.08 0.02 0.01
Disk usage:     999.1M out of 4.7G
Memory usage:   74.0M out of 985.1M
8. Suspend instances
To suspend a running instance, run:
$ multipass suspend ostechnix-instance
Verify if it is suspended or not using info command:
$ multipass info ostechnix-instance
Sample output:
Name:           ostechnix-instance
State:          Suspended
IPv4:           --
Release:        --
Image hash:     3c3a67a14257 (Ubuntu 18.04 LTS)
Load:           --
Disk usage:     --
Memory usage:   --
As you can see, my ostechnix-instance is suspended.
9. Starting and stopping instances
To stop a running VM, run:
$ multipass stop ostechnix-instance
To start the VM:
$ multipass start ostechnix-instance
10. Manage Ubuntu VMs from Multipass tray icon
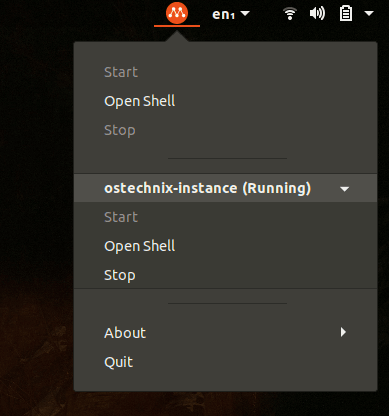
If you are not comfortable with Multipass command line options, you can manager VMs from the Multipass tray icon.
Launch Multipass GUI from your host system's menu or dash. You will then see the Multipass icon on your system tray.
From the multipass tray icon, you can:
- Start/stop VMs,
- Open shell access of the running VMs,
- Disable/enable Multipass autostart option,
- Quit Multipass.
11. Delete VMs
Once you are done with your Ubuntu instances, you can delete them if they are no longer required.
First stop the VM that you want to delete.
$ multipass stop ostechnix-instance
Then, delete it from your local host using commands:
$ multipass delete ostechnix-instance
$ multipass purge
12. Getting help
Run the following command to view the list of available options and sub-commands along with description.
$ multipass help
Sample output:
Usage: multipass [options] <command>
Create, control and connect to Ubuntu instances.

This is a command line utility for multipass, a
service that manages Ubuntu instances.

Options:
  -h, --help     Display this help
  -v, --verbose  Increase logging verbosity, repeat up to three times for more
                 detail

Available commands:
  delete    Delete instances
  exec      Run a command on an instance
  find      Display available images to create instances from
  get       Get a configuration setting
  help      Display help about a command
  info      Display information about instances
  launch    Create and start an Ubuntu instance
  list      List all available instances
  mount     Mount a local directory in the instance
  purge     Purge all deleted instances permanently
  recover   Recover deleted instances
  restart   Restart instances
  set       Set a configuration setting
  shell     Open a shell on a running instance
  start     Start instances
  stop      Stop running instances
  suspend   Suspend running instances
  transfer  Transfer files between the host and instances
  umount    Unmount a directory from an instance
  version   Show version details
To view the help section for each sub-command:
$ multipass help <sub-command>
Example:
$ multipass help launch
Resources:


9 comments
Looks like a very cool utility. I installed it on Fedora 31 but ran into a weird socket read/write issue. I’ll keep looking on the ‘net for possible solutions to that error.
What’s the difference from LXC/D?
Not much. As far as I observed, Multipass is meant to offer a universal Ubuntu experience across platforms other than Linux. It supports Linux, Mac OS and Windows. Please have a look at this this thread for detailed discussion. https://forum.snapcraft.io/t/reasoning-behind-the-move-to-multipass/9648/4
Because the Multipass daemon runs as root, only privileged users can connect to it. The “sudo”, “adm” and “admin” groups are tried, in that order.
“`
$ ll /var/snap/multipass/common/multipass_socket
srw-rw—- 1 root sudo 0 mar 3 09:47 /var/snap/multipass/common/multipass_socket
“`
Make sure you’re in the group that the socket is read/writable to.
Primarily, it’s dealing with virtual machines, not containers. But LXD is actually growing its support for that as well (and Multipass will support using LXD on Linux rather than running its own QEMU). LXD won’t work natively on Windows or macOS, though 🙂
Thank you for your clarification, Saviq.
Great write up! Multipass makes it so easy to spin up a vm and run tests without worrying about losing any work.
TYPO:
Starting and stopping instances
To stop a running VM, run:
$ multipass stop ostechnix-instance
To start the VM:
$ multipass “STOP” ostechnix-instance
Good catch. Fixed it now.