This detailed Docker tutorial covers the essential Docker commands, such as how to create a new container, run the container, remove a container and so on. In addition, this guide also explains how to build your own custom Docker image from an existing container and how to remove containers and images. Without further ado, let us get started with Docker basics usage!
Table of Contents
Docker Installation Steps
Docker can be installed in most modern Linux operating systems. If you haven't installed Docker yet, refer the following guides:
- Install Docker Engine And Docker Compose In AlmaLinux, CentOS, Rocky Linux
- How To Install Docker And Docker Compose In Ubuntu
- How To Install Docker and Docker Compose In Debian
What is Docker Image and Docker Container?
Before getting started with Docker, let me clarify what is a Docker image and a Docker Container.
A Docker Image is the file that decides how a Container should behave, and Docker Container is the running or stopped stage of a Docker image.
The containers are isolated from the rest of host's files.
When we run a Docker container, it uses an isolated filesystem which provided by a Docker image. The Docker image consists of everything needed to run an application - all dependencies, configuration, scripts, binaries, etc.
The image also contains other configuration for the container, such as environment variables, a default command to run, and other metadata.
Getting Started with Docker in Linux
All steps given below are tested in Ubuntu 24.04, 22.04, 20.04 and 18.04 LTS server edition. However, the steps provided in the subsequent sections are common to all Linux platforms. For example, you can run the same commands in a RHEL-based system(E.g. AlmaLinux) too.
1. Search Docker Images
We can get the images from either from the official docker library called Docker hub, or create our own.
For those wondering, Docker hub is an online central repository where all Docker users build, test, and save their Docker images. Docker hub has tens of thousands of Docker images and the number of images is growing everyday.
You can search for the any Docker images with "docker search" command from command line.
For instance, to search for docker images based on Alpine Linux, run:
sudo docker search alpine
Sample Output:

To search images based on Ubuntu, run:
sudo docker search ubuntu
You can even search images for any application, for example Nginx, like below:
sudo docker search nginx
Docker hub has a wide range of images. Be it an operating system, application, or combination of multiple applications (E.g. LAMP stack), you will find pre-built Docker images for everything in Docker hub.
If something you're looking for is not available, you can build it and make it available for public via Docker hub or keep it private for your own use.
2. Download Docker Images
To download Docker image for Ubuntu OS, run the following command from the Terminal:
sudo docker pull ubuntu
The above command will download the latest Ubuntu image from the Docker hub.
Sample Output:
Using default tag: latest
latest: Pulling from library/ubuntu
405f018f9d1d: Pull complete
Digest: sha256:b6b83d3c331794420340093eb706a6f152d9c1fa51b262d9bf34594887c2c7ac
Status: Downloaded newer image for ubuntu:latest
docker.io/library/ubuntu:latest
You can also download a specific version of Ubuntu image using command:
sudo docker pull ubuntu:20.04
Docker allows us to download any images and start the container based on that image regardless of the host OS.
For example, to download Alpine OS image, run:
sudo docker pull alpine

3. List Docker Images
All downloaded Docker images will be saved in /var/lib/docker/ directory.
To view the list of downloaded Docker images, run:
sudo docker images
Sample Output:
REPOSITORY   TAG       IMAGE ID       CREATED       SIZE
ubuntu       latest    27941809078c   3 weeks ago   77.8MB
ubuntu       20.04     20fffa419e3a   3 weeks ago   72.8MB
alpine       latest    e66264b98777   5 weeks ago   5.52MB

As you see above, I have downloaded three Docker images - Ubuntu latest, Ubuntu 20.04 and Alpine Linux.
Now, let us go ahead and see how to start or run the containers based on the downloaded images.
4. Run Docker Containers
We can start a container in two ways - either using its Docker Image TAG or Image ID.
TAG refers to a particular snapshot of the image and the IMAGE ID is the corresponding unique identifier for that image.
Take a look at the following screenshot:

As you see in the above results, the tags are "latest" and "20.04".
27941809078cis the IMAGE ID of Ubuntu latest Docker image,20fffa419e3ais the image id of Ubuntu 20.04 Docker image- and
e66264b98777is the image id of Alpine latest Docker image.
4.1. Run Containers using Tag
Once you downloaded the Docker images of your choice, run the following command to start a Docker container and connect to it by using its TAG.
sudo docker run -t -i ubuntu:latest /bin/bash
Or,
sudo docker run -it ubuntu:latest /bin/bash
Here,
-t: Assigns a new Pseudo Terminal inside the Ubuntu container.-i: Allows us to make an interactive connection by grabbing the standard in (STDIN) of the container.ubuntu:latest: Ubuntu docker image with Tag "latest"./bin/bash: BASH shell for the new container. This is optional. If you don't mention the shell, the default shell will be assigned to the container.
After starting the container, you'll be automatically landed into the Container's shell (Command prompt):

The new container based on the Ubuntu latest image has been started now. A unique ID and a name will be given to all the newly containers. As you can see in the above output, the Ubuntu container ID is 2f2a5b826762. We will see where to find the name of the container in a minute.
You can now start working in the container. Once you're done with the Container, you can return back to the host system's Terminal (In my case, it is Ubuntu 22.04 LTS) without terminating the Container (guest os).
4.2. Detach from Running Containers
To detach from a running container (without terminating it), press CTRL+P followed by CTRL+Q.
Now, you are back to your original host computer's terminal window. Please note that the container is still running in the background and we didn't terminate it yet.
4.3. Run Containers using IMAGE Id
The another way to start a container and connect to it is by using the IMAGE ID as shown below:
sudo docker run -it 20fffa419e3a /bin/bash
Here,
20fffa419e3a- Image id
To detach from the container and return back to the host system's Terminal, press CTRL+P and CTRL+Q. Again, we only detached from the container but didn't stop it. The container is still running in the background.
4.4. Run Containers in Detached Mode
In the previous sections, we started a container and attached to it immediately. And then we detached from the container once our work with that container is completed.
You can also start container in detached mode (without automatically attaching it).
To run a container in the background, run:
sudo docker run -it -d alpine:latest
Sample Output:
d74f2ceb5f3ad2dbddb0b26e372adb14efff91e75e7763418dbd12d1d227129d
The first 12 letters in the above output indicates the container ID.
You can verify if the container is running using docker ps command:
$ sudo docker ps
CONTAINER ID   IMAGE           COMMAND     CREATED         STATUS         PORTS     NAMES
d74f2ceb5f3a   alpine:latest   "/bin/sh"   3 seconds ago   Up 2 seconds             zen_pascal

As you can see in the above output, we have a created an Alpine container but didn't attach to it.
If you want to attach it to the container, simply, run:
sudo docker attach d74f2ceb5f3a
5. View Running Containers
To view the list running of containers, run the following command:
sudo docker ps
Sample Output:
CONTAINER ID   IMAGE           COMMAND       CREATED          STATUS          PORTS     NAMES
f7e04eed577e   20fffa419e3a    "/bin/bash"   6 minutes ago    Up 6 minutes              brave_mclean
2f2a5b826762   ubuntu:latest   "/bin/bash"   18 minutes ago   Up 18 minutes             hungry_leavitt

Here,
- f7e04eed577e is the ID of the Ubuntu container that is created with image "2f2a5b826762". And, "brave_mclean" is the name of this container.
- 2f2a5b826762 is the ID of the Ubuntu container that is created with image "ubuntu:latest". And, "hungry_leavitt" is the name of this container.
Whenever a new container is created, a unique ID and name will be given to it, so we can access the container using either its ID or name.
Heads Up: Please note that Container ID and Docker image ID are different.
To list all available (either running or stopped) containers, run:
sudo docker ps -a
6. Attach to or Detach from Running Containers
First, find the name or ID of the container with docker ps command.
sudo docker ps
Next, attach to the running container using docker attach command.
sudo docker attach <container-id>
For instance, I am going to attach to the container that has the ID "f7e04eed577e" like below:
sudo docker attach f7e04eed577e
You can also attach to a container using its name as well.
sudo docker attach brave_mclean
Now you're logged in to the container.
To detach from the container, simply press CTRL+P followed by CTRL+Q.
7. Start, Restart, Pause, and Stop Containers
You can start, restart, pause or stop a Docker container using its name or container ID.
First, find the name or ID of the container with docker ps -a command.

Now you can start a container using docker start command with name or ID like below.
sudo docker start modest_cray
sudo docker start 10615254bb45
You can start multiple containers with space-separated like below.
sudo docker start 24b5ee8c3d3a 56faac6d20ad d74f2ceb5f3a
To gracefully restart a running container, do:
sudo docker start 10615254bb45
To pause processes in a running container:
sudo docker pause 10615254bb45
To Unpause processes in a running container:
sudo docker unpause 10615254bb45
To block a container until others stop:
sudo docker wait 10615254bb45
Similarly we can stop a docker container using its name or ID. If you're already inside the container's shell, you can stop the container by simply running the following command in the container's console:
exit
You can also stop (power off the container) from the Docker host system using the following command:
sudo docker stop 10615254bb45
You can exit multiple containers with space-separated as shown below.
sudo docker stop 35b5ee8c3d3a 10615254bb45
After exiting the container, verify if it is really stopped by listing the running containers with command:
sudo docker ps
8. Kill Docker Containers
The docker stop command will gracefully turn off a running container. Sometimes, you may stuck with an unresponsive container or you want to forcibly shutdown a container.
To kill a container by sending a SIGKILL to a running container, run:
sudo docker kill 10615254bb45
9. Automatically Delete Containers after Closing Them
You may want to test a Container and then delete it once you're done with the Container. If so, you can automatically delete the Container after closing it by using --rm flag:
sudo docker run -it --rm debian:latest
Once you exit from the Container, it will be automatically deleted.

As you see in the above output, I created a new Debian container. Once I exit from the container, it is automatically deleted. The docker ps -a output shows that the Debian container doesn't exist.
10. Assign Name to Containers
If you closely look into the output of previous commands, each container is given a random name when you start a container. If you don't name your Containers, Docker will name them for you automatically.
Have a look at the following example.
$ sudo docker run -it -d alpine:latest
2af79e97a825c91bf374b4862b9e7c22fc22acd1598005e8bea3439805ec335d
$ sudo docker run -it -d alpine:latest
80b53b7e661d33696b65c78267fc3f067b6100799c925910db4721963e3fae0a
$ sudo docker ps
CONTAINER ID   IMAGE           COMMAND     CREATED         STATUS         PORTS     NAMES
80b53b7e661d   alpine:latest   "/bin/sh"   3 seconds ago   Up 2 seconds             bold_margulis
2af79e97a825   alpine:latest   "/bin/sh"   6 seconds ago   Up 5 seconds             recursing_taussig
As you see in the above output, even though I have created two containers using the same docker image, they both gets different ID and name.
If you want to assign a static name to the container, use --name flag like below:
sudo docker run -it -d --name ostechnix_alpine alpine:latest
The above command will create run a new Container called ostechnix_alpine in detached mode.
let us view list of the running Containers:
sudo docker ps
Sample Output:
CONTAINER ID   IMAGE           COMMAND     CREATED         STATUS         PORTS     NAMES
397111fac537   alpine:latest   "/bin/sh"   2 seconds ago   Up 2 seconds             ostechnix_alpine
80b53b7e661d   alpine:latest   "/bin/sh"   7 minutes ago   Up 7 minutes             bold_margulis
2af79e97a825   alpine:latest   "/bin/sh"   7 minutes ago   Up 7 minutes             recursing_taussig
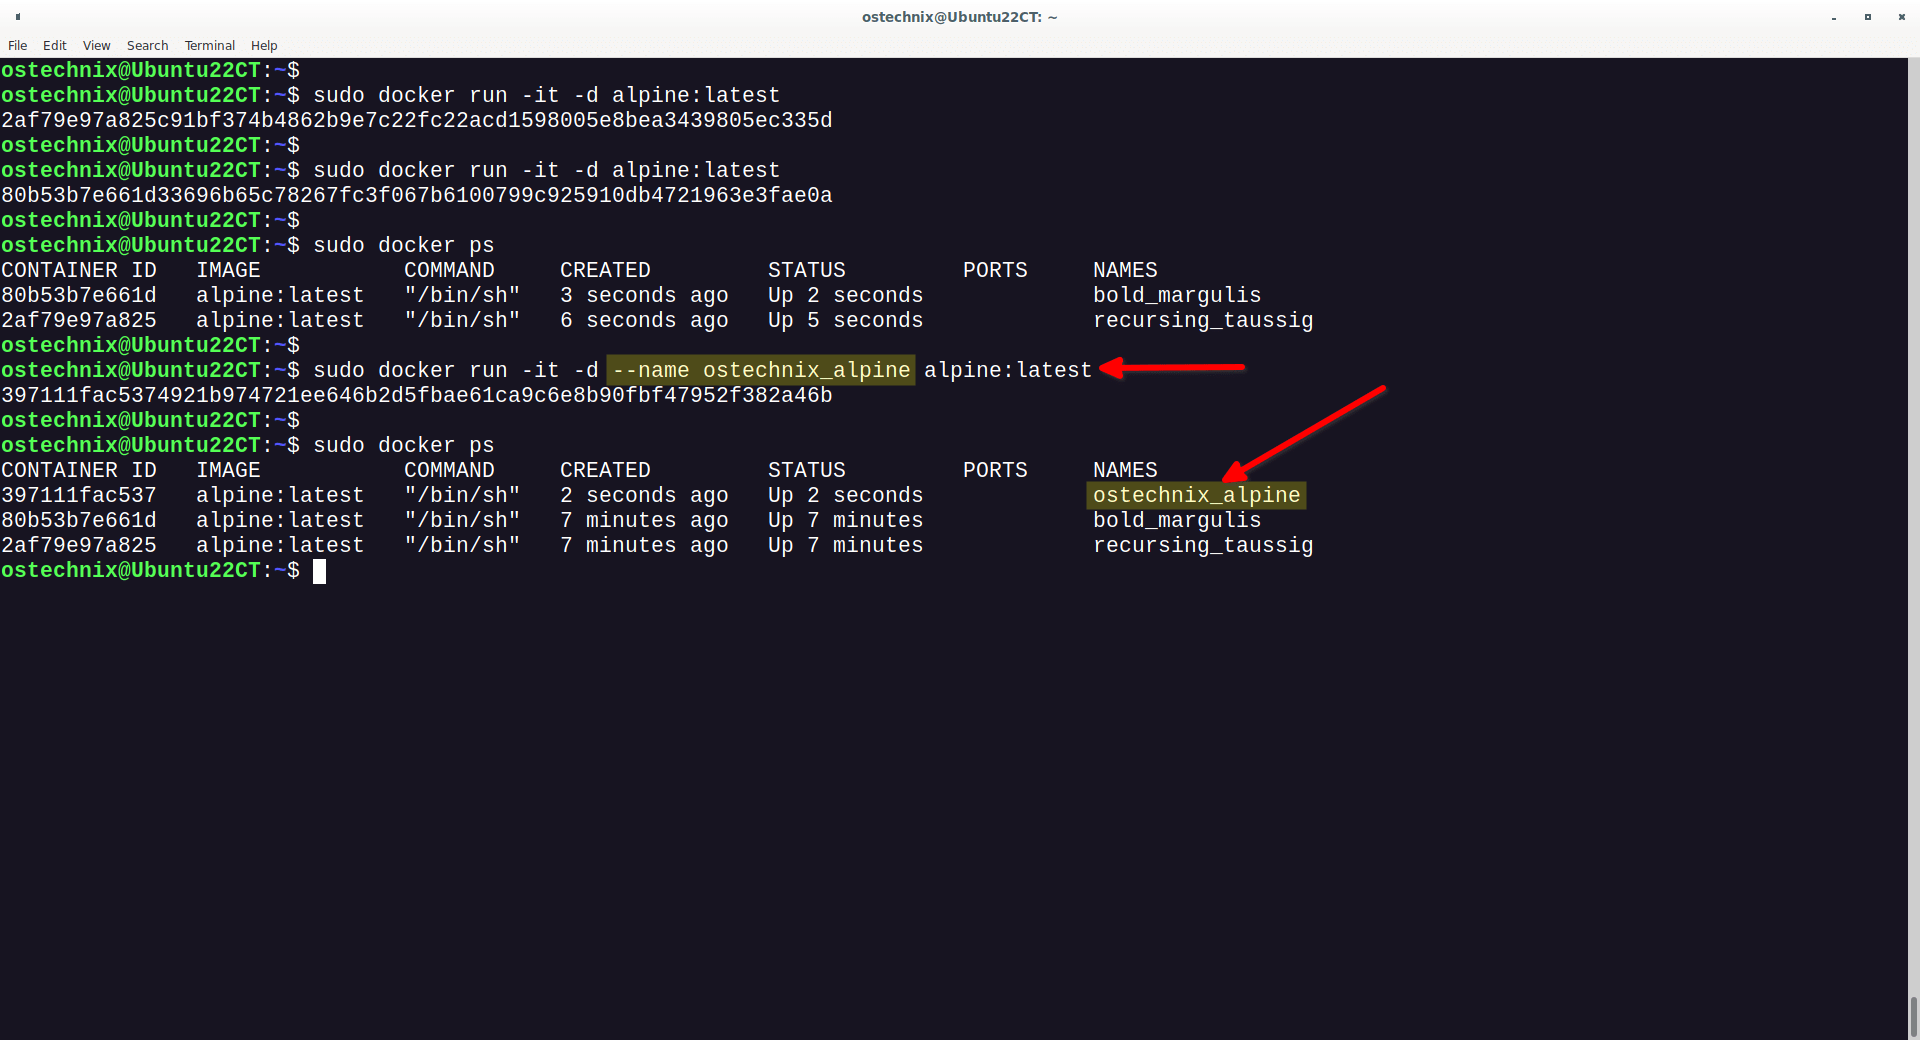
Did you notice the name of the first Container in the above output? Yes, we've assigned a custom name (i.e. ostechnix_alpine) to the Container.
Assigning custom names to containers gives us a benefit. We can easily identify what is installed in that container by looking at the name of the container name.
11. Build Custom Docker Images
Docker is not just for downloading and using the existing containers. You can create your own custom docker image as well.
Let us start an Ubuntu container:
sudo docker run -it ubuntu:latest
Now, you will be in the container's shell.
Then, install any software or do whatever you want in the container.
For example, let us install Apache web server in the container.
apt update
apt install apache2
Similarly, install and test any software of your choice in the Container.
Once you're done, detach from the container (don't exit it) and return back to the host system's shell. Please do not stop or power-off the Container. To detach from the container without stopping it, press CTRL+P followed by CTRL+Q.
From your Docker host terminal, run the following command to find the container ID:
sudo docker ps
Finally, create a Docker image of the running Container using command:
sudo docker commit 377e6d77ebb5 ostechnix/ubuntu_apache
Sample Output:
sha256:bc5e5f95ca592a3585fda2c5a40ec30c98e292046ef70390a2c3b7863cc6f7c1
Here,
377e6d77ebb5– Ubuntu container ID.ostechnix– Name of the user who created the container.ubuntu_apache– Name of the docker image created by user ostechnix.
Let us check whether the new Docker image is created or not with command:
sudo docker images
Sample Output:
REPOSITORY                TAG       IMAGE ID       CREATED          SIZE
ostechnix/ubuntu_apache   latest    bc5e5f95ca59   55 seconds ago   229MB
debian                    latest    d2780094a226   11 days ago      124MB
ubuntu                    latest    27941809078c   3 weeks ago      77.8MB
ubuntu                    20.04     20fffa419e3a   3 weeks ago      72.8MB
alpine                    latest    e66264b98777   5 weeks ago      5.52MB
As you see in the above output, the new Docker image has been created in our Docker host system from the running Container.
Now, you can create a new Container from the newly created Docker image as usual with command:
sudo docker run -it ostechnix/ubuntu_apache
12. Removing Containers
Once you're done all R&D with Docker containers, you can delete if you don't want them anymore.
To do so, First we have to stop (power off) the running Containers.
Let us find out the running containers with command:
sudo docker ps
Sample Output:
CONTAINER ID   IMAGE           COMMAND   CREATED         STATUS         PORTS     NAMES
377e6d77ebb5   ubuntu:latest   "bash"    7 minutes ago   Up 7 minutes             elegant_beaver
Stop the running container by using it's ID:
sudo docker stop 377e6d77ebb5
Now, delete the container using command:
sudo docker rm 377e6d77ebb5
Similarly, stop all containers and delete them if they are no longer required.
Deleting multiple containers one by one can be a tedious task. So, we can delete all stopped containers in one go, just run:
sudo docker container prune
Type "Y" and hit ENTER key to delete the containers.
WARNING! This will remove all stopped containers.
Are you sure you want to continue? [y/N] y
Deleted Containers:
397111fac5374921b974721ee646b2d5fbae61ca9c6e8b90fbf47952f382a46b
80b53b7e661d33696b65c78267fc3f067b6100799c925910db4721963e3fae0a
[...]
Total reclaimed space: 176B

This command will work only with latest Docker versions.
Verify if all the containers are deleted using the command:
sudo docker ps -a
If you don't see any output, all containers are deleted.
13. Removing Docker Images
Remember, first you should remove all the containers before removing all the images from which those containers were created.
Once you removed containers, you can delete the Docker images that you no longer need.
To find the list of the Downloaded Docker images:
sudo docker images
Sample Output:
REPOSITORY                TAG       IMAGE ID       CREATED          SIZE
ostechnix/ubuntu_apache   latest    bc5e5f95ca59   14 minutes ago   229MB
debian                    latest    d2780094a226   11 days ago      124MB
ubuntu                    latest    27941809078c   3 weeks ago      77.8MB
ubuntu                    20.04     20fffa419e3a   3 weeks ago      72.8MB
alpine                    latest    e66264b98777   5 weeks ago      5.52MB
As you see above, we have 5 Docker images in our host system.
Let us delete them by using their IMAGE id:
sudo docker rmi ce5aa74a48f1
Sample Output:
Untagged: ostechnix/ubuntu_apache:latest
Deleted: sha256:bc5e5f95ca592a3585fda2c5a40ec30c98e292046ef70390a2c3b7863cc6f7c1
Deleted: sha256:a8e4797160a2b2d33d8bd1bd67e008260c022b3a53fbcc198b2b74d9eae5961d
Similarly, delete all other Docker images.
To remove all stopped containers, all images, build cache, all networks, run:
sudo docker system prune -a
Be careful while using this command. It will delete all unused containers, networks, images (both dangling and unreferenced).

By default, volumes are not removed to prevent important data from being deleted even if there is currently no container using the volume.
If you want to delete everything including the Volumes, use the --volumes flag.
sudo docker system prune -a --volumes
Docker Troubleshooting
Docker won't let you to delete the Docker images if they are used by any running or stopped containers.
For example, when I try to delete a Docker Image with ID b72889fa879c, from one of my old Ubuntu server. I got the following error:
Error response from daemon: conflict: unable to delete b72889fa879c (must be forced) - image is being used by stopped container dde4dd285377
This is because the Docker image that you want to delete is currently being used by another Container.
So, let us check the running Container using command:
sudo docker ps
Sample Output:

Oops! There is no running container.
Let us again check for all containers (running and stopped) with command:
sudo docker ps -a
Sample Output:

As you see, there are still some stopped containers are using one of the Docker images. So, let us delete all of the containers.
Example:
sudo docker rm 12e892156219
Similarly, remove all containers as shown above using their respective container's ID.
Once you deleted all containers, finally remove the Docker images.
Example:
sudo docker rmi b72889fa879c
That's it. Now verify if there are any other Docker images in the host with command:
sudo docker images
You will now probably won't have any docker images.
Conclusion
In this comprehensive getting started with Docker tutorial, we explained Docker basics such as creating, running, searching, removing containers and also building own Docker image from a Container. We also explained how to delete Docker containers and images when they are no longer necessary.
Hope you a got the basic idea about Docker usage.
Suggested Read:
- How To Automatically Update Running Docker Containers
- ctop – A Commandline Monitoring Tool For Linux Containers
- Portainer – An Easiest Way To Manage Docker
- PiCluster – A Simple, Web-based Docker Management Application
- Dockly - Manage Docker Containers From Terminal
- Convert Docker Run Commands Into Docker-Compose Files
For more details, refer the official resource links given below or drop a comment in the comment section below.
Resources:
1 comment
Great tutoriel for quick but complete overview of docker usages, especially for operationnal team.
Unlikely, it seems there are some use of ‘container’ word instead of ‘image’.
For exemple, in section 3, about command line argument : ‘ubuntu:latest’ is not (nor will be) the container name, but it is the image name and tag.
You don’t talk about the docker build command and the dockerfile, hope this will be in a separate tutorial.
Thanks for your tutorials, they are all damn simple to understand !
Its always a pleasure to read.