phpMyAdmin is a free, open source web-based database management tool written using PHP programming language. It allows the database administrators to manage single or multiple database servers either from a local or remote system using a web browser. Using phpMyAdmin, we can create, delete, rename, edit databases, tables, fields, and also we can directly execute any SQL commands. Currently, It supports MySQL, MariaDB, and Drizzle database servers. In this tutorial, we will see how to install phpMyAdmin with LAMP stack in Ubuntu 16.04 lTS server.
Table of Contents
Install phpMyAdmin with LAMP stack in Ubuntu 16.04 LTS
First, Setup LAMP stack in your Ubuntu 16.04 LTS server as described in the following link.
phpMyAdmin is available in the default repositories of Ubuntu operating system. Once LAMP stack is installed and ready, install phpMyAdmin as shown below:
sudo apt-get install phpmyadmin

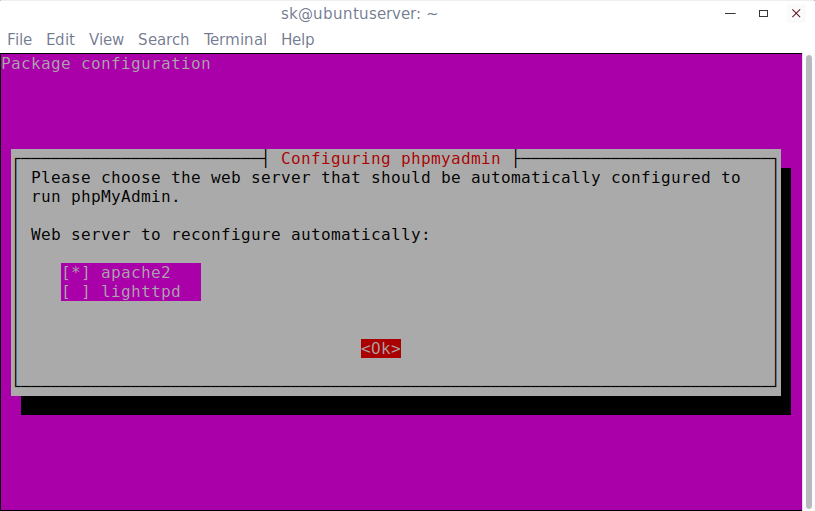
During installing, you'll be asked to choose the web server that should be automatically configured to run phpMyAdmin. In our case, it is Apache webserver.
Choose apache2 and click OK.
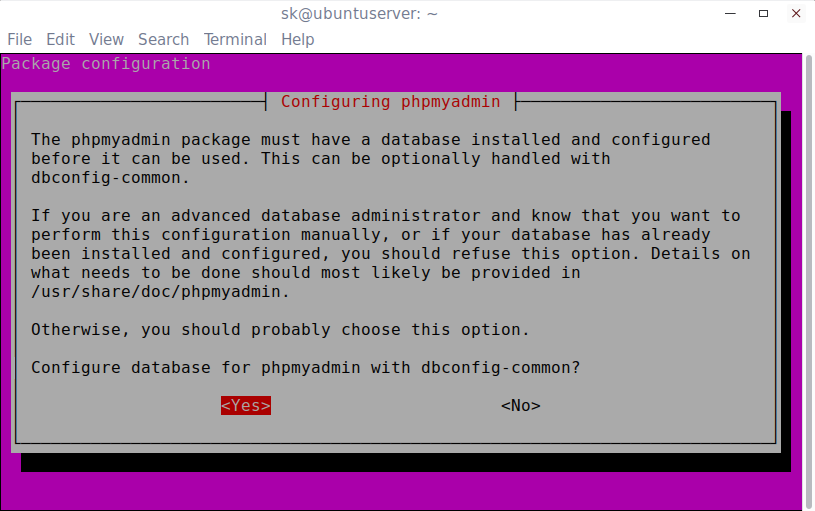
Select Yes and hit ENTER to configure database for phpmyadmin with dbconfig-common.
Enter a password for phpmyadmin to register with the database server. If left blank, a random password will be generated.
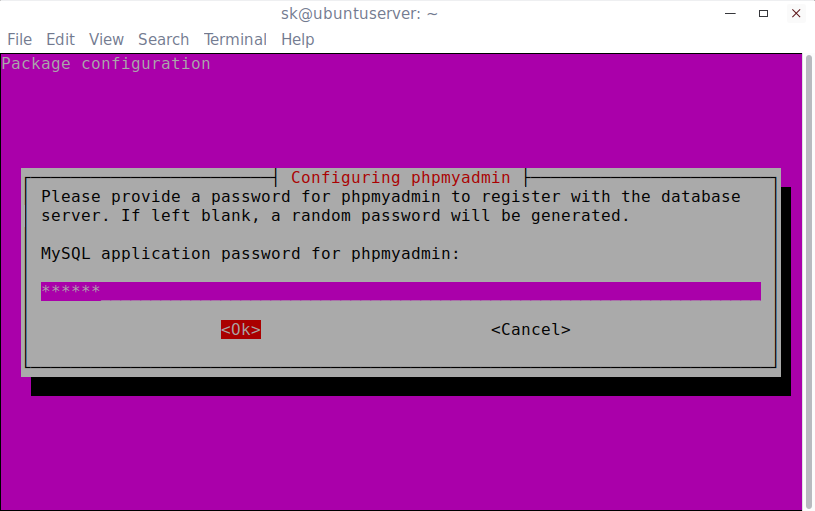
Re-enter the password to confirm:

Oops! You might be encountered with the following error message:
An error occurred while installing the database:

ERROR 1045 (28000): Access denied for user 'root'@'localhost' (using
password: NO) . Your options are:
* abort - Causes the operation to fail; you will need to downgrade,
   reinstall, reconfigure this package, or otherwise manually intervene
   to continue using it. This will usually also impact your ability to
   install other packages until the installation failure is resolved.
* retry - Prompts once more with all the configuration questions
   (including ones you may have missed due to the debconf priority
   setting) and makes another attempt at performing the operation.
* retry (skip questions) - Immediately attempts the operation again,
   skipping all questions. This is normally useful only if you have
   solved the underlying problem since the time the error occurred.
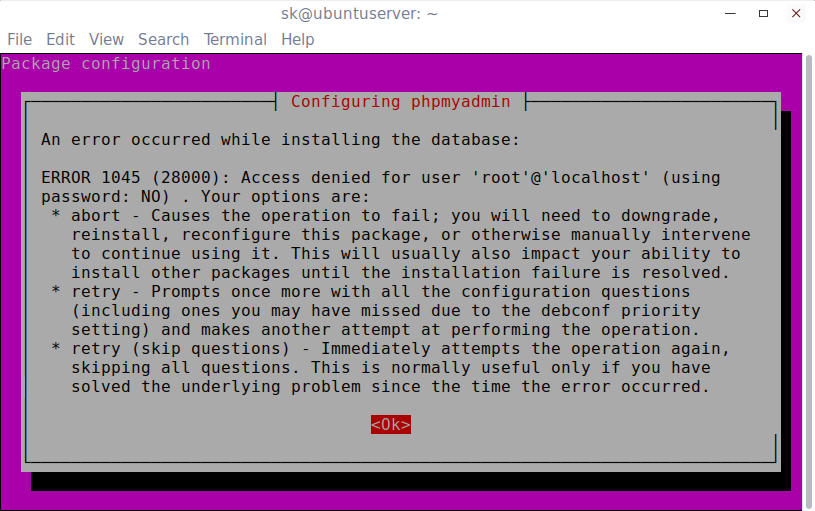
To fix this issue, click OK and abort the phpMyAdmin installation.

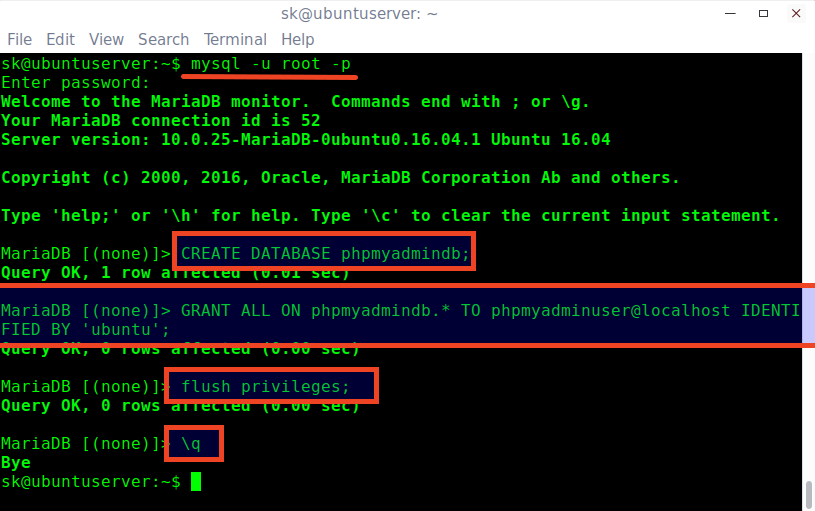
Log in to MariaDB or MySQL prompt with root user using command:
mysql -u root -p
Create a new database and database user for phpMyAdmin and grant full permission to the phpmyadmin user.
For the purpose of this tutorial, I am going to create a database called "phpmyadmindb", and database user "phpmyadminuser" with password "ubuntu". Please use a strong password which is very hard to guess in the production environment.
Welcome to the MariaDB monitor. Commands end with ; or \g.
Your MariaDB connection id is 52
Server version: 10.0.25-MariaDB-0ubuntu0.16.04.1 Ubuntu 16.04

Copyright (c) 2000, 2016, Oracle, MariaDB Corporation Ab and others.

Type 'help;' or '\h' for help. Type '\c' to clear the current input statement.

MariaDB [(none)]> CREATE DATABASE phpmyadmindb;
Query OK, 1 row affected (0.01 sec)

MariaDB [(none)]> GRANT ALL ON phpmyadmindb.* TO phpmyadminuser@localhost IDENTIFIED BY 'ubuntu';
Query OK, 0 rows affected (0.00 sec)

MariaDB [(none)]> flush privileges;
Query OK, 0 rows affected (0.00 sec)

MariaDB [(none)]> \q
Bye
Then, edit phpmyadmin/config-db.php file:
sudo nano /etc/phpmyadmin/config-db.php
Replace the database name, database user and its password with the values that you have created earlier.
[...]

$dbuser='phpmyadminuser';
$dbpass='ubuntu';
$basepath='';
$dbname='phpmyadmindb';
$dbserver='localhost';
$dbport='';
$dbtype='mysql';
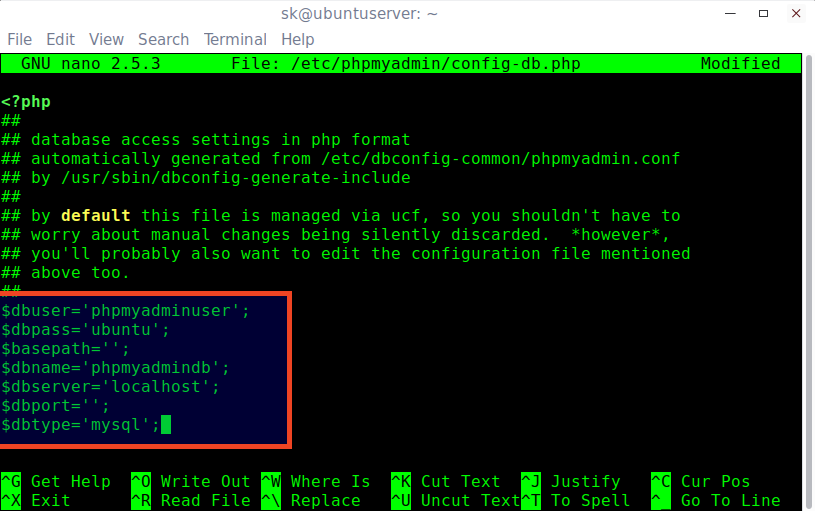
Save and close the file.
Next, you must install the following php modules. Otherwise, you will get an error message that says:
The mbstring extension is missing. Please check your PHP configuration.
To install php modules, run:
sudo apt-get install php-mbstring php7.0-mbstring php-gettext
Then, edit Apache webserver config file:
sudo nano /etc/apache2/apache2.conf
Add the following line at the end:
Include /etc/phpmyadmin/apache.conf
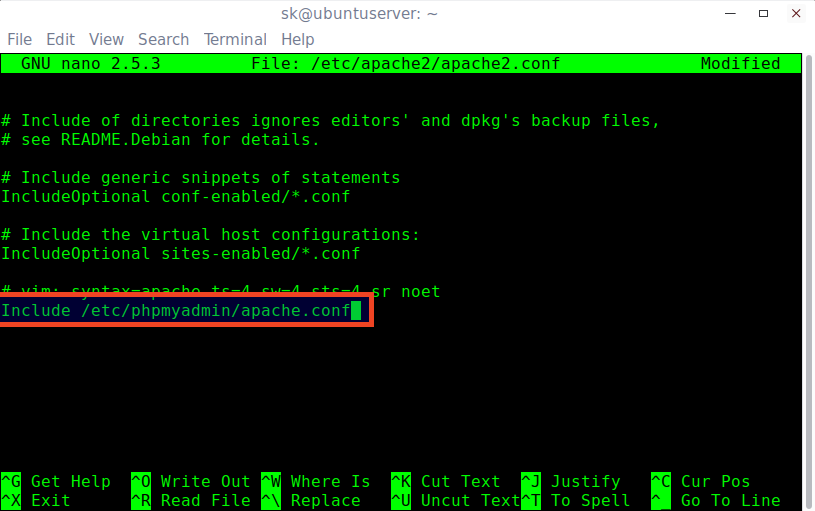
Save and close the file. Restart apache service to take effect the changes.
sudo systemctl restart apache2
Access phpMyAdmin dashboard
Open up the web browser and navigate to http://IP-Address/phpmyadmin.
You should see the following screen. Enter the MariaDB/MySQL 'root' user name and its password.
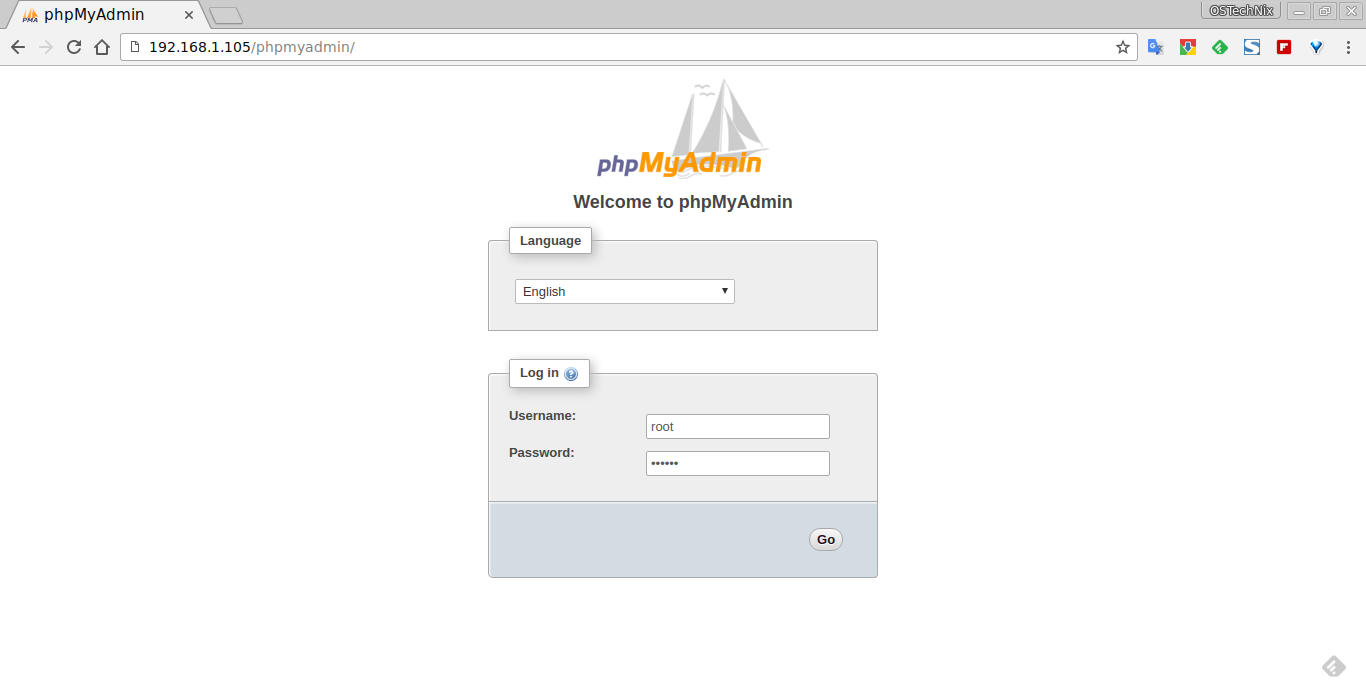
Congrats! This is how the phpMyAdmin dashboard looks like.

From here, you can create, delete, rename, and manage the databases easily.
You might want to download our free guides related to database, and PHP.
Hope this helps. If you find this guide useful, share it on your social networks and support OSTechNix.
For more details about phpMyAdmin, refer:
Cheers!
Thanks for stopping by!
How can I benefit from this blog:
- Subscribe to our Email Newsletter : Sign Up Now
- Download free E-Books and Videos : OSTechNix on TradePub
- Connect with us: Facebook | Twitter | Google Plus | LinkedIn | RSS feeds
Have a Good day!!
7 comments
To get the latest updates for PHPmyadmin
#PHPMyAdmin (16.04)
sudo apt-add-repository -y ppa:nijel/phpmyadmin
Thank you to give better installation & confirmation process.. (for phpmyadmin)
Or give better Configuration process of phpmyadmin..
You’re welcome, mate!
Thank You sir. It Worked for me. 🙂
Great it worked !
Here at this step some user may need to ensure mysql password policy
following commands may be helpful–(only if password not accepted)
SHOW VARIABLES LIKE ‘validate_password%’;
SET GLOBAL validate_password_length = 6;
SET GLOBAL validate_password_number_count = 0;
Your password does not satisfy the current policy requirements—stack overflow(search)