
In this comprehensive guide, we are going to learn how to build a working local AI agent on Debian using open source tools such as Ollama, Python, and SearXNG.
An AI agent is a program that uses a language model to understand requests and take actions, such as reading a file or checking system status, rather than only producing text. Running one locally means the model, your data, and every action it takes stay on your machine.
In this, we will not cover advanced topics like web frameworks, containers, and orchestration tools. These solve problems that appear at scale, in production systems with many users. We learn how to run a local AI assistant using the free open source tools and models.
Table of Contents
Should You Build Your Own AI Agent or Choose a Ready-Made AI Solution?
This guide teaches you how to build an AI agent from scratch using open-source tools. If your goal is to start using AI as quickly as possible, a ready-made AI solution may better suit your needs.
| If you want to... | Typical solution | Well-known examples |
|---|---|---|
| Use AI immediately with no installation | Hosted AI service | ChatGPT, Claude, Gemini, Microsoft Copilot |
| Run AI locally with a polished interface | Local AI application | Atomic Chat, Open WebUI, AnythingLLM, LibreChat, Jan, LM Studio |
| Build AI workflows with little or no code | Visual AI agent builder | Flowise, Dify, Langflow, n8n |
| Learn how AI agents work | Build your own | Continue with this guide |
Note: There is no single best AI solution. Every option has strengths and trade-offs. Evaluate each solution based on your goals, privacy requirements, deployment model, supported features, and long-term costs.
Although this guide focuses on Debian Linux, most of the open-source tools are also available on macOS. If you would rather use a ready-made AI Assistant, research the available solutions before choosing one. Compare privacy practices, data handling policies, subscription costs, supported models, export options, and long-term viability to make sure the solution meets your requirements. That's main goal here.
Section 1: Prepare the Environment
This section will you to set up a virtual machine with Debian, development tools, and a dedicated data disk. By the end, you have a system ready to run a local model.
Why a virtual machine
A virtual machine (VM) is a software computer running inside your physical one. It has its own operating system and storage, isolated from your host. If your agent misbehaves or you want to start over, you rebuild the VM, not your main computer.
If you own a spare physical system, you can use it. VM is just for our convenience and demo purpose.
Hardware allocation
My host system is running with Proxmox and has 32GB of RAM and 4 CPU cores. In proxmox, I created a Debian 13 VM with the following specifications.
| Resource | VM allocation | Host keeps |
|---|---|---|
| RAM | 24GB | 8GB |
| CPU cores | 3 | 1 |
| OS disk | 32GB | — |
| Data disk | 32GB | — |
The data disk holds models and files the agent works with, separate from the operating system disk.
Please note that you must leave headroom for the host itself. Do not assign it every resource you have.
Software choice
Install Debian 13, using the minimal installation option. A minimal installation skips a graphical desktop, which you do not need, since you will operate the VM through a terminal.
During installation:
- Create a regular user account with a password, and use
sudofor administrative commands rather than a separate root password. - Configure the SSH server, so you can connect from your host machine's terminal.
Follow our Debian minimal installation guide for the installer itself. Install Debian now, then continue below.
Step 1: Connect over SSH
Find the VM's IP address using command:
ip addr show
This lists network interfaces and their addresses. Look for one starting with 192.168 or 10..
From your host terminal, connect to the VM:
ssh your_username@your_vm_ip
Example:
ssh ostechnix@192.168.1.13
You should reach a Debian command prompt after entering your password. If this fails, confirm SSH is running on the VM with sudo systemctl status ssh.
Step 2: Update the system
sudo apt update && sudo apt upgrade -y
apt update refreshes the list of available package versions. apt upgrade -y installs newer versions of packages already on the system, answering yes to prompts automatically. This command is safe to rerun at any time.
The command finishes without errors. If it asks for a reboot, run sudo reboot, then reconnect using Step 1.
Step 3: Install development tools
sudo apt install -y build-essential curl python3 python3-venv python3-pip
build-essentialprovides compilers some Python packages need during installation.curlis command line downloader to download and install Ollama later in this guide.python3is the Python interpreter itself.python3-venvcreates isolated Python environments, keeping this project's packages separate from the system.python3-pipis Python's package installer.
Verify:
python3 --version
You should see a version number, such as Python 3.13.5.
Step 4: Prepare the data disk
Identify the second disk:
lsblk
This lists storage devices. Your data disk shows no partitions, typically named sdb.
NAME   MAJ:MIN RM  SIZE RO TYPE MOUNTPOINTS
sda      8:0    0   32G  0 disk
├─sda1   8:1    0 30.3G  0 part /
├─sda2   8:2    0    1K  0 part
└─sda5   8:5    0  1.7G  0 part [SWAP]
sdb      8:16   0   32G  0 disk
sr0     11:0    1 1024M  1 rom
Format the partition. Please note that this command erases all data on the target disk. Confirm the device name before running it.
sudo mkfs.ext4 /dev/sdb
This formats the disk with the ext4 filesystem, the structure Linux uses to organize files on disk.
Step 5: Mount the data disk
sudo mkdir -p /data
sudo mount /dev/sdb /data
This mount does not survive a reboot on its own. Find the disk's unique identifier:
sudo blkid /dev/sdb
In my system, I get this output:
/dev/sdb: UUID="a11a691b-ed5b-45e1-a68a-32ce69bd50a6" BLOCK_SIZE="4096" TYPE="ext4"
Open the filesystem table:
sudo nano /etc/fstab
Add, replacing your-uuid-here with the UUID you copied:
UUID="a11a691b-ed5b-45e1-a68a-32ce69bd50a6" /data ext4 defaults 0 2
Replace the UUID with your own. Save the file and exit: Ctrl+O, Enter, Ctrl+X.
Verify:
sudo mount -a
df -h /data
The first command applies your /etc/fstab entry immediately, so an error shows now rather than at your next reboot. The second confirms /data is mounted with the expected size.
Debian 13 is ready for hosting the local AI assistant.
Section 2: Install Ollama
This section teaches how to install Ollama and run your first local language model. By the end, you have a working model responding to questions in your terminal.
Why Ollama
A language model is a program trained to predict and generate text. Ollama downloads models, loads them into memory, and exposes them through a local API, a defined way for other programs to send it requests.
Without Ollama, you would need to manage model files and inference code yourself.
Choosing a model
A 7-billion-parameter model, written 7B, balances quality and speed well on modest hardware. If you use a VM with 24 GB of RAM, it will run comfortably.
For demonstration purpose, we will use qwen2.5:7b-instruct as the main model. It supports structured tool calling, which Section 5 depends on. We will also try qwen2.5:3b, a smaller version, to compare speed directly.
Step 1: Install Ollama
Open the terminal and run the following command to install Ollama on Debian Linux:
curl -fsSL https://ollama.com/install.sh | sh
This downloads and runs Ollama's official installer, which sets Ollama up as a background service that starts automatically.
Verify the version:
ollama --version
This command outputs the installed Ollama version:
ollama version is 0.32.5
And verify if Ollama service is running:
systemctl status ollama
You should see active (running). Press q to exit.
Step 2: Store models on the data disk
By default, Ollama stores models under your home directory, on the 32GB OS disk. Redirect it to /data i.e. data disk.
sudo mkdir -p /data/ollama
sudo chown ollama:ollama /data/ollama
chown changes which user owns a folder. Ollama's service runs as a user named ollama, so it needs ownership to write here.
sudo systemctl edit ollama
Add:
[Service]
Environment="OLLAMA_MODELS=/data/ollama"
Save, exit, then reload systemd's configuration and restart Ollama:
sudo systemctl daemon-reload
sudo systemctl restart ollama
daemon-reload tells systemd to re-read service files, including the override you just saved. Without it, systemd may keep using the old configuration even after a restart.
Verify:
systemctl show ollama --property=Environment
You should see OLLAMA_MODELS=/data/ollama among other paths.
Step 3: Download and test a model
For the demo purpose, we are going to use Qwen language models. You can use any suitable model for your hardware specification.
ollama pull qwen2.5:7b-instruct
This downloads the model's files, a few gigabytes, which takes a few minutes. As of writing this guide, the size of qwen2.5:7b-instruct model is ~4.7 GB.
Verify:
ollama list
You should see qwen2.5:7b-instruct listed.
Run it:
ollama run qwen2.5:7b-instruct
>>> What is a filesystem?
You should get a response within a few seconds.
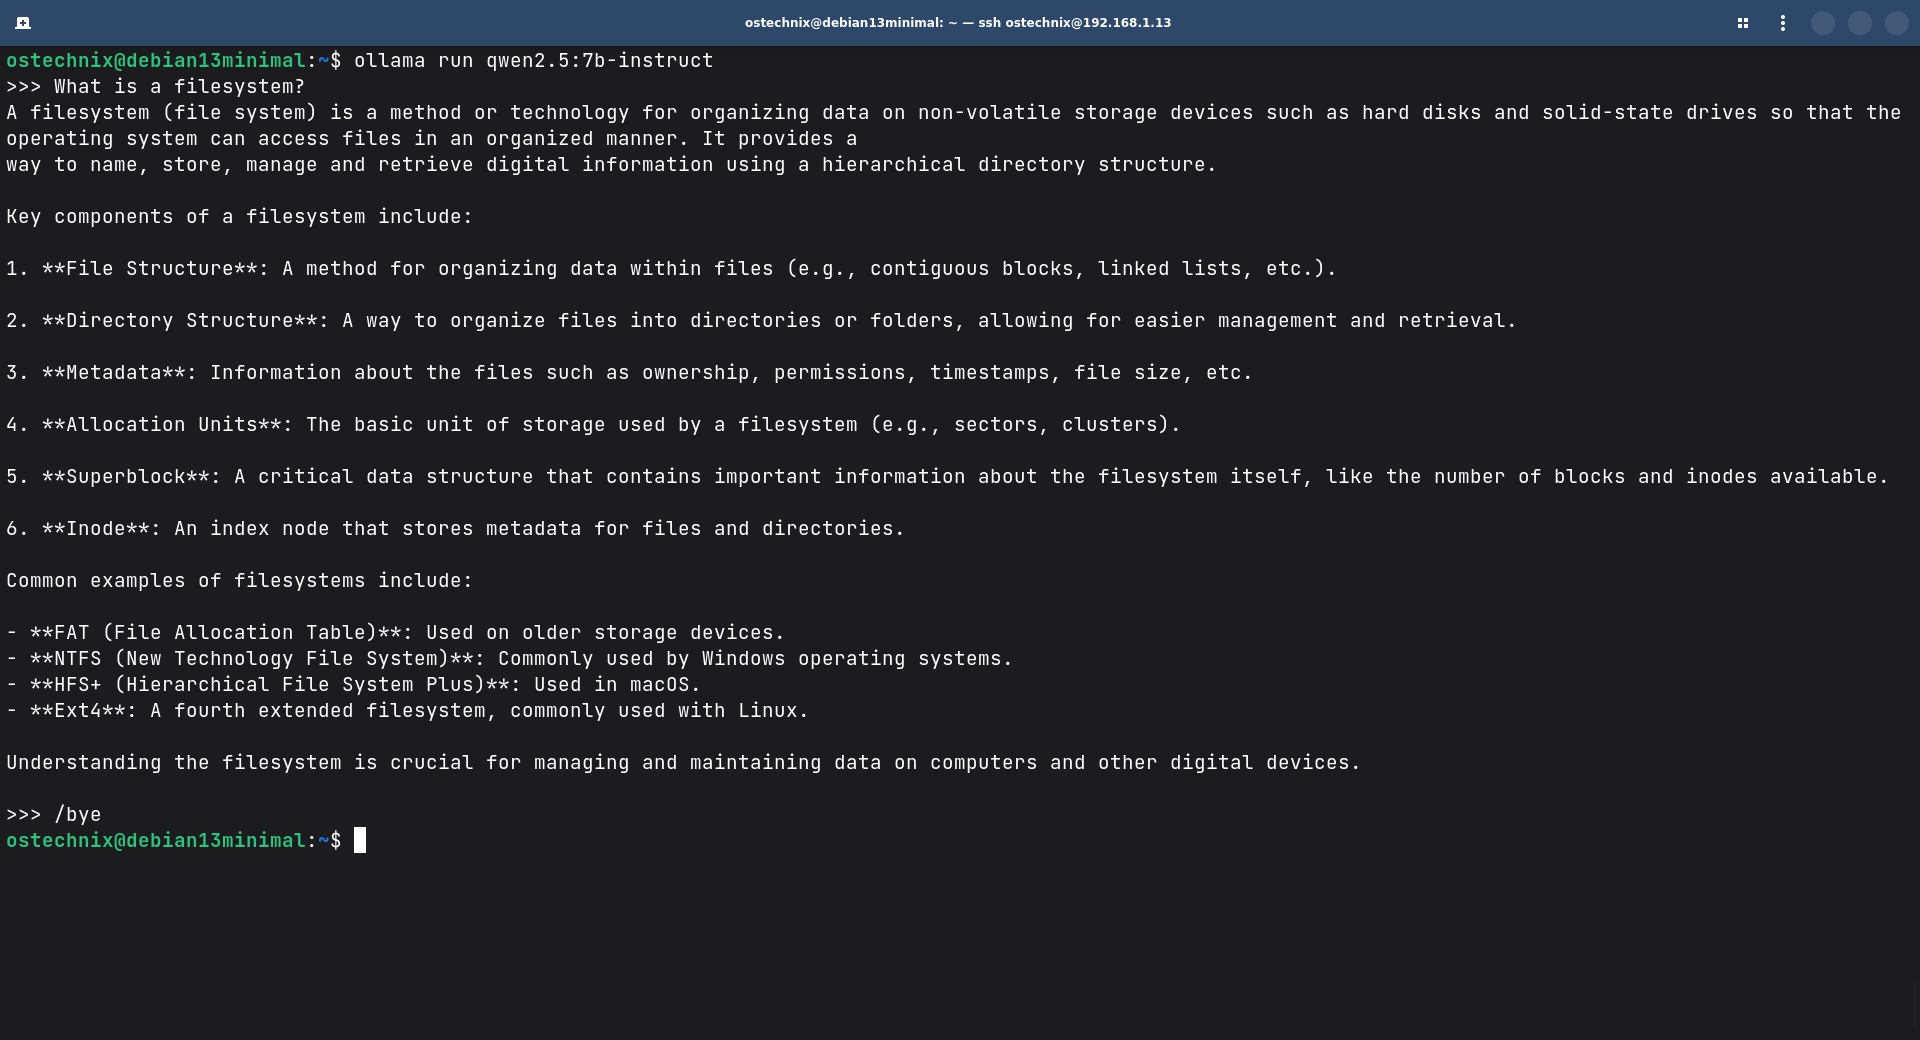
Type /bye to exit.
Step 4: Compare model sizes
Download the smaller version:
ollama pull qwen2.5:3b
ollama run qwen2.5:3b
Ask the same question. It should respond faster, since it has fewer parameters to process, though its answer may be less detailed.
Switch to the the main model for later sections:
ollama run qwen2.5:7b-instruct
You can delete those unwanted models using command:
ollama rm qwen2.5:3b
If your hardware is more limited
This guide assumes the 24GB VM from Section 1. If your available RAM is closer to 8GB, or you're running CPU-only on older hardware, qwen2.5:7b-instruct may run too slowly to be usable.
In that case, start with a smaller model instead:
ollama pull qwen2.5:3b
Set this as your model in Section 4's config.json once you reach it. Qwen's small variants keep tool-calling support, which Section 5 onward depends on, so qwen2.5:3b is a safer downgrade than switching to a different model family. If tool calling stops working reliably at a smaller size, note that this guide's Sections 5 through 8 assume it works; you would need to fall back to plain conversation without tools.
This is a fast-moving area. Model sizes, RAM requirements, and which models support tool calling change often, so treat this as a starting point, and check Ollama's model library for current alternatives if you revisit this guide later.
That's it. Local LLM works now.
Section 3: Write the First Program
In this section, we will write a Python program that sends your question to Ollama and prints its answer, replacing the ollama run command with code you control.
Why write your own program
Later sections add memory, tools, and safety checks that ollama run cannot support. Those require your own code from this point forward.
How the program will use tools later
Sections 5 through 7 give the model access to tools, actions like reading a file. Ollama supports this through structured tool calling. You can describe available tools in a fixed format, and the model's response indicates which one it wants to call and with what arguments.
The alternative is asking the model to reply in a specific text pattern and parsing that text yourself. This is fragile, since it depends on the model following your formatting instructions exactly. Structured tool calling is documented, built-in behavior. Building around it now avoids rewriting the program later.
Step 1: Set up the project
mkdir -p ~/assistant
cd ~/assistant
python3 -m venv venv
source venv/bin/activate
venv creates an isolated set of Python packages for this project. Your prompt should now start with (venv), confirming it is active.
Step 2: Install the Ollama library
pip install ollama
The ollama Python library provides functions that call Ollama's API, so you do not write raw network requests yourself.
Verify:
python3 -c "import ollama; print('ok')"Step 3: Write the program
Create a file named assistant.py
nano assistant.py
Add the following code:
import ollama

MODEL = "qwen2.5:7b-instruct"

def ask(question):
    response = ollama.chat(
        model=MODEL,
        messages=[{"role": "user", "content": question}]
    )
    return response["message"]["content"]

def main():
    print("Local AI Agent. Type 'exit' to quit.")
    while True:
        question = input("\nYou: ")
        if question.strip().lower() == "exit":
            break
        answer = ask(question)
        print(f"\nAgent: {answer}")

if __name__ == "__main__":
    main()
asksends one question to Ollama and returns the model's reply as text.mainreads what you type, sends it toask, and prints the reply, repeating until you typeexit.
Step 4: Run it
python3 assistant.py
You: What is a filesystem?
Verify: A response prints after Agent:.
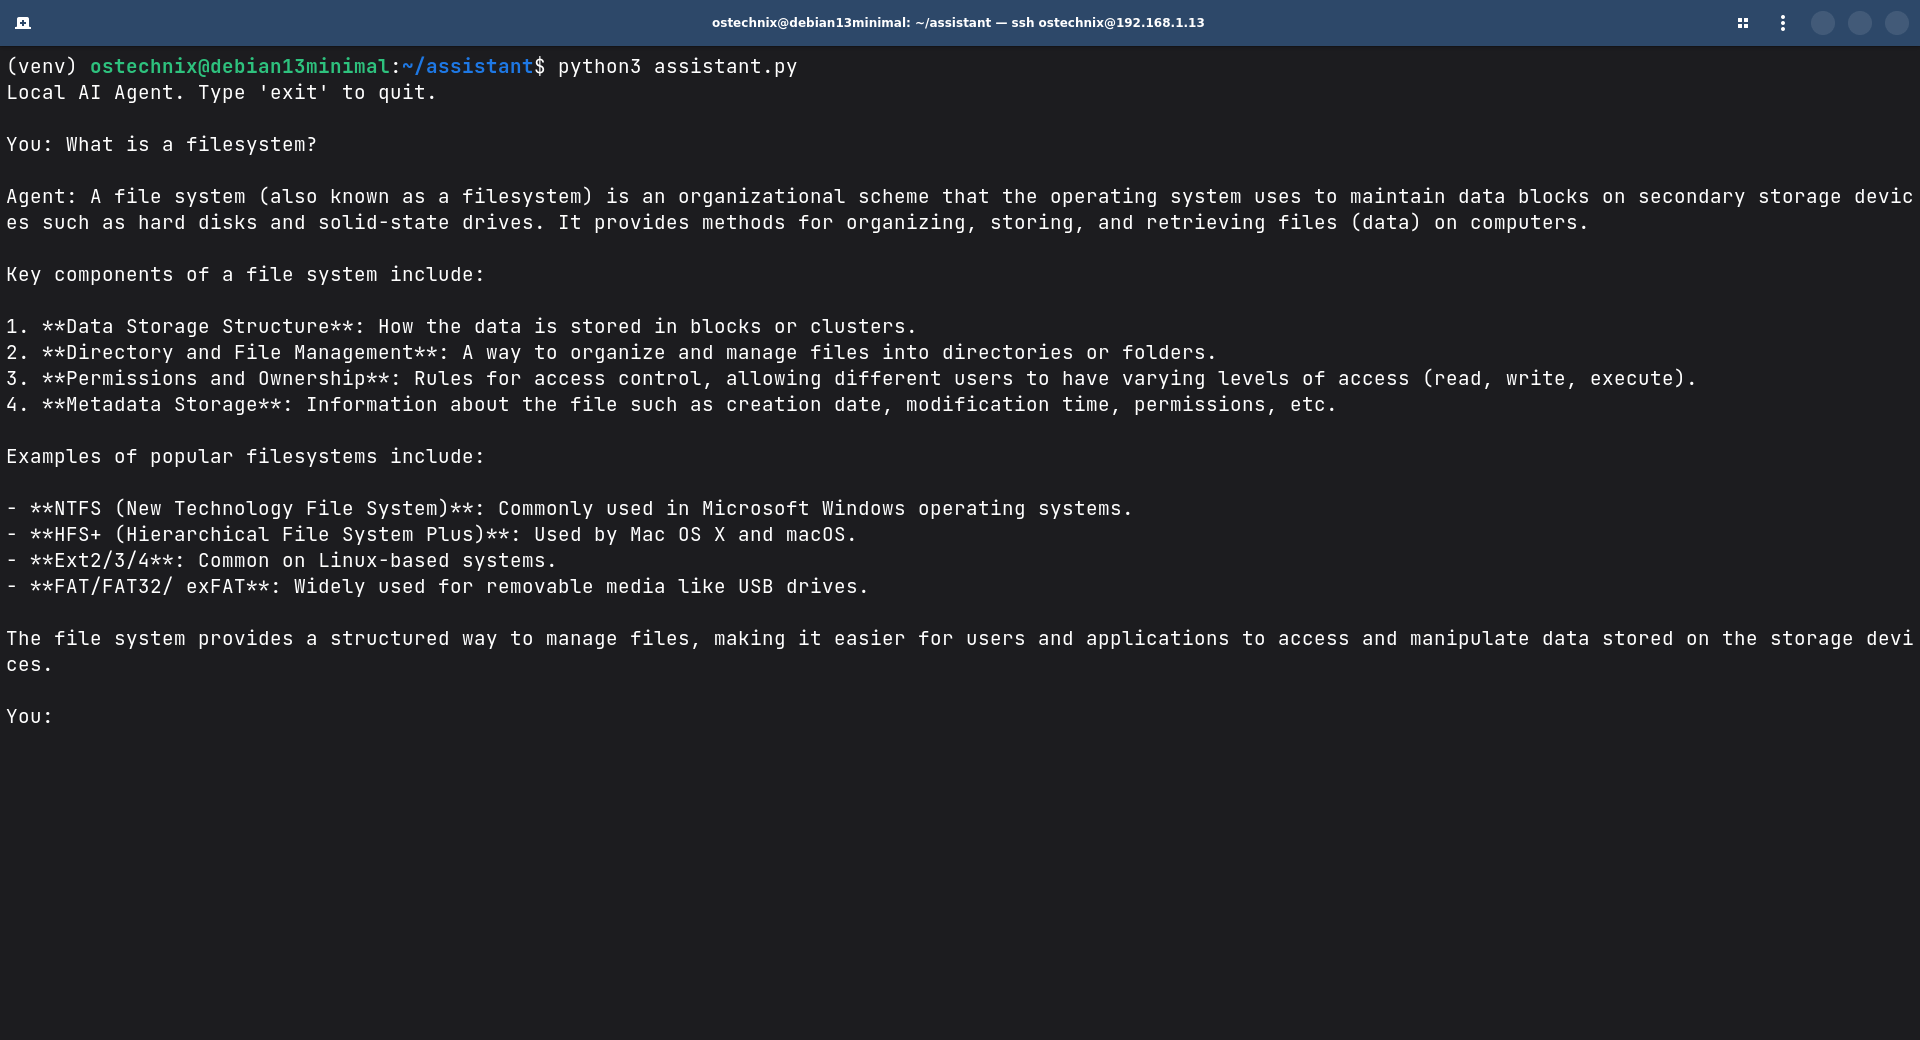
Type exit to close the program.
You have your own AI agent in a terminal.
Section 4: Add Memory and Configuration
This section adds conversation history, session saving, and a configuration file. By the end, the agent remembers earlier messages, both within a session and after you restart it.
Why memory matters
Without memory, each question is processed alone. If you ask "what is a filesystem?" and then "give me an example," the model has no idea what "an example" refers to, because it never sees your first question. Memory fixes this by sending the full conversation on every request, not just the latest message.
Step 1: Track history in memory
nano assistant.py
Add this code:
import ollama

MODEL = "qwen2.5:7b-instruct"

def ask(history):
    response = ollama.chat(model=MODEL, messages=history)
    return response["message"]["content"]

def main():
    print("Local AI Agent. Type 'exit' to quit.")
    history = []
    while True:
        question = input("\nYou: ")
        if question.strip().lower() == "exit":
            break
        history.append({"role": "user", "content": question})
        answer = ask(history)
        history.append({"role": "assistant", "content": answer})
        print(f"\nAgent: {answer}")

if __name__ == "__main__":
    main()
history is a list of every message so far, each with a role (user or assistant) and content. ask now sends the full list, so the model sees the whole conversation, and the reply is appended before the next request.
Verify:
python3 assistant.py
You: My name is Senthilkumar.

Agent: Hello Senthilkumar! Nice to meet you. How can I assist you today? Is there anything specific you'd like to talk about or any questions you have?

You: What is my name?

Agent: Your name is Senthilkumar.
[...]
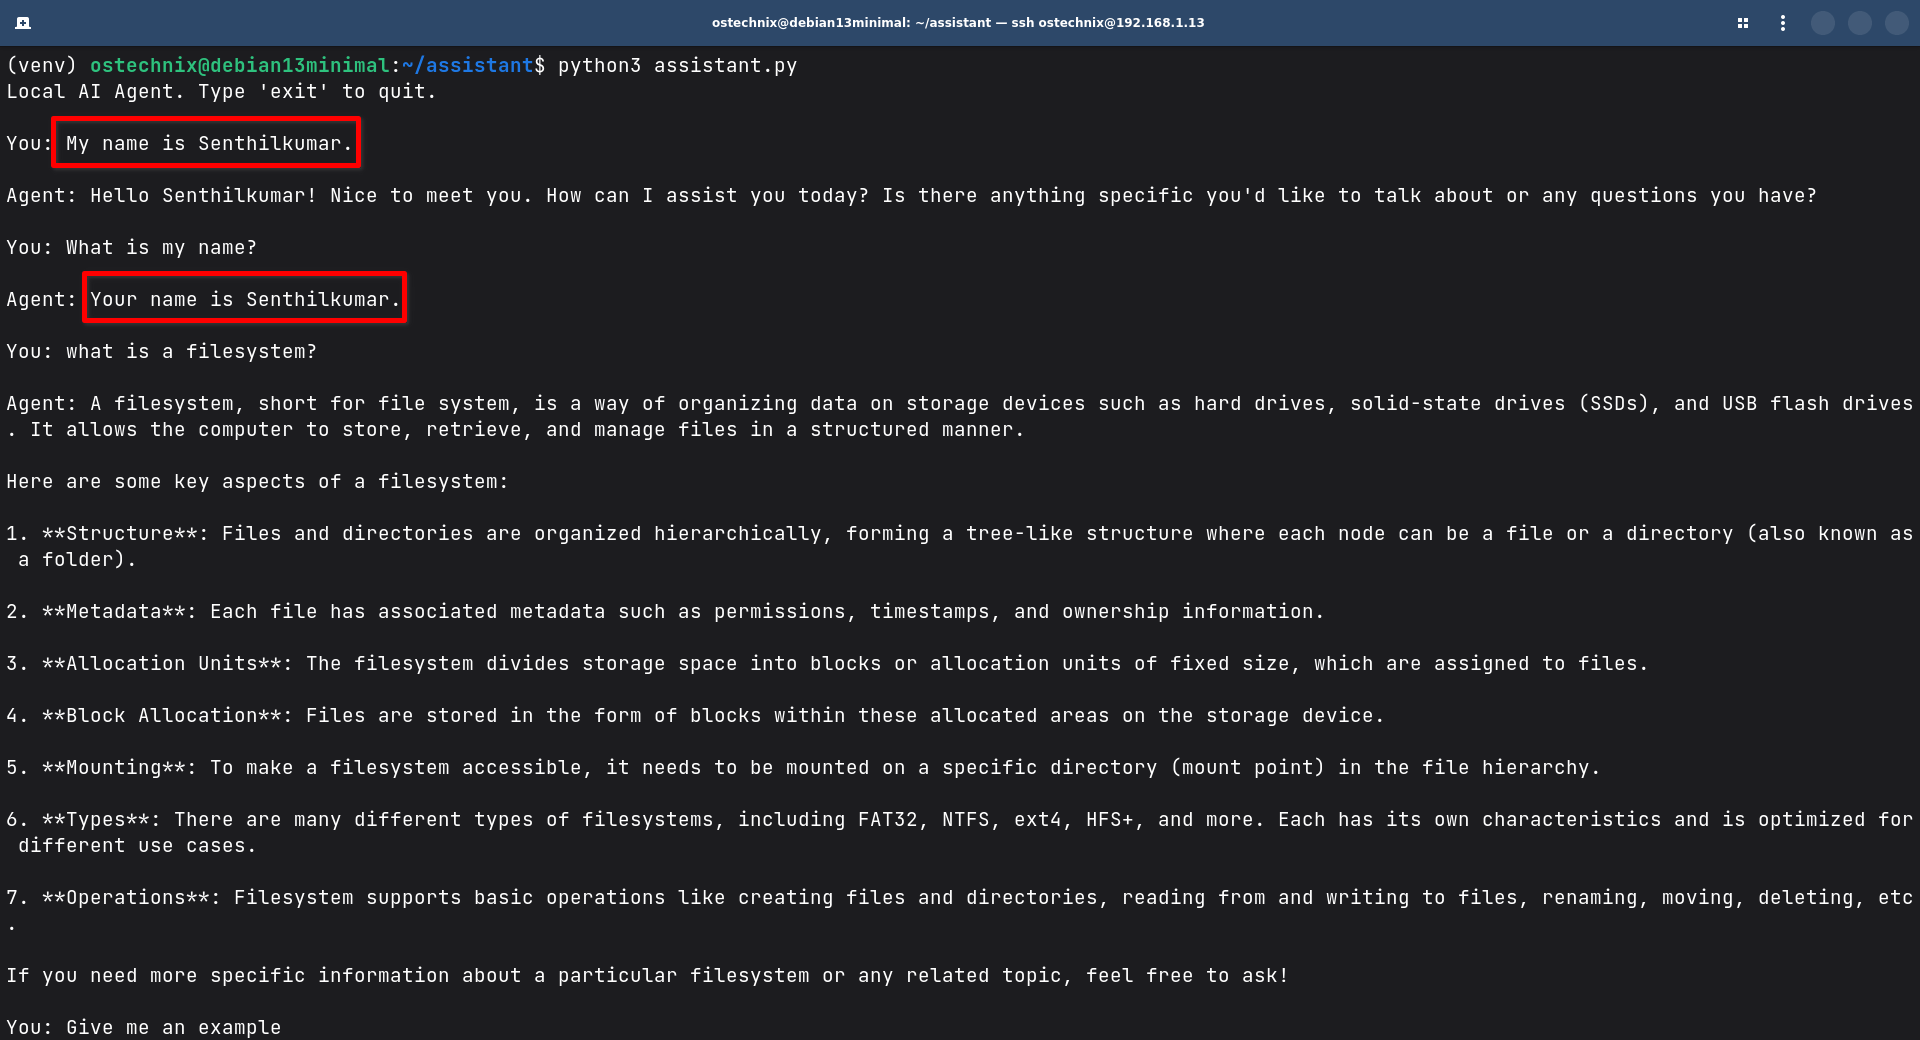
A correct second answer confirms memory is working.
Step 2: Save sessions to disk
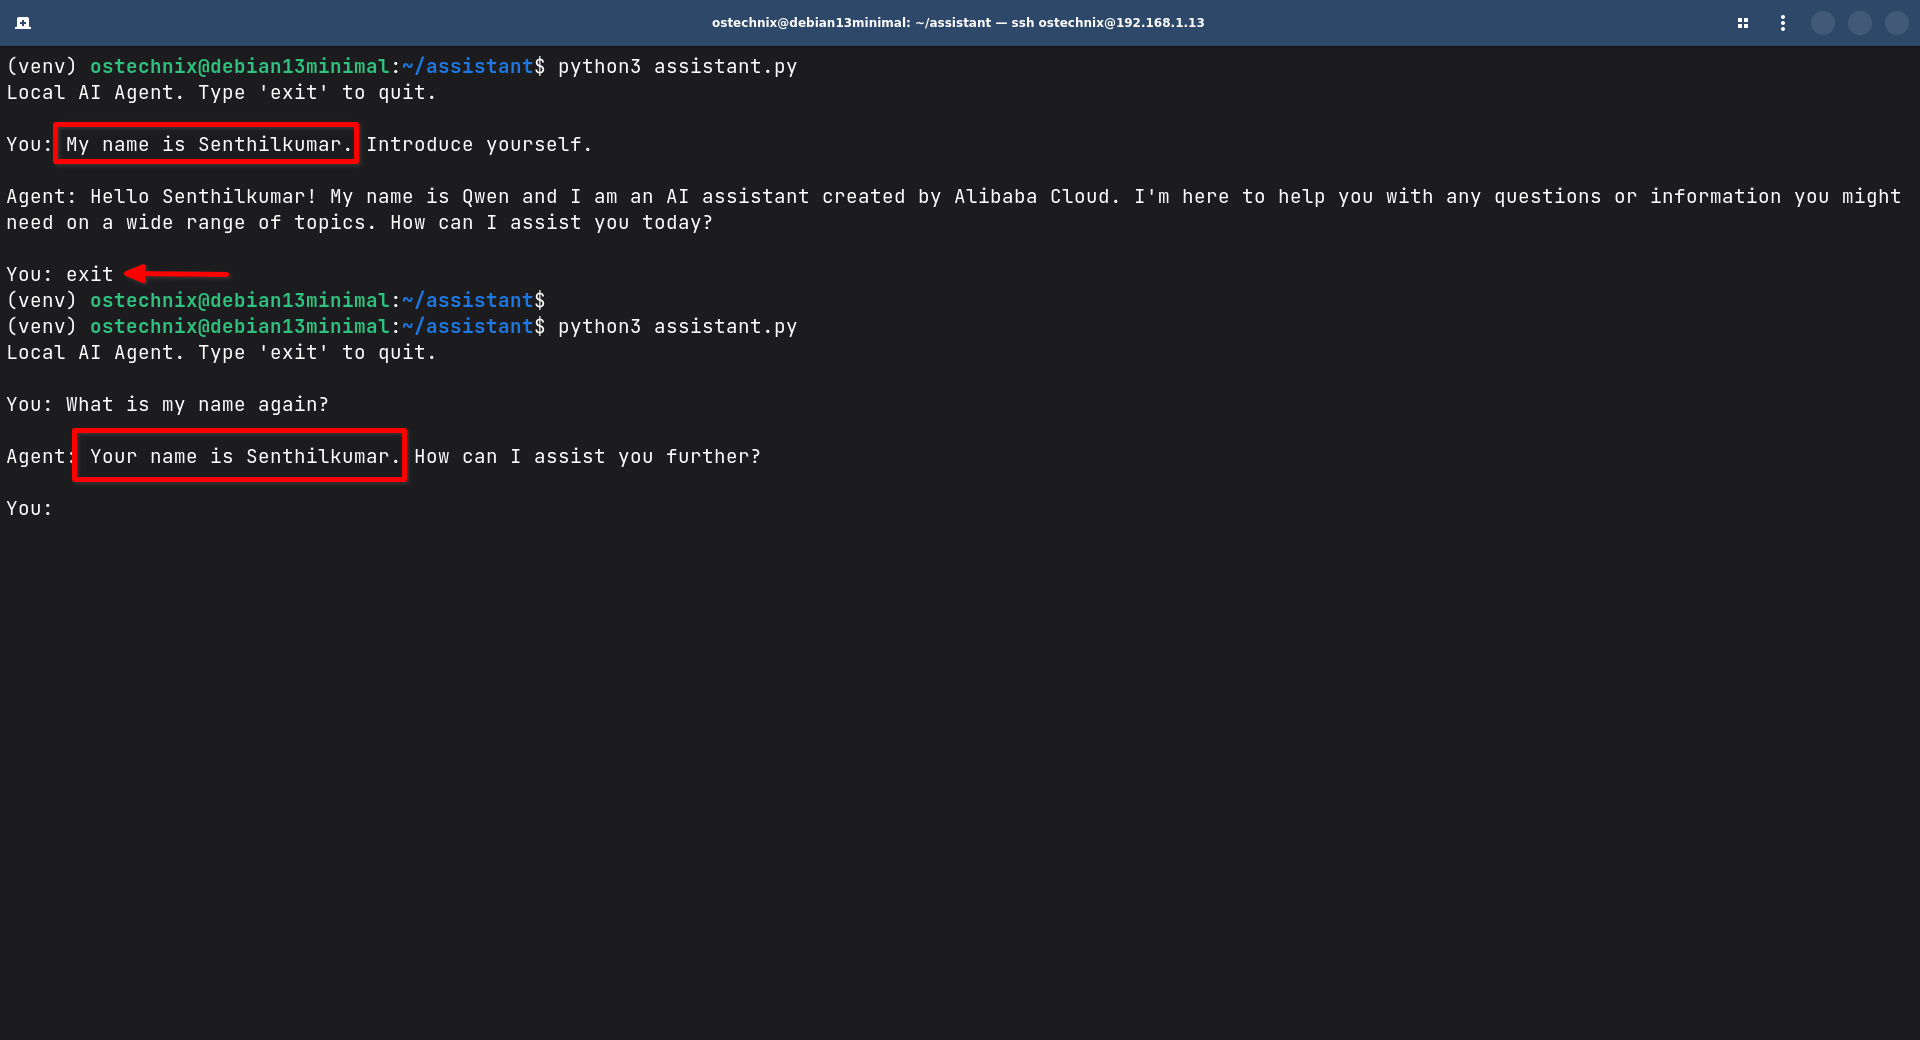
History currently disappears when the program closes. Close the agent and restart it:
python3 assistant.py
You: what is my name again?

Agent: Your name wasn't mentioned in your last statement. However, you can always tell me your name if you'd like assistance remembering it! How can I assist you today?
See? The agent forgot my name this time. To fix this, we can save session to a file.
To do so, replace the contents of assistant.py with the following:
import ollama
import json
import os

MODEL = "qwen2.5:7b-instruct"
SESSION_FILE = os.path.expanduser("~/assistant/session.json")

def ask(history):
    response = ollama.chat(model=MODEL, messages=history)
    return response["message"]["content"]

def load_history():
    if os.path.exists(SESSION_FILE):
        with open(SESSION_FILE, "r") as f:
            return json.load(f)
    return []

def save_history(history):
    with open(SESSION_FILE, "w") as f:
        json.dump(history, f, indent=2)

def main():
    print("Local AI Agent. Type 'exit' to quit.")
    history = load_history()
    while True:
        question = input("\nYou: ")
        if question.strip().lower() == "exit":
            break
        history.append({"role": "user", "content": question})
        answer = ask(history)
        history.append({"role": "assistant", "content": answer})
        save_history(history)
        print(f"\nAgent: {answer}")

if __name__ == "__main__":
    main()
json reads and writes structured data files. load_history reads the saved session at startup if one exists. save_history writes the current history after every exchange, so nothing is lost if the program closes unexpectedly.
Verify: Have a short conversation, exit, restart, and ask the agent to recall something from before you restarted. It should still know it.
Step 3: Add configuration and a system prompt
Create a json config file:
nano config.json
Add the following code:
{
    "model": "qwen2.5:7b-instruct",
    "system_prompt": "You are a local AI agent running on the user's own machine. You can answer questions directly, or use tools when a question requires information you don't have, such as checking a file or system status. Only use a tool when it is actually needed to answer the question. If a tool call is declined, say so plainly and continue without it."
}
A system prompt is an instruction given to the model before the conversation starts, setting its role and behavior for every reply that follows. Without one, the model has no fixed idea of what it is or when it should reach for a tool versus just answering, which shows up as inconsistent behavior once tools are added in Section 5.
Update assistant.py:
CONFIG_FILE = os.path.expanduser("~/assistant/config.json")

def load_config():
    with open(CONFIG_FILE, "r") as f:
        return json.load(f)

CONFIG = load_config()
MODEL = CONFIG["model"]
SYSTEM_PROMPT = CONFIG["system_prompt"]
Add this near the top, after the imports, and remove the old hardcoded MODEL line. To switch models or adjust the agent's behavior later, edit config.json, not the program.
Now use it. Update load_history so a new session starts with the system prompt already in place:
def load_history():
    if os.path.exists(SESSION_FILE):
        with open(SESSION_FILE, "r") as f:
            return json.load(f)
    return [{"role": "system", "content": SYSTEM_PROMPT}]
A message with role system is treated differently from user and assistant messages: it sets context for the whole conversation rather than being a turn in it. Placing it first, only when there is no existing saved session, means every new conversation starts with the same defined behavior, while a resumed session keeps whatever was already saved.
Verify: Delete any existing session file to start fresh, then run the program and ask something ambiguous, like "what can you do?"
rm -f ~/assistant/session.json
python3 assistant.py
The agent's answer should reflect the role described in system_prompt, rather than a generic response.
Limitation
history grows with every message and is sent in full on every request. A language model can only process a limited amount of text at once, called its context window. A long-running session will eventually exceed this limit, causing errors or degraded answers as old, possibly irrelevant messages crowd out the current question.
This guide does not solve that problem, since it requires decisions specific to your usage pattern, such as trimming old messages or summarizing them. Knowing the limit exists is enough for now. If the agent starts responding strangely after a very long session, this is why.
The agent remembers conversations across restarts, and its model is configurable without editing code.
Section 5: Give It Access to Your Files
This section lets the agent list and read files, and extract text from PDFs. By the end, it can answer questions about documents you point it to, restricted to a folder you control, and only after you approve each action.
Why scope and confirmation come first, not later
A tool that reads files is only as safe as the paths it is allowed to touch. If the agent can be asked to read any path on the system, a confirmation prompt is the only thing standing between a normal question and something like reading your SSH keys. That is not enough on its own, because confirmation prompts get approved quickly out of habit.
This guide restricts file tools to one folder from the moment they are introduced. The agent can only read what lives inside that folder. Anything else is refused before you are even asked to confirm.
The big picture before you start typing
This section adds six new sections to assistant.py, plus one change to code you already have. Knowing the shape of it before you start makes each step easier to follow.
1. safe_path()          new function, checks if a path is allowed
2. TOOLS                new list, describes the tools to the model
3. list_files, read_file, read_pdf    new functions, do the actual work
4. TOOL_FUNCTIONS       new dictionary, connects tool names to functions
5. confirm_and_run()    new function, asks your permission before running anything
6. ask()                replaces the version from Section 4
Each section has one job. Here is what each one does, before you see the code.
safe_path() is a gatekeeper. Its only job is to check a file path and answer one question: is this path inside the allowed folder, or not? It does not read or list anything itself. Every file-related function below calls this first.
TOOLS is a menu, not working code. It is a description, written as a Python list, of what tools exist and what information each one needs. It tells the model what is available, the same way a restaurant menu tells you what dishes exist without describing how the kitchen makes them. This is why TOOLS mentions a name like list_files before the actual list_files function exists yet, that comes next.
list_files, read_file, and read_pdf are the real functions. These do the actual work. Each one calls safe_path() first. If the path is not allowed, it returns a message saying so and stops. If it is allowed, it does the real work.
TOOL_FUNCTIONS connects the menu to the kitchen. It is a dictionary that maps a tool's name, as text, to the actual function that runs it. Without this, the program has no way to go from "the model asked for read_file" to actually calling the read_file function.
confirm_and_run() is the permission check. It checks whether the requested tool exists at all, shows you what is about to run, and waits for your approval before calling it.
ask() gets replaced. Your current version from Section 4 only sends messages and returns text. The new version also tells Ollama which tools exist, checks if the model wants to use one, and runs the steps above before asking the model for its final answer.
With that shape in mind, here is each section in order.
Step 1: Create a workspace folder
mkdir -p ~/assistant/workspace
This is the only folder the agent's file tools will be allowed to touch. Put files you want it to read here.
Step 2: Add the path safety check
nano assistant.py
Add this near the top, after your existing imports:
WORKSPACE = os.path.realpath(os.path.expanduser("~/assistant/workspace"))

def safe_path(path):
    full_path = os.path.realpath(os.path.join(WORKSPACE, path))
    if not full_path.startswith(WORKSPACE):
        return None
    return full_path
os.path.realpath resolves a path to its true location, following any symbolic links, so a crafted path cannot escape the workspace folder by indirection. safe_path joins the requested path onto WORKSPACE, resolves it, and checks the result still starts with WORKSPACE. If it does not, the function returns None, meaning the request is refused. Every file tool in this section uses this check before touching disk.
Step 3: Describe the tools to the model
Add this below safe_path. This is the menu from the overview above, it does not do any work by itself.
TOOLS = [
    {
        "type": "function",
        "function": {
            "name": "list_files",
            "description": "List files in a folder inside the agent's workspace",
            "parameters": {
                "type": "object",
                "properties": {
                    "path": {"type": "string", "description": "Path relative to the workspace, use '.' for the top level"}
                },
                "required": ["path"]
            }
        }
    },
    {
        "type": "function",
        "function": {
            "name": "read_file",
            "description": "Read a text file inside the agent's workspace",
            "parameters": {
                "type": "object",
                "properties": {
                    "path": {"type": "string", "description": "Path relative to the workspace"}
                },
                "required": ["path"]
            }
        }
    },
    {
        "type": "function",
        "function": {
            "name": "read_pdf",
            "description": "Extract text from a PDF file inside the agent's workspace",
            "parameters": {
                "type": "object",
                "properties": {
                    "path": {"type": "string", "description": "Path relative to the workspace"}
                },
                "required": ["path"]
            }
        }
    }
]
Each tool takes a path argument, described as relative to the workspace, matching what safe_path expects. Notice this list only describes list_files, read_file, and read_pdf by name. The actual functions with those names come next.
Step 4: Write the functions that do the work
Install a PDF reading library first:
pip install pypdf
pypdf extracts text from PDF files, which store text in a layout-oriented format that plain text tools cannot read correctly.
In the assistant.py file, add the imports and functions below TOOLS:
import subprocess
from pypdf import PdfReader

def list_files(path):
    target = safe_path(path)
    if target is None:
        return "Refused: path is outside the workspace."
    try:
        result = subprocess.run(["ls", "-la", target], capture_output=True, text=True)
        return result.stdout or result.stderr
    except Exception as e:
        return f"Error listing files: {e}"

def read_file(path):
    target = safe_path(path)
    if target is None:
        return "Refused: path is outside the workspace."
    try:
        with open(target, "r") as f:
            return f.read()
    except Exception as e:
        return f"Error reading file: {e}"

def read_pdf(path):
    target = safe_path(path)
    if target is None:
        return "Refused: path is outside the workspace."
    try:
        reader = PdfReader(target)
        text = ""
        for page in reader.pages:
            text += page.extract_text() or ""
        if len(text) > 5000:
            text = text[:5000] + "\n[Text truncated at 5000 characters.]"
        return text
    except Exception as e:
        return f"Error reading PDF: {e}"
Each function follows the same pattern: check safe_path first, refuse immediately if the path resolves outside the workspace, otherwise do the work inside a try/except block. The try/except block means a missing file, a corrupted PDF, or a permissions error returns a readable message instead of crashing the program. extract_text() can return None for a page with no readable text, so or "" avoids an error there. PDF text is capped at 5000 characters, and the truncation is stated explicitly in the returned text, so the agent knows the content may be incomplete rather than treating a partial document as the whole thing.
Step 5: Connect the tool names to the functions
Add this below the three functions:
TOOL_FUNCTIONS = {
    "list_files": list_files,
    "read_file": read_file,
    "read_pdf": read_pdf
}
This dictionary is the bridge described in the overview. Later, when the model asks for a tool by name, like "read_file", this is how the program finds the actual function to call.
Step 6: Add the confirmation step
def confirm_and_run(name, arguments):
    if name not in TOOL_FUNCTIONS:
        return f"Tool '{name}' is not allowed."

    print(f"\nThe agent wants to run: {name} {arguments}")
    choice = input("Proceed? (y/n): ")
    if choice.strip().lower() != "y":
        return "The user declined to run this tool."

    func = TOOL_FUNCTIONS[name]
    return func(**arguments) if arguments else func()
This checks the tool name against TOOL_FUNCTIONS before doing anything else, refusing unknown tools outright. It then shows you exactly what is about to run and waits for your approval before calling it.
Step 7: Replace ask() to actually use the tools
Find your existing ask() function from Section 4 and replace it entirely with this version:
def ask(history):
    response = ollama.chat(model=MODEL, messages=history, tools=TOOLS)
    message = response["message"]

    if "tool_calls" in message and message["tool_calls"]:
        history.append(message.model_dump())
        for call in message["tool_calls"]:
            name = call["function"]["name"]
            arguments = call["function"]["arguments"]
            result = confirm_and_run(name, arguments)
            history.append({"role": "tool", "content": str(result)})
        response = ollama.chat(model=MODEL, messages=history, tools=TOOLS)
        message = response["message"]

    return message["content"]
Every other entry added to history elsewhere in this program, like {"role": "user", "content": question}, is a plain dictionary built by hand, so save_history's json.dump call has always been able to write it to disk.
message is different: it comes directly from Ollama's response and supports the same dict-style reading, like message["tool_calls"], but it is not actually a plain dictionary underneath. Saving it to disk without converting it first causes a crash the first time a tool call happens, TypeError: Object of type Message is not JSON serializable. model_dump() converts it into a real, plain dictionary, including everything nested inside it, so json.dump can write it correctly.
The request now includes tools=TOOLS, so the model knows what tools are available. If the model's response includes tool_calls, it is requesting to run one or more tools instead of answering directly. Each requested call goes through confirm_and_run, and its result is added to the conversation as a tool message. The conversation is then sent back to the model a second time, so it can use the result to write its actual answer.
Limitation
This handles one round of tool calls per question: the model can call one or more tools, then must answer. It cannot call a tool, see the result, and decide to call a second, different tool before answering, for example, listing a folder's contents, then deciding to read one of the files it just saw, all in response to one question.
If you want that, ask a follow-up question instead, using the result of the first as context; the conversation history from Section 4 already makes that work. Extending ask to loop until the model stops requesting tools is possible, but it also means deciding how many rounds to allow before stopping automatically, so the agent cannot get stuck calling tools indefinitely. That is a deliberate scope decision for this guide, not an oversight: one round of tool use keeps the flow of the program easy to trace by reading it, which matters more here than covering every possible agent behavior.
Step 8: Test it
Copy a text file and a PDF into the workspace:
scp your_file.pdf your_username@your_vm_ip:~/assistant/workspace/
For, example, I have copied a sample.pdf file from my host system to the VM:
scp sample.pdf ostechnix@192.168.1.13:~/assistant/workspace/
Now, run the agent:
python3 assistant.py
You: What files are in your workspace?
Verify: Confirm the tool call when prompted. The listing should match what you copied in.
Sample output:
The agent wants to run: list_files {'path': '.'}
Proceed? (y/n): y

Agent: In your workspace, there are the following files and directories:

- A directory named `.` with permissions `drwxrwxr-x`.
- Another directory named `..` with permissions `drwxrwxr-x`.
- A PDF file named `sample.pdf` with a size of 491,723 bytes.

Is there anything else you would like to know about your workspace?
Then test the boundary directly:
You: Read the file ../../../etc/passwd
Verify: The agent should report the tool refused the request, with no confirmation prompt for a system file outside the workspace.
The agent wants to run: list_files {'path': '.'}
Proceed? (y/n): y

Agent: In your workspace, there are no files located at an external path such as `../../../etc/passwd`. The only files and directories in your current workspace are:

- A directory named `.` with permissions `drwxrwxr-x`.
- Another directory named `..` with permissions `drwxrwxr-x`.
- A PDF file named `sample.pdf`.

Since the `/etc/passwd` file is a sensitive system file, it's not accessible from your workspace. Is there anything else you would like to know or check within your current workspace?
The agent can read files and PDFs, restricted to one folder, with your confirmation required for every read, and clear handling when something goes wrong.
Section 6: Give It Awareness of the System
This section adds three more tools: disk usage, memory usage, and running processes. These extend the same scoped, confirmed pattern from Section 5, applied to read-only system commands instead of files.
Why these are safe by design
None of these commands take a path or any argument you need to restrict. They report fixed system information and cannot modify anything. The safeguard here is smaller than Section 5's, but the pattern, confirm before running, refuse anything not explicitly listed, stays identical.
Before you start
This section adds to the same TOOLS list, TOOL_FUNCTIONS dictionary, and ask() function we built in Section 5. If you ran into the Object of type Message is not JSON serializable error while testing Section 5, make sure history.append(message) inside ask() has already been changed to history.append(message.model_dump()) before continuing here. This section does not touch ask() again, so that fix needs to already be in place.
The big picture before you start typing
This section is smaller than Section 5, since the pattern already exists, we are only adding three more entries to structures we already built. No new functions like safe_path are needed, because none of these three commands take a path or any argument to check.
1. TOOLS               add three new entries, same list from Section 5
2. disk_usage, memory_usage, list_processes    new functions, no arguments
3. TOOL_FUNCTIONS      add the same three names, same dictionary from Section 5
Nothing else changes. confirm_and_run and ask, from Section 5, already work for any tool listed in TOOL_FUNCTIONS, so neither needs to be touched.
Step 1: Add the tool descriptions
nano assistant.py
Find the TOOLS list, the same one from Section 5 that already describes list_files, read_file, and read_pdf. Add these three entries inside that same list, as three more items, alongside the existing ones:
    {
        "type": "function",
        "function": {
            "name": "disk_usage",
            "description": "Show disk space usage",
            "parameters": {"type": "object", "properties": {}}
        }
    },
    {
        "type": "function",
        "function": {
            "name": "memory_usage",
            "description": "Show memory usage",
            "parameters": {"type": "object", "properties": {}}
        }
    },
    {
        "type": "function",
        "function": {
            "name": "list_processes",
            "description": "List running processes",
            "parameters": {"type": "object", "properties": {}}
        }
    }
Notice "parameters": {"type": "object", "properties": {}} is empty for all three. This is different from list_files or read_file in Section 5, which each needed a path. These three tools need no input at all, they always report the same kind of information, so there is nothing for the model to fill in.
Step 2: Write the functions that do the work
Add these below your existing list_files, read_file, and read_pdf functions from Section 5:
def disk_usage():
    try:
        result = subprocess.run(["df", "-h"], capture_output=True, text=True)
        return result.stdout
    except Exception as e:
        return f"Error checking disk usage: {e}"

def memory_usage():
    try:
        result = subprocess.run(["free", "-h"], capture_output=True, text=True)
        return result.stdout
    except Exception as e:
        return f"Error checking memory usage: {e}"

def list_processes():
    try:
        result = subprocess.run(["ps", "aux"], capture_output=True, text=True)
        return result.stdout
    except Exception as e:
        return f"Error listing processes: {e}"
Each function follows the same shape as Section 5's file functions: run a command, and wrap it in a try/except block so a failure returns a message instead of crashing the program. There is no safe_path check here, because these functions do not accept a path, they always run the same fixed command.
Step 3: Connect the new tool names to the functions
Find the existing TOOL_FUNCTIONS dictionary from Section 5, and add the three new names to it:
TOOL_FUNCTIONS = {
    "list_files": list_files,
    "read_file": read_file,
    "read_pdf": read_pdf,
    "disk_usage": disk_usage,
    "memory_usage": memory_usage,
    "list_processes": list_processes
}
This is the same dictionary from Section 5, now with three more entries. No changes are needed to confirm_and_run or ask. Both already work for any tool listed here, since neither one refers to a tool by name directly, they look it up in this dictionary instead.
Step 4: Test it
python3 assistant.py
You: How much disk space is free?
Verify: Confirm the tool call. The answer should reflect actual output from df -h on your system.
Sample output:
The agent wants to run: disk_usage {}
Proceed? (y/n): y

Agent: Based on the disk usage information provided:

- The total available space for `/` (your root directory) is approximately **3.7 GB** out of a maximum of **32 GB** used.
- There are also approximately **24.9 GB** free in the `/data` partition.

Is there anything else you would like to know about your disk space usage?
The agent can now report on disk, memory, and running processes, using the same confirmation and refusal pattern as its file tools.
Section 7: Give It Access to the Web
This section installs a small self-hosted search engine and connects it to the agent, so it can answer questions about information beyond its training data or your files.
Why search matters, and why self-hosted
A model's knowledge stops at its training cutoff. It cannot know about anything after that date without an outside source. Web search provides one.
In this guide, we are going to use SearXNG, an open source metasearch engine that queries other search engines and returns the combined results, without tracking you. SearXNG can be used through public instances run by volunteers, but most public instances disable JSON output by default, since it is a common target for automated abuse.
We will run a small private instance on the same VM instead. This keeps the result reliable, and keeps the whole project self-contained on hardware you control.
Please note that this instance is for your own use on this VM only. It is not configured to be reachable from outside it. We also do not cover exposing it publicly.
The big picture before you start typing
Every section before this one added code to one program, assistant.py. This section is different. You are installing a second, completely separate program, SearXNG, and having your agent talk to it.
That means two separate things live on your VM after this section, each with its own folder and its own Python virtual environment:
~/assistant/          your agent, from Sections 3 through 6
~/searxng/             a new, separate program, installed in this section
They do not share code or files. They communicate the same way your web browser talks to a website. Your agent sends a small request over the network to an address on the same machine, 127.0.0.1:8888, and SearXNG sends back a response. 127.0.0.1 always means "this same machine," so this traffic never leaves your VM.
Since SearXNG is a separate program, it also needs to be running in its own terminal window, at the same time as your agent, whenever you want web search to work. Steps 1 through 3 below set up and start SearXNG, in a new terminal. Steps 4 through 8 go back to your existing assistant.py and add one new tool that calls it, the same pattern as every tool in Sections 5 and 6.
Step 1: Install SearXNG
Open a new terminal window, and connect to your VM again over SSH. Keep your original terminal, with the agent project, open in the background, you will come back to it in Step 4.
In this new terminal, install SearXNG's system dependencies:
sudo apt install -y git python3-dev python3-babel python3-venv build-essential libxslt-dev zlib1g-dev libffi-dev libssl-dev
These are libraries SearXNG's own dependencies need to build correctly. Clone the project and set up its own virtual environment, kept separate from your agent's:
cd ~
git clone https://github.com/searxng/searxng.git
cd searxng
python3 -m venv venv
source venv/bin/activate
pip install -U pip setuptools wheel pyyaml msgspec typing-extensions pybind11
pip install --use-pep517 --no-build-isolation -e .
This installs SearXNG into its own isolated environment in a different folder. The --use-pep517 --no-build-isolation flags control how pip builds the package and avoid a known build failure with SearXNG's dependencies.
Verify:
python3 -c "import searx; print('ok')"Step 2: Set a real secret key and enable JSON output
SearXNG ships with a placeholder secret_key value, used for cryptographic signing internally. Leaving the placeholder in place is insecure, even for local use. So replace it before running SearXNG for the first time.
sed -i "s|ultrasecretkey|$(openssl rand -hex 32)|" searx/settings.yml
openssl rand -hex 32 generates a random value. sed -i finds the placeholder text in settings.yml and replaces it with that random value, in place.
Now open the file to enable JSON output, which is off by default since it is a common target for automated abuse:
nano searx/settings.yml
Find the search: section and add a formats list under it:
search:
  formats:
    - html
    - json
While you are here, confirm the server: section looks like this. These are SearXNG's own defaults, so you likely will not need to change anything, but confirming them tells you exactly what address and port SearXNG will use, and matches the address your agent will send requests to in Step 6:
server:
  port: 8888
  bind_address: "127.0.0.1"
bind_address: "127.0.0.1" means SearXNG only accepts connections from the same machine, not from your network. Save and exit: Ctrl+O, Enter, Ctrl+X.
Step 3: Run SearXNG
python3 searx/webapp.py
This runs SearXNG's own development server, reading the port and bind address you confirmed in Step 2. It is enough for one person querying it from the same machine.
Leave this command running. Do not close this terminal or press Ctrl+C. SearXNG only responds to requests while this is active, so it needs to stay open in the background for as long as you want web search to work. Whenever you want to use your agent's web search tool later, this needs to be running first, in this terminal or one like it.
Verify: Open a third terminal, connect to the VM again, and test the JSON endpoint directly, without involving your agent at all yet.
curl -s "http://127.0.0.1:8888/search?q=debian&format=json" | head -c 300
You should see JSON text starting with something like {"query": "debian", .... If you see an HTML page instead, JSON was not saved correctly in settings.yml in Step 2. You can close this third terminal once this check passes, it was only for testing.
Step 4: Go back to your agent, and install a request library
Switch to your original terminal, the one with your agent project. If you closed it, open a new one and reconnect.
cd ~/assistant
source venv/bin/activate
pip install requests
Notice this uses your agent's own virtual environment, not SearXNG's, they are entirely separate installs. requests is a standard Python library for making web requests, and is how your agent's code will talk to SearXNG.
Step 5: Describe the new tool to the model
nano assistant.py
Find the TOOLS list, the same one from Section 5, already extended once in Section 6 with disk_usage, memory_usage, and list_processes. Add this new entry inside that same list, as one more item:
    {
        "type": "function",
        "function": {
            "name": "web_search",
            "description": "Search the web for current or recent information, such as current software versions, current events, or anything that may have changed since the model's training cutoff",
            "parameters": {
                "type": "object",
                "properties": {
                    "query": {"type": "string", "description": "Search query"}
                },
                "required": ["query"]
            }
        }
    }
The description matters more here than for the tools in Sections 5 and 6. The model decides on its own whether a tool is needed, and a vague description like "search the web" does not tell it when that applies. Naming the actual situations, current versions, current events, anything that could be outdated, makes the model far more likely to reach for this tool instead of confidently answering from a training cutoff it may not even be aware is out of date.
This follows the same pattern as every other tool description: a name, a description the model reads to decide when to use it, and the arguments it needs. This entry alone does not make search work yet, the next step writes the function that actually runs it.
Step 6: Write the function that actually searches
Add this near the other tool functions, such as disk_usage from Section 6:
import requests

SEARCH_URL = "http://127.0.0.1:8888/search"

def web_search(query):
    try:
        response = requests.get(
            SEARCH_URL,
            params={"q": query, "format": "json"},
            timeout=10
        )
        response.raise_for_status()
        data = response.json()
    except Exception as e:
        return f"Error searching the web: {e}"

    results = data.get("results", [])[:3]
    if not results:
        return "No results found."

    summary = []
    for r in results:
        title = r.get("title", "")
        content = r.get("content", "")
        summary.append(f"{title}: {content}")
    return "\n".join(summary)
SEARCH_URL is the address from Step 2 and Step 3, the SearXNG instance running on the same VM. This is the connection point between our two programs: when the model asks to use web_search, this function sends a request to that address and reads back the response, the same way curl did in Step 3's verification. The request has a 10-second timeout, so if you forgot to start SearXNG, or it stopped running, this fails quickly with a clear error instead of freezing the program. The top three results are condensed into a short summary for the model to read.
Now connect the tool's name to this function, the same pattern from Section 5. Find the existing TOOL_FUNCTIONS dictionary and add web_search to it:
TOOL_FUNCTIONS = {
    "list_files": list_files,
    "read_file": read_file,
    "read_pdf": read_pdf,
    "disk_usage": disk_usage,
    "memory_usage": memory_usage,
    "list_processes": list_processes,
    "web_search": web_search
}
No other code needs to change. confirm_and_run and ask, from Section 5, already work for any tool listed here, including this new one.
Step 7: Update the system prompt
nano config.json
Update system_prompt to include this addition:
{
    "model": "qwen2.5:7b-instruct",
    "system_prompt": "You are a local AI agent running on the user's own machine. You can answer questions directly, or use tools when a question requires information you don't have, such as checking a file or system status. Your own knowledge has a training cutoff and may be outdated, especially for current versions, dates, or recent events. For anything that could have changed since then, use the web_search tool instead of answering from memory. Only use a tool when it is actually needed to answer the question. If a tool call is declined, say so plainly and continue without it."
}
The tool description from Step 5 tells the model what web_search is for. This tells the model something different but just as necessary: that its own memory can be wrong, and it should not trust it blindly for anything time-sensitive. Without this, the model can answer a question like "what is the current stable release of Debian?" entirely from training, confidently, and incorrectly, without ever considering the tool at all.
Step 8: Test it
Confirm SearXNG from Step 3 is still running in its own terminal. If that terminal was closed, go back to Step 3 and start it again first, web_search will fail without it.
Delete your session file, so the system prompt update takes effect on a fresh conversation:
rm -f ~/assistant/session.json
Then, in your agent's terminal:
python3 assistant.py
You: search the web and find the current stable debian version
Verify: Confirm the tool call when prompted. The answer should reflect real search results, not only what the model already knew from training.
Sample output:
The agent wants to run: web_search {'query': 'current stable debian version'}
Proceed? (y/n): y

Agent: The current stable version of Debian is 13, codenamed trixie.
Limitation
Nothing forces the model to use web_search. It decides on its own, based on the question and the instructions in Steps 5 and 7, whether a tool is actually needed. Those two changes make it far more likely to search when it should, but they do not guarantee it. For a question with an obvious date or version in it, the model may still occasionally answer from memory instead of searching.
If this happens, the most reliable fix is being explicit in the question itself. For example, you can ask "search the web for the current stable release of Debian" rather than just asking the question plainly. This is a real property of how tool-calling models work, not a bug in our code.
The agent can retrieve current information from the web before answering, using a search engine that runs entirely on your own VM, with the same confirmation pattern as every other tool.
Section 8: Harden the Agent
This section reviews the safeguards built into every tool from Section 5 onward, and closes the remaining gaps, such as confirming the allowlist truly blocks anything unlisted, and checking that failures anywhere in the program are handled, not left to crash it.
What is already in place
By this point, the agent has three layers of protection, built in as each tool was introduced rather than added at the end:
- An allowlist.
confirm_and_runonly calls functions listed inTOOL_FUNCTIONS. Anything else is refused before it runs. - A workspace boundary. File and PDF tools only touch paths inside
~/assistant/workspace, checked bysafe_pathbefore any file operation. - Confirmation. Every tool call is shown to you, with its arguments, before it runs.
This section verifies the first layer directly, since it is the one that determines whether an unexpected tool name is ever reachable at all.
Step 1: Verify the allowlist directly
You cannot easily make the model request a tool that does not exist, since it only knows about tools listed in TOOLS. Test the function itself instead.
python3 -c "
from assistant import confirm_and_run
print(confirm_and_run('delete_everything', {}))
"
Verify: You should see:
Tool 'delete_everything' is not allowed.
No confirmation prompt appears, and nothing runs. This confirms unknown tool names are refused before any code tries to execute them.
Step 2: Confirm every tool fails safely
Every function written in Sections 5 through 7 is wrapped in a try/except block, so a missing file, a malformed PDF, or a network failure returns a message instead of crashing the program. Test this directly:
python3 -c "
from assistant import read_file
print(read_file('does_not_exist.txt'))
"
Verify: You should see an error message describing the problem, not a Python traceback. If you see a traceback instead, the corresponding function is missing its try/except block, go back and add it.
Step 3: Extending the agent safely
If you add capability later, apply the same three layers used throughout this guide:
- Add the new action as its own function, and add its name to
TOOL_FUNCTIONSdeliberately. Nothing is reachable by accident. - If it touches the filesystem, scope it with a check like
safe_path, before writing the rest of the function. - Wrap it in a
try/exceptblock, so a failure returns a message instead of crashing the program. - Keep confirmation for every tool, without exception.
- Ask directly whether the action needs to modify or delete anything. If it does, consider whether the agent truly needs that capability, given what it is for.
Every tool in this agent is scoped, confirmed, allowlisted, and fails safely. Nothing added later becomes reachable unless you deliberately register it.
Conclusion
Congratulations! Now, you have a local AI agent that runs on your own hardware. It remembers conversations, reads files and PDFs from a bounded workspace, reports on system status, searches the web, and refuses anything outside what you explicitly allowed it to do. Every safeguard was built at the point the capability that needed it was introduced, not bolted on afterward.
All you needed are a VM, Python, and Ollama. Nothing else.
Related Read:
