Docker networking is basically used to establish communication between the docker containers and the outside world via host machine or you can say it is a communication passage through which all the isolated containers communicate with each other in various situations to perform the required actions. In this guide, we will explain basic Docker networking concepts with practical examples on Ubuntu.
If you haven't installed Docker yet, refer the following guide.
Basics of Docker usage:
Table of Contents
Explaining Docker Networking Concepts
All commands listed below are tested with root privileges on Ubuntu.
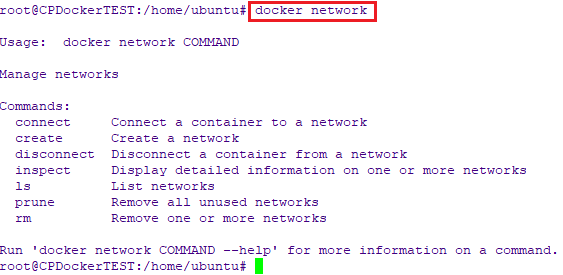
To manage network operations, like creating a new network, connecting a container to a network, disconnect a container from the network, listing available networks and removing networks etc., we use the following command:
# docker network
Types of docker network drivers
To list all your networks, run:
# docker network ls

Let’s have some short introduction on all of them.
- Bridge network : When you start Docker, a default bridge network is created automatically. A newly-started containers will connect automatically to it. You can also create user-defined custom bridge networks. User-defined bridge networks are superior to the default bridge network.
- Host network : It remove network isolation between the container and the Docker host, and use the host’s networking directly. If you run a container which binds to port 80 and you use host networking, the container’s application is available on port 80 on the host’s IP address. Means you will not be able to run multiple web containers on the same host, on the same port as the port is now common to all containers in the host network.
- None network : In this kind of network, containers are not attached to any network and do not have any access to the external network or other containers. So, this network is used when you want to completely disable the networking stack on a container.
- Overlay network : Creates an internal private network that spans across all the nodes participating in the swarm cluster. So, Overlay networks facilitate communication between a docker swarm service and a standalone container, or between two standalone containers on different Docker Daemons.
- Macvlan network : Some applications, especially legacy applications or applications which monitor network traffic, expect to be directly connected to the physical network. In this type of situation, you can use the Macvlan network driver to assign a MAC address to each container’s virtual network interface, making it appear to be a physical network interface directly connected to the physical network.
Allow me to show you hands-on exercises to Bridge and Host networks.
1. Bridge Network
I will be using two Alpine containers to explain this type of network.
Now, I am going to run two Alpine containers namely C1 and C2 using commands:
# docker run -it -d --name c1 alpine ash
# docker run -it -d --name c2 alpine ash

Next, let us find out the IP address of those running containers. To do so, run:
# docker exec -it c1 sh –c “ip a”
# docker exec -it c2 sh –c “ip a”
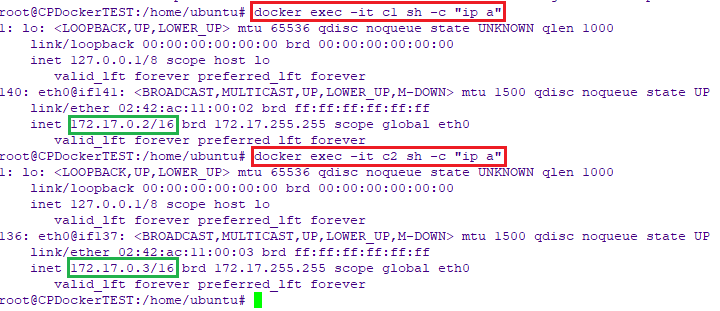
As you can see, the IP address of C1 container is 172.17.0.2 and IP address of C2 is 172.17.0.3.
Now let us go ahead and try to ping each other to ensure if they can be able to communicate.
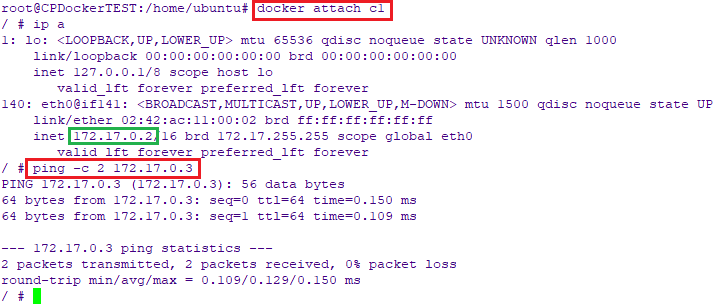
First, attach to the running C1 container and try to ping the C2 container:
# docker attach c1
# Ping –c 2 172.17.0.3
Similarly, attach to C2 container and try to ping C1 container.
# docker attach c2
# Ping –c 2 172.17.0.2
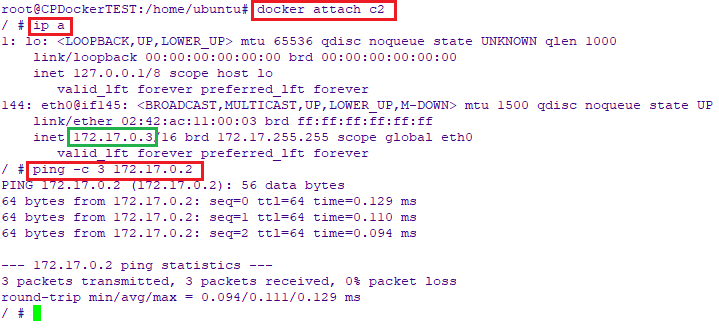
As you see in the above screenshots, the communication is happening between the containers with in the same network.
We can also verify it by inspecting the bridge network using command:
# docker network inspect bridge
The above command will display all information about the network, such as network type, subnet, gateway, containers name and iip addresses etc.

1.1 Creating user-defined bridge network
Like I already said, when you start Docker, a default bridge network is created automatically. All newly-started containers will connect automatically to it. However, you can also create user-defined custom bridge networks.
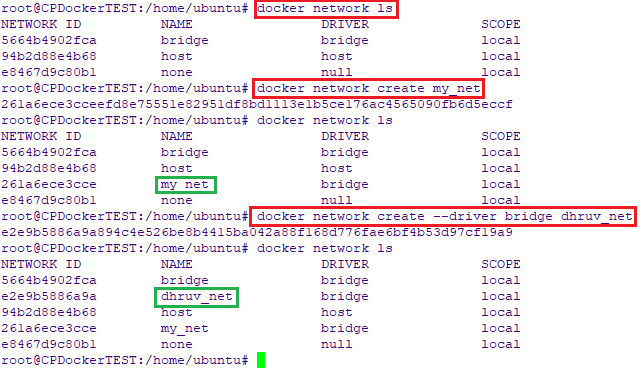
To create new network driver, simply run:
# docker network create my_net
Or,
# docker network create --driver bridge dhruv_net
Both commands will do the same work. If you will not specify the driver name, it will create in the default network driver i.e. bridge.
On user-defined networks like dhruv_net, containers can not only communicate by IP address, but can also resolve a container name to an IP address. This capability is called automatic service discovery.
To ensure if the containers can communicate with each other, let us run three alpine containers namely A1, A2 and A3 on dhruv_net network which we created earlier.
# docker run -it -d --name A1 --network dhruv_net alpine ash
# docker run -it -d --name A2 --network dhruv_net alpine ash
# docker run -it -d --name A3 --network dhruv_net alpine ash

Now try to attach to any one of the containers and ping the other two using container name.
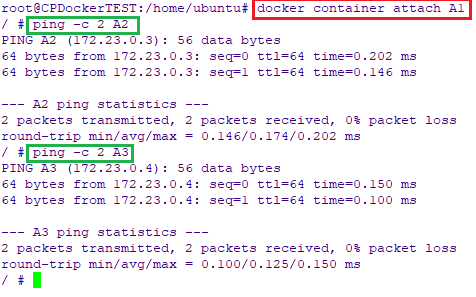
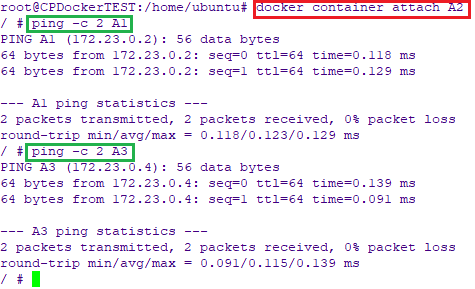
From the above screenshots, it is proved that containers can be able to to communicate with each other.
2. Host Network
We are running a container which binds to port 80 using host networking, the container’s application is available on port 80 on the host’s IP address.
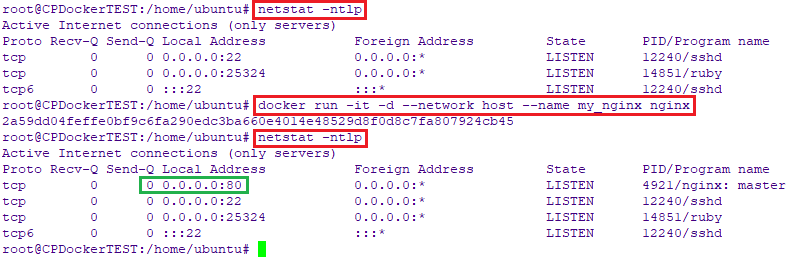
Host network is only needed when you are running programs with very specific network. The application running inside the Docker container look like they are running on the host itself, from the perspective of the network. It allows the container greater network access than it can normally get.
Here, we used netstat -ntlp command to display the listening port on the server. To find which service is listening on a particular port, this guide.
We've only covered the basics of Docker networking concepts. For more details, I suggest you to look into the Docker networking guide attached below.
Suggested read:
- Explaining Docker volumes
- How To Automatically Update Running Docker Containers
- ctop – A Commandline Monitoring Tool For Linux Containers
- Portainer – An Easiest Way To Manage Docker
- PiCluster – A Simple, Web-based Docker Management Application
- Dockly – Manage Docker Containers From Terminal
About the Author:
Dhruv Tiwari is a DevOps Engineer who loves automating things, working with Linux at scale and dream of the day when systems are smart enough to never need to login to a Linux box. Journey Of CI/CD from source code to code deployment to production.
Thanks for stopping by!
Help us to help you:
- Subscribe to our Email Newsletter : Sign Up Now
- Support OSTechNix : Donate Via PayPal
- Download free E-Books and Videos : OSTechNix on TradePub
- Connect with us: Reddit | Facebook | Twitter | LinkedIn | RSS feeds
Have a Good day!!
4 comments
docker android?
What do you mean?
Great. This information is really good
I would love to see how you might use this in a docker-compose.yml file. Say between a Nextcloud container and a MySql container on a the same defined network.
Thanks for sharing!