In this comprehensive Rsync tutorial, we are going to learn useful Rsync command examples to copy, backup and synchronize files in Linux operating systems.
Table of Contents
1. A brief introduction to Rsync
There are plenty of Backup/file synchronization tools exists for Linux and Unix platforms. Rsync is considered to be one of the most widely used and trusted backup tool.
Rsync, stands for Remote Sync, is a fast and versatile file copying tool. It can copy locally, to/from another host over any remote shell, or to/from a remote rsync daemon.
Rsync is an uni-directional and incremental file transfer tool that uses delta-transfer algorithm. It greatly reduces the amount of data sent over the network by transferring only the differences between the source and destination files.
It is widely used by single users as well as hundreds of thousands of organizations, ranging from small to enterprise grade for backups and mirroring.
Many individual users are also using Rsync as an improved copy command for everyday use.
Rsync is one of the oldest open source program still in use today. This program was first announced in June 1996, and it was originally developed by Andrew Tridgell and Paul Mackerras. It is currently being maintained by Wayne Davison.
Rsync is a cross-platform, open source backup application that supports Linux, Unix distributions such as FreeBSD, NetBSD, OpenBSD, macOS and Windows (via Cygwin).
Rsync is written in C programming language as a single threaded application, and is freely available under GPL.
1.1. Rsync features
Rsync has many features compared to its counter-parts. Here are a few notable features of Rsync:
- Rsync can update whole directory trees and filesystems.
- It can preserve symbolic links, hard links, file ownership, permissions, devices and times.
- Internal pipelining reduces latency for multiple files.
- Can use rsh, ssh or direct sockets as the transport.
- Supports anonymous rsync which is ideal for mirroring.
2. Install Rsync in Linux
Rsync comes pre-installed in many Linux and Unix-like operating systems. Just in case if it is not available on your Linux system, you can install Rsync using your distribution's default package manager.
Rsync is available in the default repositories of most Linux distributions.
Install Rsync on Alpine Linux:
sudo apk add rsync
Install Rsync on Arch Linux:
sudo pacman -S rsync
Install Rsync in Fedora, CentOS, RHEL, AlmaLinux, Rocky Linux:
sudo dnf install rsync
Install Rsync on Debian, Ubuntu, Linux Mint, Pop!_OS:
sudo apt install rsync
Install Rsync on openSUSE:
sudo zypper install rsync
Install Rsync on Solus:
sudo eopkg install rsync
Heads Up: Rsync must be installed on both systems if you want to synchronize files between two systems.
3. Rsync command syntax
Similar to cp, rcp and scp commands, rsync also requires the specification of a source and of a destination, of which at least one must be local.
Heads Up: Rsync does not support copying files between two remote hosts.
The general syntax of Rsync is given below:
Local to local:
rsync [OPTION…] SRC… [DEST]
Local to remote:
rsync [OPTION…] SRC… [USER@]HOST:DEST
Remote to local:
rsync [OPTION…] [USER@]HOST:SRC… [DEST]
Here,
OPTION- List of Rsync optionsSRC- Source file or directoryDEST- Destination file or directoryUSER@HOST- Remote username and hostname or IP address
3.1. Rsync options
Rsync has numerous options. The most commonly used Rsync options are given below:
-a: Archive mode. The archive mode instructs Rsync to perform archive operation and, recursively copy directories and its children, preserve all file attributes such as file permissions, ownership, symlinks, and timestamps. It is equivalent to-rlptgoDoptions.-v: Verbose mode.-u- Skip files that are newer on the receiving end. Useful to avoid overwriting destination files.-z: Compress files.-r: Recursively copy entire directory and its contents. It can be excluded when using-aflag.-P: Show progress bar during file transfer. This option is also used to keep partially transferred files.--delete: Delete extraneous files from destination directory. In other words, this option will delete all directories and files that are not available in the source but available in the destination. Useful when synchronizing files and directories.-x: Restrict rsync to sync data within the file system boundaries. It instructs Rsync to not cross filesystem boundaries. If you have mounted any file system inside your home directory, that will be skipped during the sync operation.-h: Output numbers in a human-readable format.
As stated earlier, Rsync has a lot more options. But the aforementioned are mostly enough for day to day operations.
4. Useful Rsync command examples for beginners
Using Rsync, we can easily transfer single files, or multiple files matching a pattern within the local system and also transfer files either to or from a remote system.
Here is the list of most commonly used Rsync commands with examples for beginners as well as intermediate users.
1. Copy or synchronize files locally
Rsync is widely used as an alternative to cp command to backup and copy files from one location another.
To backup or copy a file, for example ostechnix.txt, using Rsync, simply do:
rsync -av ostechnix.txt ostechnix-backup.txt
This command copies the contents of ostechnix.txt file to ostechnix-backup.txt in [a]rchive mode in the current directory. This is mostly used when backing up configuration files before making any changes in them.
Sample output:
sending incremental file list
ostechnix.txt

sent 138 bytes  received 35 bytes  346.00 bytes/sec
total size is 30  speedup is 0.17

If you want to save the backup file in different location, just mention target path like below:
rsync -av ostechnix.txt mybackup/ostechnix-backup.txt
This will copy the given file to mybackup directory.
To copy multiple files, specify them with space-separated like below:
rsync -av file1 file2 file3 mybackup/
2. Copy or synchronize files to external drive
You can also copy the files to different partition and even different drive.
For example, I am copying the ostechnix.txt file to my External Seagate hard disk mounted on /media/sk/ location using command:
rsync -auv ostechnix.txt /media/sk/seagate/myfiles
Here, the -u switch is used to skip files that are newer on the receiver and -v is used to print verbose output.
Heads Up: To find the mount point of your external drive, use the lsblk command.
$ lsblk

sdb             8:16   0 931.5G  0 disk
└─sdb1          8:17   0 931.5G  0 part  /media/sk/seagate
3. Copy or synchronize directories locally
To copy a directory including its sub-directories and files to another directory with Rsync, use -a flag like below:
rsync -av dir1/ dir2
Rsync will automatically create the destination directory if it does not exists.
Heads Up: Here, the trailing slash (/) plays an important role.
If you want to transfer a directory contents (but not the directory itself) to another directory, make sure you have specified the trailing / at the end of the source directory like below:
rsync -av path/to/source_directory/ path/to/destination_directoryA trailing slash on the source directory avoids creating an additional directory level at the destination.
To transfer a directory itself and all its children from a one one directory to another:
rsync -av path/to/source_directory path/to/destination_directory
Please note that I didn't add the trailing / at the end of the source directory in the above command. This will copy the whole source directory to destination.
To copy multiple directories, specify them with space-separated like below:
rsync -av dir1/ dir2/ dir3

This will copy the contents of dir1 and dir2 to dir3 directory.
When you run rsync for the first time, it will take a while to copy all files from source to destination depending upon the number of files and the file size.
Since Rsync is incremental backup tool, it will only copy the file changes from source to destination location in the subsequent times.
If any files are already copied, it will simply omit them. So the file transfer rate will always be faster in the subsequent times.
4. Synchronize or transfer files from local system to remote system
Heads Up: In order to sync files between two systems, Rsync should be installed on both systems. Also both systems should be able to communicate via SSH and the target directory must have read-write permission.
To copy or sync files from your local system to a remote system on the network, the command would be:
rsync path/to/local_file remote_host:path/to/remote_directory
Example:
rsync -av file1 ostechnix@192.168.122.25:/home/ostechnix/data
Sample output:
ostechnix@192.168.122.25's password:
sending incremental file list
file1

sent 129 bytes  received 35 bytes  46.86 bytes/sec
total size is 30  speedup is 0.18

Here,
-a: Archive mode to preserve attributes.file1: Source file.ostechnix@192.168.122.25: Remote system's username and ip address./home/ostechnix/data: Remote location.
We can also combine multiple Rsync options to perform specific tasks.
The following command transfers the given file in [a]rchive (to preserve attributes) and compressed ([z]ipped) mode with [v]erbose output and [h]uman-readable format.
rsync -azvh file1 ostechnix@192.168.122.25:/home/ostechnix/data
5. Synchronize or transfer files from remote system to local system
To copy or sync files from a remote system to local system, just reverse the source and destination paths in the above command:
rsync -a ostechnix@192.168.122.25:/home/ostechnix/data/file1 Downloads/file1
This command transfers the file (E.g. /home/ostechnix/data/file1) from the remote system to our local system's Downloads directory.
6. Synchronize or transfer a directory and all its contents from local to remote system
To copy or sync a directory and all its contents (E.g. sub-directories and the files), we can use -r flag:
rsync -r path/to/local_directory remote_host:path/to/remote_directory
Example:
rsync -rv dir1/ ostechnix@192.168.122.25:/home/ostechnix/data

Here, -r is used to recursively copy the directory and its contents.
7. Synchronize or transfer a directory and all its contents from a remote to local system
To copy or sync a directory along with its contents from a remote system to your local system, use this command:
rsync -r remote_host:path/to/remote_directory/ path/to/local_directory
Example:
rsync -rv ostechnix@192.168.122.25:/home/ostechnix/data/ dir1/

This command copies the contents of data/ directory from the remote system to our local directory called dir1/.
8. Synchronize or transfer directories recursively, preserve attributes, softlinks and ignore already transferred files
As stated already, we can combine multiple Rsync switches in a single command to perform a specific task.
For instance, to copy or sync a directory [r]ecursively, in [a]rchive mode to preserve attributes, resolving contained soft[l]inks , [v]erbose mode, and ignoring already copied files [u]nless newer, use -rauvL flag like below:
rsync -rauvL dir1/ ostechnix@192.168.122.25:/home/ostechnix/data
9. Delete files that are not in source directory
Some times, you may want to keep both source and destination directories in sync. Meaning - you want to maintain the same content on both sides. In that case, you can use --delete switch.
You should be very careful when using --delete flag. Because, Rsync will delete all directories and files that are not available in the source but only available in the destination.
Let us see an example.
This is the current contents of my destination directory:
$ ls data/
nettle-3.4.1rc1-3.fc31.x86_64.rpm  usr
I am going to create a new directory named ostechnix and a new file named file1 in my destination location.
mkdir data/ostechnix
touch data/file1
Let us check if the they are created:
$ ls data/
file1  nettle-3.4.1rc1-3.fc31.x86_64.rpm  ostechnix  usr
Remember the newly created directory called ostechnix and the new file file1 are not available in the source directory.
Now, I run the following Rsync command with --delete switch in my local system (source):
rsync -av --delete dir1/ ostechnix@192.168.122.25:/home/ostechnix/data
Sample output:
sending incremental file list
deleting ostechnix/
deleting file1
./

sent 712 bytes  received 54 bytes  218.86 bytes/sec
total size is 1,400,477  speedup is 1,828.30
As you can see in the above output, Rsync deletes the newly directory and the file.
Now let us go to the target system and check if they are deleted or not:
$ ls data/
nettle-3.4.1rc1-3.fc31.x86_64.rpm  usr

They are gone!
Again, I warn you! You MUST BE VERY CAREFUL while using --delete switch. You may accidentally delete any important files.
10. Delete source files after successful transfer
Ths is somewhat similar previous command. But in this method, we delete the source files after successfully synchronized or transferred to the destination system.
To remove source files after successful transfer using Rsync, use --remove-source-files switch.
rsync -av --remove-source-files ostechnix.txt ostechnix@192.168.122.25:/home/ostechnix/data
Sample output:
sending incremental file list
ostechnix.txt

sent 137 bytes  received 43 bytes  51.43 bytes/sec
total size is 30  speedup is 0.17
You can also remove files in a source directory after successful transfer:
rsync -arv --remove-source-files dir1/ ostechnix@192.168.122.25:/home/ostechnix/data
Please note that this will only remove the files from the source directory, but not the source directory itself. After successful transfer, you will still have an empty source directory.
11. Show progress bar when transferring files
By default, Rsync will not show any progress bar while transferring files. It will only show the summary after successful transfer. If you want to know what is going on behind the scenes, you can show the progress bar with -P switch.
The following command transfers dir1/ directory with [P]rogress bar to the remote system:
rsync -avP dir1/ ostechnix@192.168.122.25:/home/ostechnix/data
Sample output:
sending incremental file list
./
video.mp4
    839,974,565 100%   43.78MB/s    0:00:18 (xfr#1, to-chk=13/15)
video.srt
        127,340 100%  405.07kB/s    0:00:00 (xfr#2, to-chk=12/15)

sent 840,307,476 bytes  received 69 bytes  39,084,071.86 bytes/sec
total size is 840,101,905  speedup is 1.00
This will be useful when you transfer large amount fo data. You can keep track of the file copy progress to know how much data is currently being transferred and the time elapsed to transfer the file.
The -P flag is also useful to resume partially downloaded or transferred files.
You can also use --info=progress2 switch to show global progress, which is equivalent to -P.
rsync -av --info=progress2 dir1/ ostechnix@192.168.122.25:/home/ostechnix/data
12. Synchronize or transfer files over SSH
The newer version of Rsync is configured to use ssh as the default remote shell, so you don't need to specify any extra options to sync files over SSH.
Just in case, if you're using older Rsync version, you can use -e ssh flag to copy or sync files between local system and remote system over SSH like below.
rsync -e ssh file.json ostechnix@192.168.122.25:/home/ostechnix/data
If you want to also delete the files that do not exist on the source, add --delete switch in the above command:
rsync -e ssh --delete file.json ostechnix@192.168.122.25:/home/ostechnix/data
13. Synchronize or transfer files over SSH using a different port
You might have changed the default SSH port for security.
In that case, you need to explicitly mention the SSH port as shown below:
rsync -e 'ssh -p 2222' -P file.json ostechnix@192.168.122.25:/home/ostechnix/data
This will copy or sync files via SSH using a custom port (2222) and with progress bar.
14. Set maximum and minimum file size to transfer
When you transfer large amount of files, you may not want to transfer files larger or smaller than a specific size. Rsync has two switches exclusively for this purpose.
You can use --max-size flag if you don't want to transfer any file larger than the given size.
For example, the following command will avoid transferring any file that is larger than 100 MB in size:
rsync -av -P --max-size=100M dir1/ ostechnix@192.168.122.25:/home/ostechnix/data
You can use B (bytes), K (kilo), M (mega), G (giga), T (tera), or P (peta) to specify the sizes.
Similarly, If you don't want to transfer any file smaller than the given size, use --min-size flag:
rsync -av -P --min-size=100M dir1/ ostechnix@192.168.122.25:/home/ostechnix/data
15. Ignore empty directories from sync
You might probably have empty directories in the source location. If you want to exclude some bunch of useless, empty directory from sync list, use --prune-empty-dirs or -m flag.
rsync -av -m dir1/ ostechnix@192.168.122.25:/home/ostechnix/data
This command will get rid of all empty directories from the dir1/ source directory, including nested directories that have no non-directory children.
This is useful for avoiding the creation of a bunch of useless directories when the sending rsync is recursively scanning a hierarchy of files using include/exclude/filter rules.
16. Set bandwidth limit
We can also define the maximum data transfer rate for the data sent over the socket with --bwlimit option.
The following command transfers files at the speed of 10MB per second.
rsync -av --bwlimit=10M dir1/ ostechnix@192.168.122.25:/home/ostechnix/data
Sample output:
sending incremental file list
./
video.mp4
usr/
usr/lib/
usr/lib/.build-id/
usr/share/
usr/share/doc/
usr/share/licenses/

sent 901,983,468 bytes  received 72 bytes  10,078,028.38 bytes/sec
total size is 901,770,618  speedup is 1.00
You can specify K for kilobytes. If no suffix is specified, the data transfer rate value will be assumed to be in units of 1024 bytes.
17. Stop copying files after certain time
There is an option named --stop-after, which instructs rsync to stop copying files when the specified number of minutes has been elapsed.
The following command tells Rsync to stop copying after 15 minutes:
rsync -av --stop-after=15 dir1/ dir2
18. Stop copying files at exact time
You can even stop copying files exactly at a specified time using --stop-at option. You need to specify the time in year-month-dayThour:minute format.
Example:
rsync -av --stop-at=2021-07-28T23:59 dir1/ dir2
19. Include or exclude files and directories
Rsync has two options to include or exclude certain files or directories from the synchronization.
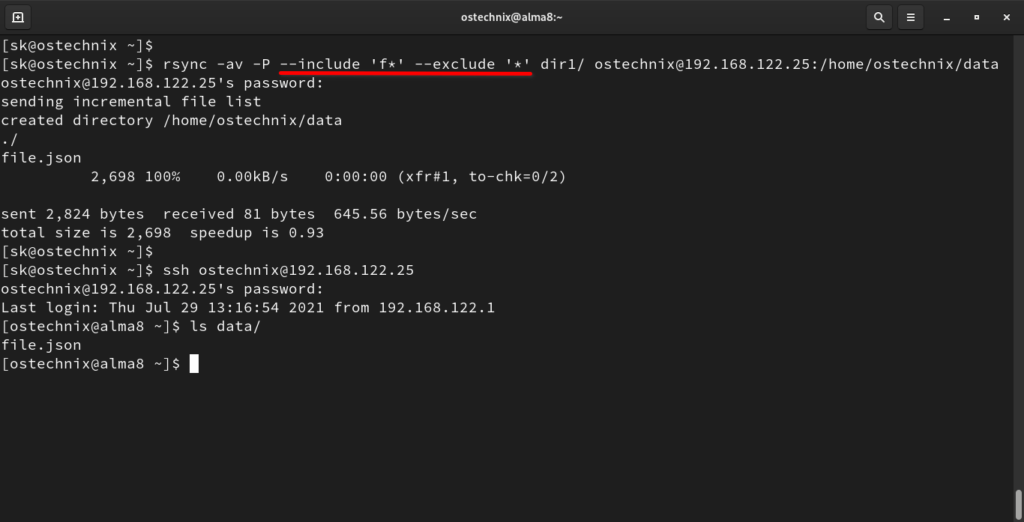
The following command includes all that starts with f and exclude all other from the sync.
rsync -av -P --include 'f*' --exclude '*' dir1/ ostechnix@192.168.122.25:/home/ostechnix/data
If you want to only exclude a specific type of files (E.g. txt files) from copying, run:
rsync -avP --exclude '*.txt' dir1/ ostechnix@192.168.122.25:/home/ostechnix/data
20. Show difference between source and destination files
To show if there is a difference betwenn source and destination while transferring files, you can use -i flag.
rsync -avi dir1/ ostechnix@192.168.122.25:/home/ostechnix/data
Sample output:
ostechnix@192.168.122.25's password:
sending incremental file list
.d..t...... ./
<f+++++++++ file1.txt

sent 270 bytes  received 40 bytes  88.57 bytes/sec
total size is 901,770,621  speedup is 2,908,937.49
As you see in the above output, the file1.txt is missing in the destination.
The letter f in the above output stands for file.
The other possible letters in the output could be:
d- shows the destination file is in question.t- shows the timestamp has changed.s- shows the size has changed.
21. Automate synchronization with cron job
You can use cron scheduler to schedule file transfering at a particular time on a particular day.
Edit the current user's cron jobs using command
crontab -e
Add your rsync in the file. Say for example, to run backup every day at 3am, use the following line:
0 3 * * * rsync -av dir1/ ostechnix@192.168.122.25:/home/ostechnix/data
Depending upon your requirement you can schedule Rsycn commands daily, weekly or monthly.
If you're new to Cron Jobs, we have compiled a list of useful cron job examples to schedule tasks in Linux. For more details on cron usage, refer the following guide.
22. Perform Dry run with Rsync
Rsync is powerful tool. You should be careful, espcially when using --delete flag. You could accidenty delete important files.
To avoid this, you can use the --dry-run option, which shows what will happen if you run the command, without actually making any changes in the files.
rsync -av --delete --dry-run dir1/ ostechnix@192.168.122.25:/home/ostechnix/data
This makes rsync perform a trial run that doesn't make any changes and produces mostly the same output as a real run.
Sample output:
ostechnix@192.168.122.25's password:
sending incremental file list
deleting file1.txt
./

sent 214 bytes  received 34 bytes  70.86 bytes/sec
total size is 901,770,621  speedup is 3,636,171.86 (DRY RUN)
It is most commonly used in combination with the -v and -i options to see what an rsync command is going to do before one actually runs it.
For more details, check Rsync man pages.
$ man rsync
5. Rsync graphical front-ends
If you're a beginner, you may find it difficult to understand all Rsync options and flags. Fortunately, there are a few graphical frontend tools for Rsync available. One such tool is Grsync.
Grsync is a simple graphical user interface for Rsync. You don't have to memorize any Rsync commands and its options. You can do everything via easy-to-use GUI.
To know to install and use Grsync to backup and synchronize files easily, refer the following guide:
6. Conclusion
In this detailed Rsync guide, we discussed the most commonly used Rsync commands with examples in Linux. There are lot more yet to cover, but I guess these 20+ Rsync command examples are enough to learn Rsync usage.
In my opinion, Rsync is one of the best, free and open source backup application for Linux and Unix-like operating systems. You must make use of this useful program to backup your data that you can't afford to lose.
Resource:
Related read:
- How To Backup Your Entire Linux System Using Rsync
- How To Backup Files And Directories Using Rsync In Linux
- How To Backup And Restore Files Using Deja Dup In Linux
- How To Setup Backup Server Using Rsnapshot
- How To Backup And Restore Linux System With Timeshift
- How To Synchronize Files With Unison On Linux
- How To Synchronize Local And Remote Directories In Linux
- How To Synchronize Files And Directories Using Zaloha.sh
- CYA – System Snapshot And Restore Utility For Linux
- Restic – A Fast, Secure And Efficient Backup Application
2 comments
Your headline reads “WSL ON Linux” But your article is about Linux in Windows. Rather confusing…
I cannot think of why anyone would want Linux programs in Windows. That’s like putting Volkswagen parts on a Fiat. It works, but is it better? Or for that matter even necessary? Just running Linux seems to me to make more sense.
WSL ON Linux in headline? I don’t see any such line in the title or sub-headings. Could you please elaborate what are you referring?