This guide explains what is Restic, how to install Restic in various Linux distributions, and finally how to backup and restore data using Restic in Linux operating systems.
Table of Contents
Restic, a Fast, Secure and Efficient Backup Application
Restic is a fast, open source, secure and cross-platform backup program. It allows saving multiple revisions of files and directories in an encrypted repository stored on different backends.
Restic uses cryptography to guarantee confidentiality and integrity of your data. It encrypts the data with AES-256 in counter mode and authenticate it using Poly1305-AES cryptographic message authentication code.
Backing up and restoring data with Restic is easy and very fast! It only transfers the modified files (incremental backup) just like Rsync.
Using Restic, we can easily backup files and directories in a local disk or a remote system, or a cloud storage. Restic supports popular cloud storage backends such as AWS, Azure, BackBlaze, Google Cloud, OpenStack and a few more.
Restic is written using Go programming language and its source code is freely available in GitHub. It is cross-platform backup application. It supports GNU/Linux, macOS, FreeBSD, openBSD and Microsoft Windows.
Install Restic In Linux
Restic is packaged for popular Linux operating systems.
Install Restic in Alpine Linux:
$ sudo apk add restic
Install Restic in Arch Linux, EndeavourOS, Manjaro Linux:
Restic is available in the default repositories of Arch Linux. Make sure the [Community] repository is enabled and install Restic in Arch Linux and its variants like EndeavourOS, Manjaro Linux using Pacman as shown below.
$ sudo pacman -S restic
Install Restic from AUR:
Restic is also available in AUR. So, you can install it using any AUR helpers, such as Paru or Yay, in Arch-based systems.
$ paru -S restic-git
Or,
$ yay -S restic-git
Install Restic in Debian, Ubuntu, Linux Mint, Pop_OS!:
$ sudo apt-get install restic
Install Restic in Fedora:
$ sudo dnf install restic
Install Restic in RHEL, CentOS, AlmaLinux and Rocky Linux:
$ sudo dnf copr enable copart/restic
$ sudo dnf install restic
Install Restic in Solus:
$ sudo eopkg install restic
Install Restic in Nix OS:
$ nix-env --install restic
Install Restic in openSUSE:
$ sudo zypper install restic
Install restic using Linuxbrew:
$ brew install restic
Install Restic from source:
For other operating systems, you can compile and install it like below. First, make sure you have installed Go language on your system.
Once Go installed, git clone restic github respository:
$ git clone https://github.com/restic/restic
This command will clone all the contents of restic repository in the current working directory.
Cd into the restic directory:
$ cd restic
And, install Restic like below:
$ go run build.go
Check the installed Restic version:
$ restic version
restic 0.12.0 compiled with go1.14.12 on linux/amd64
Update Restic
If you have installed Restic from official repositories, it could be bit old version.
To update Restic to latest version, run:
$ sudo restic self-update
Now check its version with command:
$ restic version
restic 0.12.1 compiled with go1.16.6 on linux/amd64
Backup and restore data using Restic in Linux
Restic supports the following backends to store the backup:
- Local directory,
- sftp server (via SSH),
- HTTP REST server,
- AWS S3,
- OpenStack Swift,
- BackBlaze B2,
- Microsoft Azure Blob Storage,
- Google Cloud Storage,
- And many other services via the rclone.
Now, let us see how to backup and restore data in a local directory.
Create new local repository
First, let us create a repository to store the backup. For example, I am going to create a repository named mybackup in my $HOME directory.
$ restic init --repo ~/mybackup
Enter the password for the repository twice. You must remember the password to access this repository later. Otherwise, you will permanently lose the data stored in the repository. You have been warned!
enter password for new repository:
enter password again:
created restic repository c1c5bcfdb8 at /home/sk/mybackup

Please note that knowledge of your password is required to access
the repository. Losing your password means that your data is
irrecoverably lost.

As you see in the above output, a local restic repository with ID c1c5bcfdb8 is created at /home/sk/mybackup location.
Now it is time to backup your data to the newly created repository.
Backup data to local directory using Restic
I am going to backup the entire ~/mydata directory (including the directory itself) to the repository ~/mybackup using command:
$ restic -r ~/mybackup backup ~/mydata
Enter the password of your repository:
Sample output:
enter password for repository:
repository c1c5bcfd opened successfully, password is correct
no parent snapshot found, will read all files

Files:           7 new,     0 changed,     0 unmodified
Dirs:            4 new,     0 changed,     0 unmodified
Added to the repo: 21.919 MiB

processed 7 files, 21.913 MiB in 0:00
snapshot 7457d80e saved

As you can see, restic created the backup of the given directory i.e mydata. Additionally, I created a snapshot of the current backup with a unique name 7457d80e.
Let us break down the above command and see what each option does.
restic: The restic command-r: Indicates repository~/mybackup: Repository namebackup- Restic sub-command to backup files/folders~/mydata- The directory to backup.
Add more files/folders in the backup directory. For instance, I added a new file named vi editor.pdf in ~/mydata directory. Now, run the same restic command again:
$ restic -r ~/mybackup backup ~/mydata
enter password for repository:
repository c1c5bcfd opened successfully, password is correct
using parent snapshot 7457d80e

Files:           1 new,     0 changed,     7 unmodified
Dirs:            0 new,     3 changed,     1 unmodified
Added to the repo: 50.123 KiB

processed 8 files, 21.957 MiB in 0:00
snapshot 963d4de3 saved

Restic will keep creating new snapshots with unique name every time we run it.
Since Restic does incremental backup, the subsequent backups will be pretty faster than the previous backups. We can keep adding the data in the backup folder and run the backup to create many snapshots.
Not just the directories, Restic also allows us to backup individual files as well.
$ restic -r ~/mybackup backup ~/mydata/vi\ editor.pdf
Sample output:
enter password for repository:
repository c1c5bcfd opened successfully, password is correct
no parent snapshot found, will read all files

Files:           1 new,     0 changed,     0 unmodified
Dirs:            3 new,     0 changed,     0 unmodified
Added to the repo: 47.129 KiB

processed 1 files, 45.139 KiB in 0:00
snapshot 59439d78 saved
As you see, a new snapshot named 59439d78 is created in the repository.
List snapshots
To list the available snapshots in a local repository, run:
$ restic -r ~/mybackup snapshots
Sample output:
enter password for repository:
repository c1c5bcfd opened successfully, password is correct
ID        Time                 Host        Tags        Paths
----------------------------------------------------------------------
7457d80e  2021-08-13 12:51:58  ostechnix               /home/sk/mydata
963d4de3  2021-08-13 12:57:55  ostechnix               /home/sk/mydata
----------------------------------------------------------------------
2 snapshots
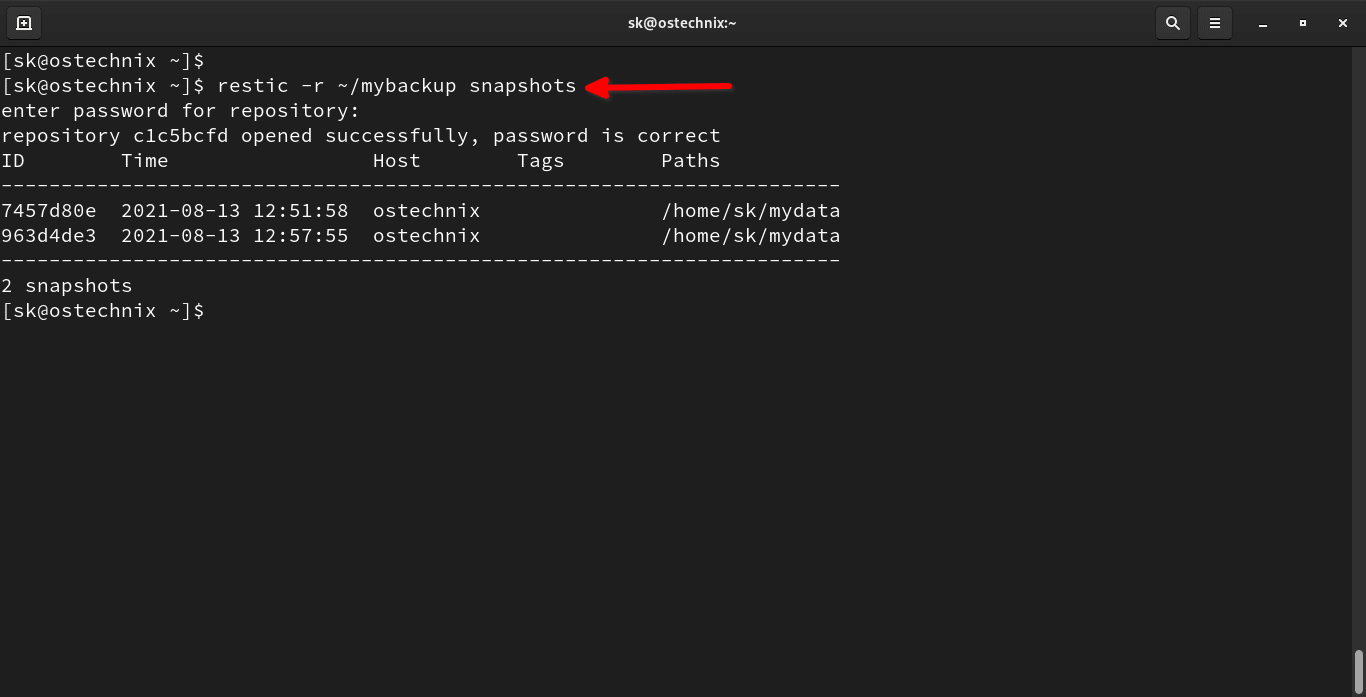
As you see, I have 2 snapshots, namely 7457d80e and 963d4de3.
Check difference between two snapshots
To check the difference between two snapshots, we can use diff option like below:
$ restic -r ~/mybackup diff 7457d80e 963d4de3
This command compares the given two snapshots and lists the differences i.e. which files are added, how many files and directories are removed from the repository.
enter password for repository:
repository c1c5bcfd opened successfully, password is correct
comparing snapshot 7457d80e to 963d4de3:

+    /home/sk/mydata/vi editor.pdf

Files:           1 new,     0 removed,     0 changed
Dirs:            0 new,     0 removed
Others:          0 new,     0 removed
Data Blobs:      1 new,     0 removed
Tree Blobs:      4 new,     4 removed
  Added:   50.123 KiB
  Removed: 4.511 KiB

As you see, I have added a new pdf file in the backup.
Exclude files and folders
It is also possible to exclude some files or directories. For example the following command will exclude all .doc type files:
$ restic -r ~/mybackup backup --exclude=*.doc ~/mydata
Alternatively, you can put the actual location of all files and folders that you want to exclude from the backup in a file and specify its path in the backup command.
For example, create a file named exclude:
$ vi exclude.txt
Add the files or folders you want to exclude:
*.txt
ostechnix.zip
mydata/movies
Now, start backup process using command:
$ restic -r ~/backup backup --exclude-file=exclude.txt ~/mydata
For more details about restic backup command, please run:
$ restic help backup
Now, we have successfully backed up our data. Next we will see how to restore the data from the local backup.
Restore data using Restic
Restoring data is easy!
First, list the available snapshots from the repository using command:
$ restic -r ~/mybackup snapshots
Sample output:
repository c1c5bcfd opened successfully, password is correct
ID        Time                 Host        Tags        Paths
----------------------------------------------------------------------
7457d80e  2021-08-13 12:51:58  ostechnix               /home/sk/mydata
963d4de3  2021-08-13 12:57:55  ostechnix               /home/sk/mydata
----------------------------------------------------------------------
2 snapshots
As you see in the above output, I have two snapshots.
To restore the data from a specific snapshot, for example 7457d80e, run:
$ restic -r ~/mybackup restore 7457d80e --target ~/mydata
Sample output:
enter password for repository:
repository c1c5bcfd opened successfully, password is correct
restoring <Snapshot 7457d80e of [/home/sk/mydata] at 2021-08-13 12:51:58.592771333 +0530 IST by sk@ostechnix> to /home/sk/mydata

We just restored the data from the snapshot 7457d80e to ~/mydata directory.
To restore a single file from the snapshot, we do:
$ restic -r ~/mybackup restore 7457d80e --target ~/mydata file.json
For more details, check the restore command help section.
$ restic help restore
Mount repository to view backup data
You can browse the backup as a regular file system. This comes handy when you want to view the contents of repository.
First, create a mount point:
$ mkdir ostechnix
Then, mount your repository on ostechnix mount point as shown below.
$ restic -r ~/mybackup mount ostechnix/
This command will mount the Restic repository in your local filesystem.
enter password for repository:
repository c1c5bcfd opened successfully, password is correct
Now serving the repository at ostechnix/
When finished, quit with Ctrl-c or umount the mountpoint.
Now, open your file manager and you will see that your repository is mounted there. Go to the snapshots folder and verify the data.

When you're done, press Ctrl-c to quit or umount the mountpoint from the File manager.
For more details, check the help section:
$ restic help mount
Remove snapshots
First, list all available snapshots in a repository:
$ restic -r ~/mybackup snapshots
enter password for repository:
repository c1c5bcfd opened successfully, password is correct
ID        Time                 Host        Tags        Paths
----------------------------------------------------------------------
7457d80e  2021-08-13 12:51:58  ostechnix               /home/sk/mydata
963d4de3  2021-08-13 12:57:55  ostechnix               /home/sk/mydata
----------------------------------------------------------------------
2 snapshots
To delete a snapshot, for example 963d4de3, run:
$ restic -r ~/mybackup forget 963d4de3
Sample output:
enter password for repository:
repository c1c5bcfd opened successfully, password is correct
[0:00] 100.00%  1 / 1 files deleted
Check whether the snapshot is deleted or not:
$ restic -r ~/mybackup snapshots
enter password for repository:
repository c1c5bcfd opened successfully, password is correct
ID        Time                 Host        Tags        Paths
----------------------------------------------------------------------
7457d80e  2021-08-13 12:51:58  ostechnix               /home/sk/mydata
----------------------------------------------------------------------
1 snapshots

The snapshot is gone! However, the data that was referenced by files in this snapshot is still stored in the repository.
To cleanup unreferenced data, run:
$ restic -r ~/mybackup prune
Sample output:
enter password for repository:
repository c1c5bcfd opened successfully, password is correct
loading indexes...
loading all snapshots...
finding data that is still in use for 1 snapshots
[0:00] 100.00%  1 / 1 snapshots
searching used packs...
collecting packs for deletion and repacking
[0:00] 100.00%  8 / 8 packs processed

to repack:            0 blobs / 0 B
this removes          0 blobs / 0 B
to delete:            5 blobs / 50.279 KiB
total prune:          5 blobs / 50.279 KiB
remaining:           25 blobs / 21.919 MiB
unused size after prune: 0 B (0.00% of remaining size)

rebuilding index
[0:00] 100.00%  6 / 6 packs processed
deleting obsolete index files
[0:00] 100.00%  3 / 3 files deleted
removing 2 old packs
[0:00] 100.00%  2 / 2 files deleted
done
After removing all snapshots and the associated data, you can delete the repository.
$ rm -fr ~/mybackup/
Conclusion
You know now how to install and use Restic backup program to safeguard your important data. We have only covered how to bakup files and folders to local directory with Restic. There is more! In our upcoming guides, we will see how to backup data to remote system and a cloud storage.
I also recommend you to check the Restic official documentation for more detailed usage.
Resources:
Related read:
- How To Backup Your Entire Linux System Using Rsync
- How To Backup Files And Directories Using Rsync In Linux
- How To Backup And Restore Files Using Deja Dup In Linux
- How To Setup Backup Server Using Rsnapshot
- How To Backup And Restore Linux System With Timeshift
- How To Synchronize Files With Unison On Linux
- How To Synchronize Local And Remote Directories In Linux
- How To Synchronize Files And Directories Using Zaloha.sh
- CYA – System Snapshot And Restore Utility For Linux
4 comments
Thank you for this! This fine summary article is what convinced me to use restic. Well done.
thanks for the summary !! assuming that I want to remove the restic files (not snapshot) after testing
Hi,
Thanks a lot
useful article…
I have been using restic for a couple of years now. It is nothing short of terrific.