The latest FreeBSD version 15.0 has been released a few days ago. FreeBSD 15 is packed with so many improvements and feature updates. This step by step guide explains how to download the latest FreeBSD version, how to create a FreeBSD Bootable USB and how to install FreeBSD 15 latest edition with screenshots.
Table of Contents
What is FreeBSD?
FreeBSD is an Unix-like, advanced operating system that can be installed in modern Servers, Desktops, Laptops and embedded platforms.
The first version of FreeBSD was released in 1993, and today it is the most widely used open source BSD operating system.
FreeBSD is the direct descendant of BSD Unix and of course it is free. It is licensed under permissive BSD license.
Download FreeBSD 15
Go to the FreeBSD official download page and download the suitable version for your system's architecture.
FreeBSD 15.0-RELEASE is available for the following system architectures:
- amd64
- aarch64
- armv7
- powerpc64
- powerpc64le
- riscv64
Please note that FreeBSD retired several older 32-bit hardware platforms. Specifically, i386, armv6, and 32-bit powerpc are no longer supported.
The FreeBSD installation requires at least 2-4 GB RAM and 8 GB hard drive space. However, you may need more Memory and disk space to run graphical desktop environments.
Create FreeBSD Bootable USB Medium
FreeBSD DVD ISO size is around 4.1 GB. So you may require 6 GB USB drive or more.
First, you need to create a bootable USB medium with the FreeBSD ISO file. There are many bootable USB creation tools available to create a bootable USB medium.
We have listed some of the tools to create bootable USB drive in Linux.
Command line bootable USB creation tools:
- How To Create Multiboot USB Drives With Ventoy In Linux
- How To Create Bootable USB Drive Using dd Command
- Bootiso Lets You Safely Create Bootable USB Drive In Linux
Graphical bootable USB creation tools:
- Create Bootable USB Drive With Ventoy WebUI In Linux
- Create Bootable USB Drives And SD Cards With Etcher In Linux
- Popsicle – Create Multiple Bootable USB Drives At Once
- Create Bootable USB Drive With USBImager In Linux
- Kindd – A Graphical Frontend To dd Command
If you wish to install and test FreeBSD on any hypervisor (Virtualbox, KVM, Vmware), just skip the media creation step and boot up the ISO image.
For demonstration purpose, I will be installing FreeBSD on Proxmox VE.
Install FreeBSD 15 Step By Step
Boot your system with FreeBSD bootable USB. You will be greeted with the FreeBSD Boot Loader menu.
Press 1 (number one) or press ENTER key to start the FreeBSD installation.

A few seconds, you will be prompted to choose one of the three options.
- Press ENTER to install FreeBSD on your hard drive.
- Select Shell and press to enter into command line mode. In commend line mode, you can partition the hard drives as per your choice before installing FreeBSD on it.
- The third option, Live CD will let you to try the live FreeBSD system without installing it.
Choose the "Install" option and hit ENTER to start FreeBSD installation.

Select your preferred keymap . I will go with the default keymap.

Enter a hostname for your FreeBSD system.

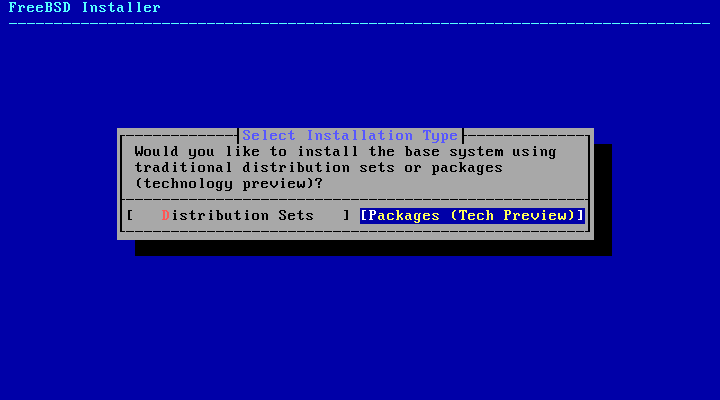
This is a new and important option in the latest FreeBSD 15 version. You'll have to choose your preferred installation method. There are two options given:
- Distribution Sets (Traditional Method): This method relies on the
freebsd-update(8)utility for maintenance, just like previous releases. However, the project plans to remove support for distribution sets in FreeBSD 16. This method remains available for the full lifetime of the FreeBSD 15 stable branch. - Packages (Pkgbase / New Method): Using this approach, the system installs the base components as a collection of packages from the "FreeBSD-base" repository. So, you manage the entire system using the
pkg(8)tool. The project offers pkgbase as a technology preview in FreeBSD 15.0, anticipating it will become the standard for base system installations and upgrades in future releases. Notably, all VM images and public cloud images use this new package-based method by default.
Packages (Pkgbase support) is the default installation method. I will go with that one:
You will be prompted if you want to configure the Network. You can configure it to fetch the latest packages directly from the official repositories or choose offline method to choose the limited set of packages provided in the FreeBSD ISO.

If you chose the network installation type in the previous. you need to configure network settings in this step.
Select your Network interface (If you have more than one) and choose the preferred network configuration mode (E.g. Auto or Manual). I want to manually configure the network, so I go with manual mode.

Choose Yes to configure IPv4:

If you have a DHCP server in your network and want to assign IP address automatically from the DHCP to your FreeBSD system, choose Yes and hit ENTER. If you don't have a DHCP server, simply choose "No".
I don't have a DHCP server in my network, so I chose "No".

If you've selected manual network configuration in the previous step, enter your IP address, Subnet and Gateway:

Now you will be asked to configure IPv6. If you want IP version 6, select Yes and enter the details in the subsequent window. I don't want IPv6 at the moment, so I chose No.

In this section, enter DNS server details. Leave blank if you don't want to.

This is yet another important step in FreeBSD installation. In this step, you need to choose how would you like to partition the drive. You will be prompted to choose one of the four partitioning methods as listed below.
- Auto (ZFS) - This is the default selection. If you choose this option, the drive will be automatically partitioned with ZFS filesystem.
- Auto (UFS) - This will automatically partition the disk with UFS filesystem.
- Manual - It is for the advanced users. When you selected this method, you can create customized partitions from menu options as you wish.
- Shell - It allows the users to create customized partitions of their choice using commandline tools like fdisk, gpart etc.
Choose the partitioning method that suits you and follow the on-screen instructions to complete partitioning the drive.
I will go with the default selection i.e. Auto (ZFS).

When Auto (ZFS) method is selected, you will see the main ZFS configuration menu that provides a number of options to control the creation of the pool. Configure the options according to your requirements.
Finally choose ">>> Install Proceed with Installation" option and hit ENTER to continue.

Next, we need to partition the disk drive and allocate space for each partition. FreeBSD installer provides six different partitioning methods to choose from.
Depending upon the use case, you can choose any one of the following partitioning method.
- stripe - It provides maximum storage of all connected disks, but no redundancy. If just one disk fails, the data on the pool is completely lost.
- mirror - Mirroring stores a complete copy of all data on every disk. It provides a good read performance because the data is read from all disks in parallel. On the contrary, the Write performance is slower because the data is written to all disks in the pool. Allows all but one disk to fail. To use this option, you must have at least two disks.
- raid10 - Striped mirrors. Provides the best performance, but the least storage. This option needs at least an even number of disks and a minimum of four disks.
- raidz1 - Single Redundant RAID. It requires at least three disks and allows one disk to fail concurrently.
- raidz2 - Double Redundant RAID. It requires at least four disks and allows two disks to fail concurrently.
- raidz3 - Triple Redundant RAID. It requires at least five disks and allows three disks to fail concurrently.
For other partitioning methods, please head over to the Allocating Disk Space section in FreeBSD handbook.
I have only one disk and I go with the "stripe" option.

Once the partitioning method is selected, a list of available disk drives will be listed in the next menu. You need to select the one or more devices to make up the ZFS pool.

You will now see a warning message that says the contents of the selected disk(s) will be deleted. If you're sure that there is nothing important in the disk, choose "Yes" and and hit ENTER key to continue.

Choose the optional system components that you want to install on your FreeBSD system.

The installer will now download the installation files from the FreeBSD official repositories. This is because we have chosen network installation type in one of our earlier steps.

This will take a while depending upon the speed of your Internet connection. Please be patient.
Enter a password for your root user account:

Select your geographical region and press ENTER.

Select your Country.

A pop up message will ask you to confirm the time zone.

Set your current date.

Set the time.

Choose the services that you'd like to be started at system reboot.

Choose the system hardening options that you'd like to apply on your FreeBSD systems.

Select "Yes" if you wish to add a new user to your system.

Enter the user details such as username, full name, password etc. Review the user details and type "yes" and press ENTER to create the user.

If you want to create more users, type "yes" and enter the details of the new user. If you don't want to add more users, simply type "no" and press ENTER.
We reached the final stage of FreeBSD installation. You can now modify the configuration choices that you made throughout the installation process. If you don't want make any changes, simply choose "Finish" and hit ENTER.

FreeBSD installation is finished! If you want to make any manual changes before completing the installation, choose "yes". If you don't want to make any modifications, choose "no" and press ENTER.

Reboot into the newly installed FreeBSD system.

Login to the FreeBSD system as root user.

Check the install FreeBSD version using any one of the following commands:
# freebsd-version -kru
# uname -prism
# cat /etc/os-release

The latest Fedora 15 operating system is ready to use.
Update FreeBSD System
The first thing to do after installing any operating system is to apply the latest available updates.
To update FreeBSD OS, run the following command as root user:
# pkg update -f

In older FreeBSD versions, use this command to update the system:
# freebsd-update fetch install
Congratulations! We have successfully installed and updated FreeBSD 15 edition.
In our upcoming articles, we will see how to,
- Create sudo users,
- Enable SSH,
- Set Static IP address and DNS,
- Reset or recover root user password,
- And more BSD related stuffs.
6 comments
Did you copy and paste?
The article is mentioning:
”
If you wish to install and test Ubuntu Linux on any hypervisor (Virtualbox, KVM, Vmware), just skip the media creation step and boot up the iso image.
”
But, this article is about FreeBSD… 🙂
Yes. The bootable creation instructions are same for all OSes. It is copied from our Ubuntu installation article. I fixed it now. Thanks for pointing it out.
How to triple boot windows 10, linux and freebsd?
We don’t have a guide for triple boot setup yet. We will try to write one when we can.
The Distribution Select screenshot is wrong. Please see https://mastodon.bsd.cafe/@grahamperrin/115686709247123297
Hi Graham Perrin,
I just updated the article with new screenshot. Actually, this guide is originally written for FreeBSd version 13 and I updated it for the 15 a few days ago. Somehow I missed to update one of the screenshots. Thanks for bringing it to my attention. Appreciated.